Quality is not an act, it is a habit.
When to use Postman?
- When you want to verify the API abides by the spec
- When you want to check if the API is returning the appropriate data
- To write API tests
- When something is not testable via the frontend app
- When you want to set up your test environment quickly
Make sure to read up on API - Basics before starting with this article.
How Postman works
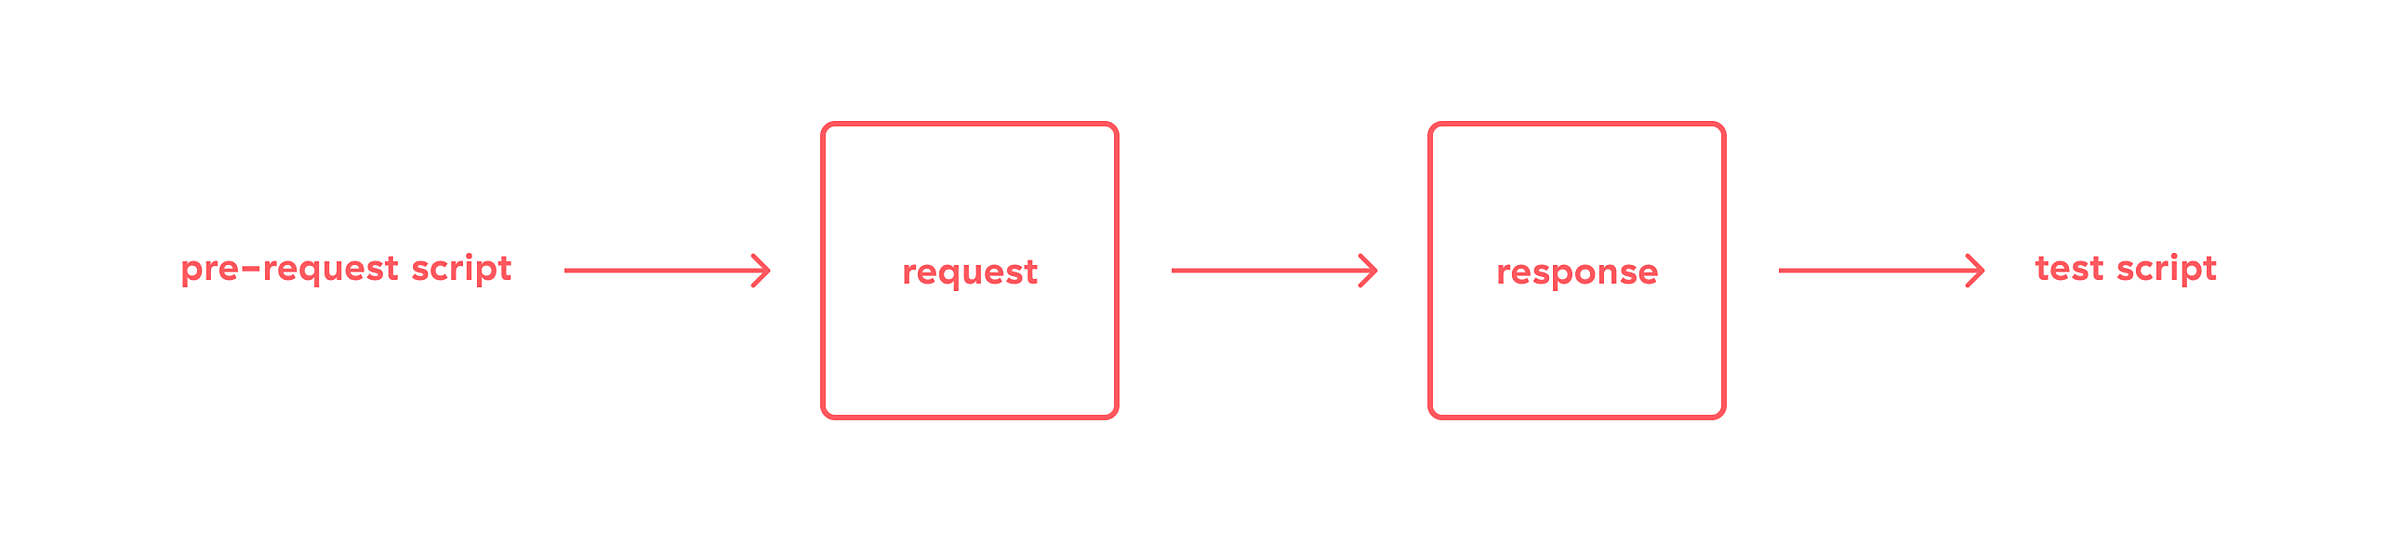
Postman has a really simple workflow that is repeated for every request. The pre-request script is executed before request execution and tests are executed after the response. The code in both pre-request scripts and tests is written in JavaScript, but do not worry - it is really simple and easy to understand.
Here is a graphical representation of a single request flow:
Workspaces
Workspaces act as working areas that help you organize your collections and requests. One workspace could contain all the collections needed for one project. Also, it is possible to invite people to join your workspace and in that way, you can collaborate with your teammates.
Creation of a Workspace
- Click the Workspaces drop-down in the top left corner
- Click New Workspace
- Enter the name of the Workspace, Summary and choose whether this Workspace will be shared with your team, public or it will be personal (only for you)
- Click the Create Workspace button
Now you created your Workspace. If you click on the Workspaces drop-down again you will see your newly created Workspace in a list. This is a list of all of your Workspaces and from here you can edit and switch in-between them. Also, the name of the currently chosen Workspace is displayed under the Workspaces drop-down.
Collections
Collections are folders that help you organize your requests. Each collection can test different modules or related APIs. Also, having a collection is helpful if you need to monitor requests, and it is easy to export and share them.
Creation of a Collection
- Click the New button right from the name of chosen Workspace
- Click Collection.
- Enter the collection name and press Enter.
Great, the collection is created and now you can add requests.
Creation and execution of a request
Note: Further in this article PokeAPI will be used as an example.
Once the collection is created you need to add a request to it so let's begin.
- Expand your collection
- Click Add a request
- Enter the name of the request, let's name this request "GET Pokemons"
- Hit Enter button
- Set
GETas your HTTP request method and paste the following URLhttps://pokeapi.co/api/v2/pokemon/to the URL input field
- Execute the request by clicking the Send button
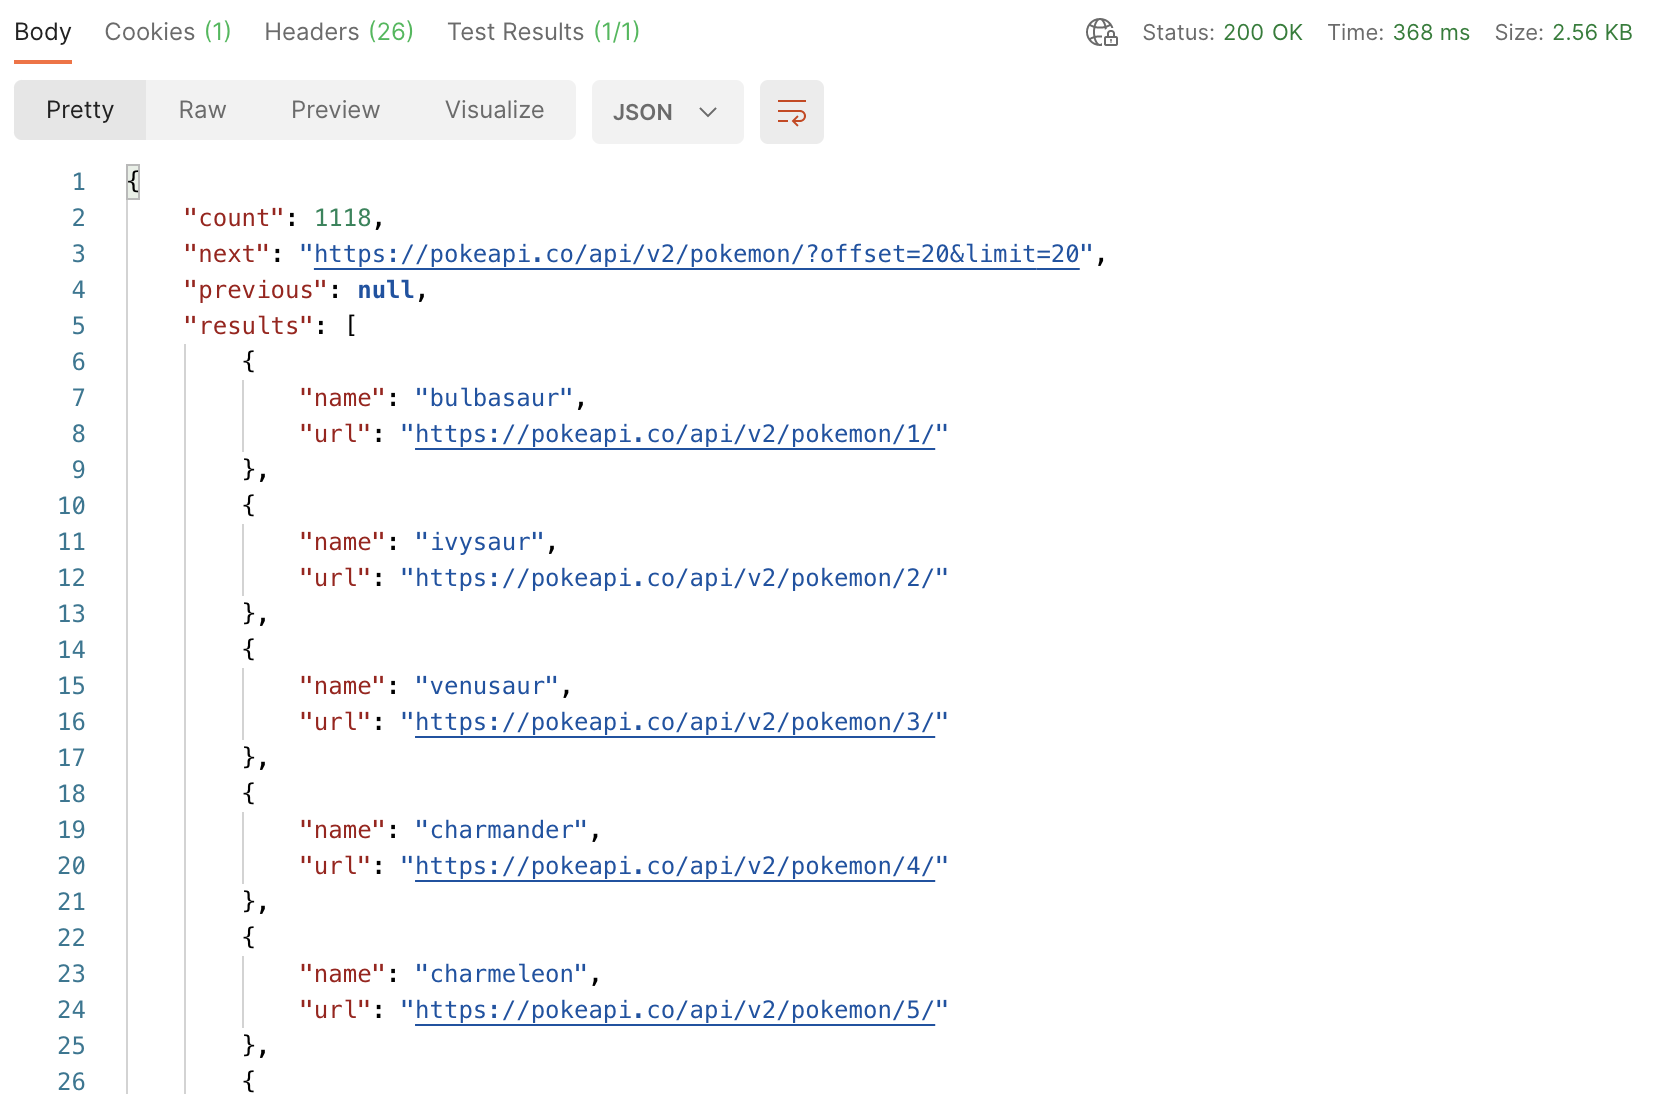
Great, now you executed a request. As the response in the Body, you can see a list of 20 Pokemons in JSON format.
Environments and variables
An environment is a set of key-value pairs ("key" represents the name of the variable). Environments let you customize requests using variables to switch between different setups without changing your requests.
From the list of Pokemons that you got after executing a request, let's save Bulbasaur's URL to an environmental variable. For that, first, you need to add the environment.
Creation of an environment
- In the top right corner tap the eye icon
- Since you do not have environments, tap the Add button in the Environment card
- The Environment card should open as a tab. Enter the name of the environment, let's name it "Pokemons"
- Enter "BULBASAUR_URL" as the name of variable

- Click the Save button.
Great, now you have an empty variable in which you can add data. To switch in between environments click on the Environments drop-down and choose the desired one.
TIP: Name your variables (constants) in uppercase letters so that is easier to separate them from the rest of the code, for example in pre-request scripts and tests.
Writing a value into the variable
There are two ways how you can enter a value into a variable:
You can enter a specific value into Initial and Current values input fields. The value can be anything from URLs, strings, numbers. Usually, both Initial and Current values are the same.
- The Initial Value is synced to your account via the Postman servers and shared with any collaborators who have access to the environment.
- The Current Value is local to your Postman app, and is never synced to your account or shared with your team — unless you choose to permit it.
Or you can save a value from the response to a variable.
- Open the "GET Pokemons" request.
- Switch to the Tests tab inside this request.
- Add the following line of code in the Tests tab:

- Execute the request by clicking Send button.
This line of code will save in variable "BULBASAUR_URL" whatever is the value of data.results[0].url key, in this case, Bulbasaur's URL. If you now open "Pokemons" environment you will see that the variable contains Bulbasaur's URL.
Using variables
Using variables you avoid copy-paste of URL and the good thing is that variables can be used as many times as you need.
To use a variable you need to enter the name of the variable in between double curly braces. It should look like this: {{VARIABLE}}. This way Postman will read and use a value from a variable. Or you can use a combination of variable and URL like this: {{VARIABLE}}/example_url.
Let's now use "BULBASAUR_URL" variable and the value stored inside it.
- Create a new
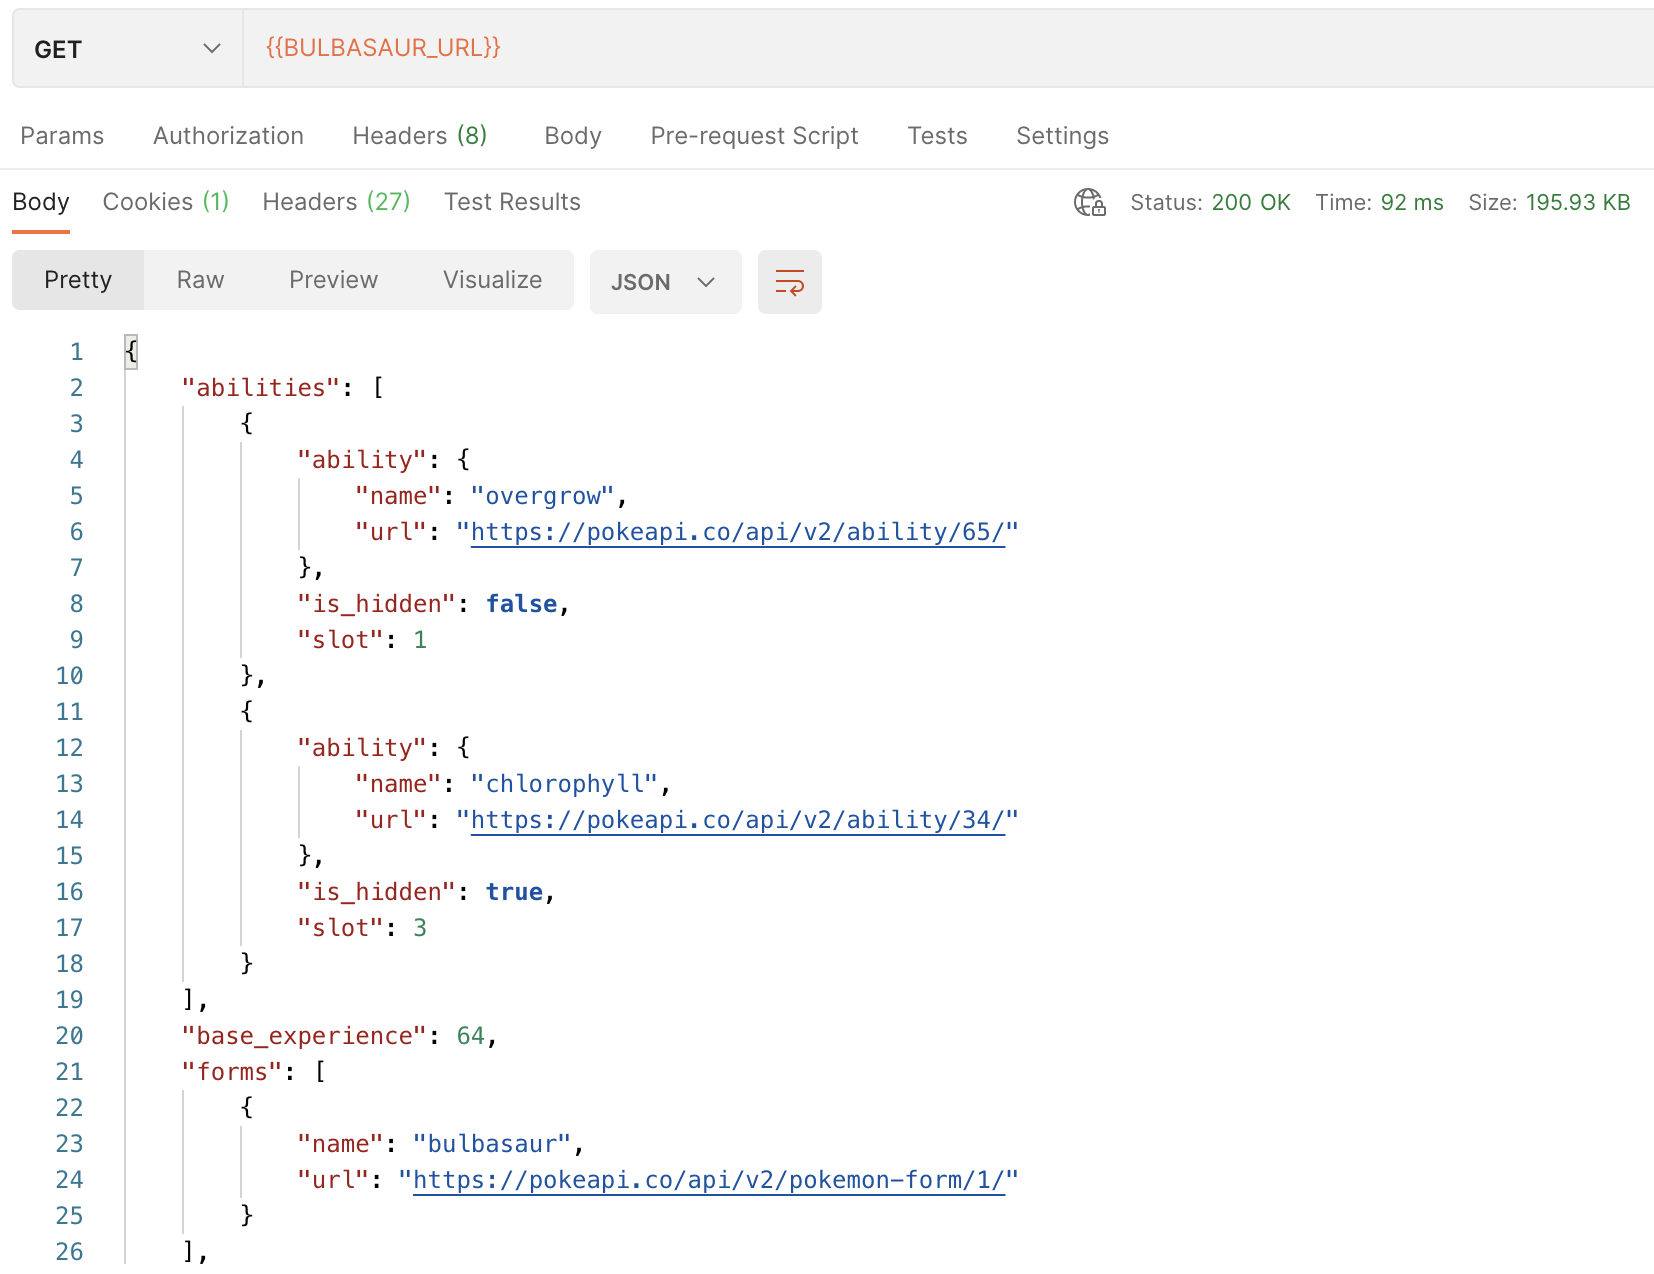
GETrequest but this time instead of the URL enter{{BULBASAUR_URL}}in the URL input field - Execute the request.
As a response, you will get more technical information about Bulbasaur.
- TIP: If there is an error, variable
{{BULBASAUR_URL}}will be red indicating that you either misspelled its name or the variable does not exist - you did not create it and add it to your environment or you are using the wrong environment.
Pre-request scripts
Pre-request scripts are snippets of code that can be added to a collection, a folder, or a single request within a collection that is executed before the request is sent. The pre-request script can be super useful and the best example of it is for token creation.
Adding a pre-request script to a single request:
- Open the "GET Pokemons" request
- Switch to the Pre-request Script tab
Let's take a look at example of pre-request script for token creation:
 const loginRequest = {
    url: pm.environment.get{"BASE_URL"} + "auth/login",
    method: 'POST',
    header: {'Content-Type':'application/json'},
    body: {
        mode: 'raw',
        raw: JSON.stringify({"username": "admin", "password": "infinum"})
    }
};

 pm.sendRequest(loginRequest, function (err, res) {
    const loginResponse = res.json();
    pm.environment.set("TOKEN", loginResponse.token);
});
The first part of the code contains URL, HTTP method, header, and body with username and password that are necessary for the generation of a token. The second part of the code will save the generated token to the TOKEN variable, and we can use this variable and its value in other requests if needed.
Writing tests
With Postman you can write and run tests, and they run every time you run a request. They are helpful when you are using collection runner because they give you a good preview if the request went well or failed.
The good thing about tests is that Postman offers "Snippets" or a list of already written tests. Simply clicking on them you can add them and the best thing is that you can add as many tests as you need.
Adding snippets:
- Open the "GET Pokemons" request
- Switch to the Tests tab
- Locate "SNIPPETS" list right from the text field
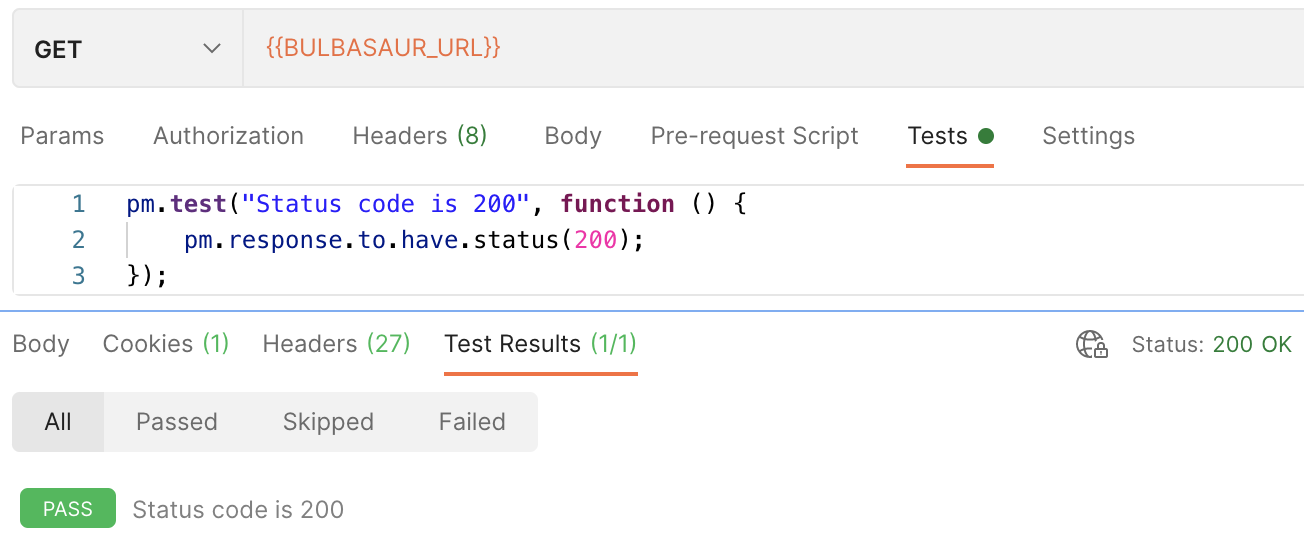
- Find the "Status code: Code is 200" snippet and click on it. You will see a code like this:

- Execute the request
- In the response of the made request, switch to the Test Results tab
Inside the Test Results tab you should see the test "Status code is 200" marked as PASS.
TIP: Add one or two empty rows so that your tests are separated and in that way easier for reading.
Adding more complex tests
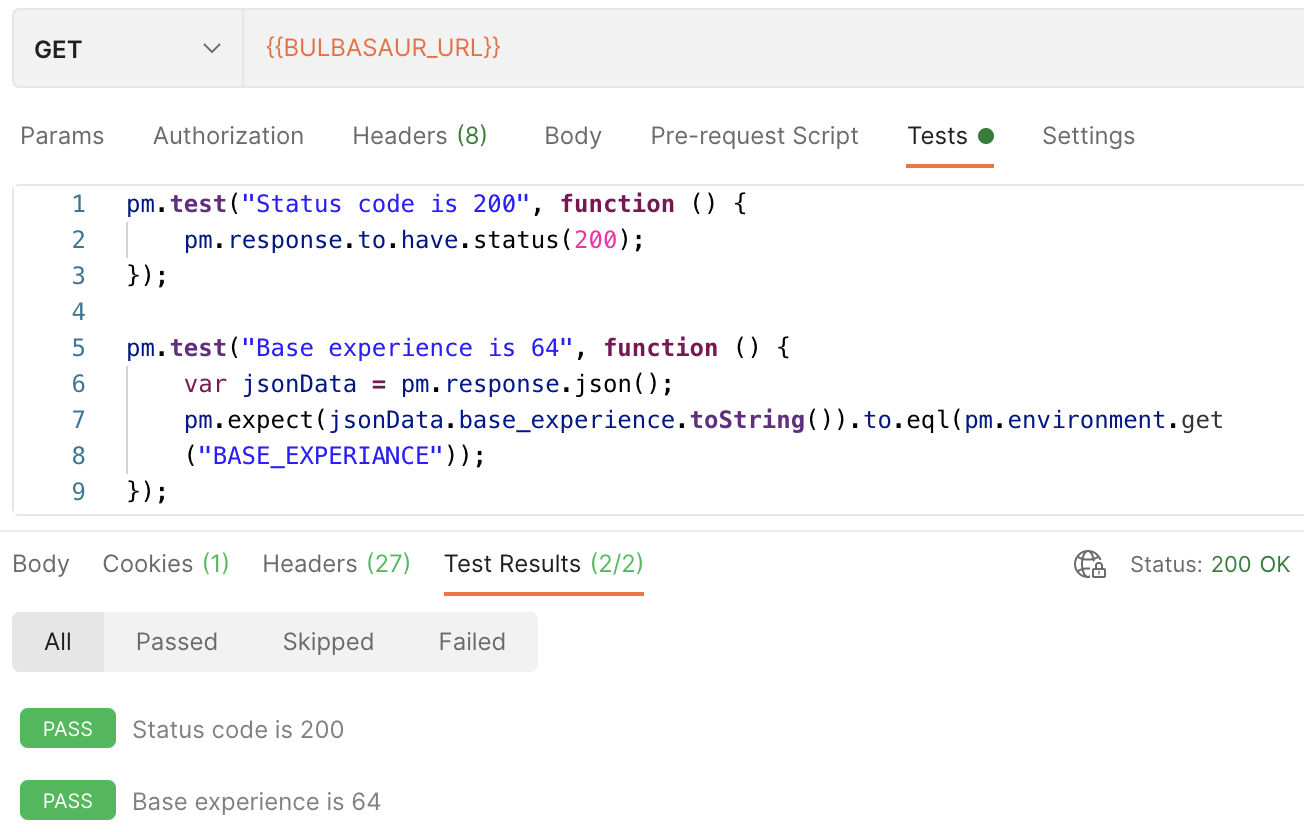
Sometimes the status of a response can be 200 but the body is empty. In this case, we need to add some complexity. Let's now check if the response returned something that does not change, for example, Bulbasaur's base experience.
- For this test, we will need to add the "BASE_EXPERIANCE" variable and set the value to 64
Add the following code under "Status code: Code is 200"
pm.test("Base experience", function () {
var jsonData = pm.response.json();
pm.expect(jsonData.base_experience.toString()).to.eql(pm.environment.get("BASE_EXPERIANCE"));
});
Execute the request
If the status is 200 and base experience is indeed 64, tests will be marked as passed.
Collection runner
The Collection Runner allows users to run sets of requests in a specified sequence against specific environments. You can also set the number of iterations, delay, save the response, keep variable values...
- Click the collection that you want to run
- After the collection tab is opened click the Run button (another tab with all requests inside the collection should open)
- Choose which requests you want to include in this run. For this example let's leave them all selected
- Make sure that you are using the correct environment for your collection
- Click Run "name of collection" button
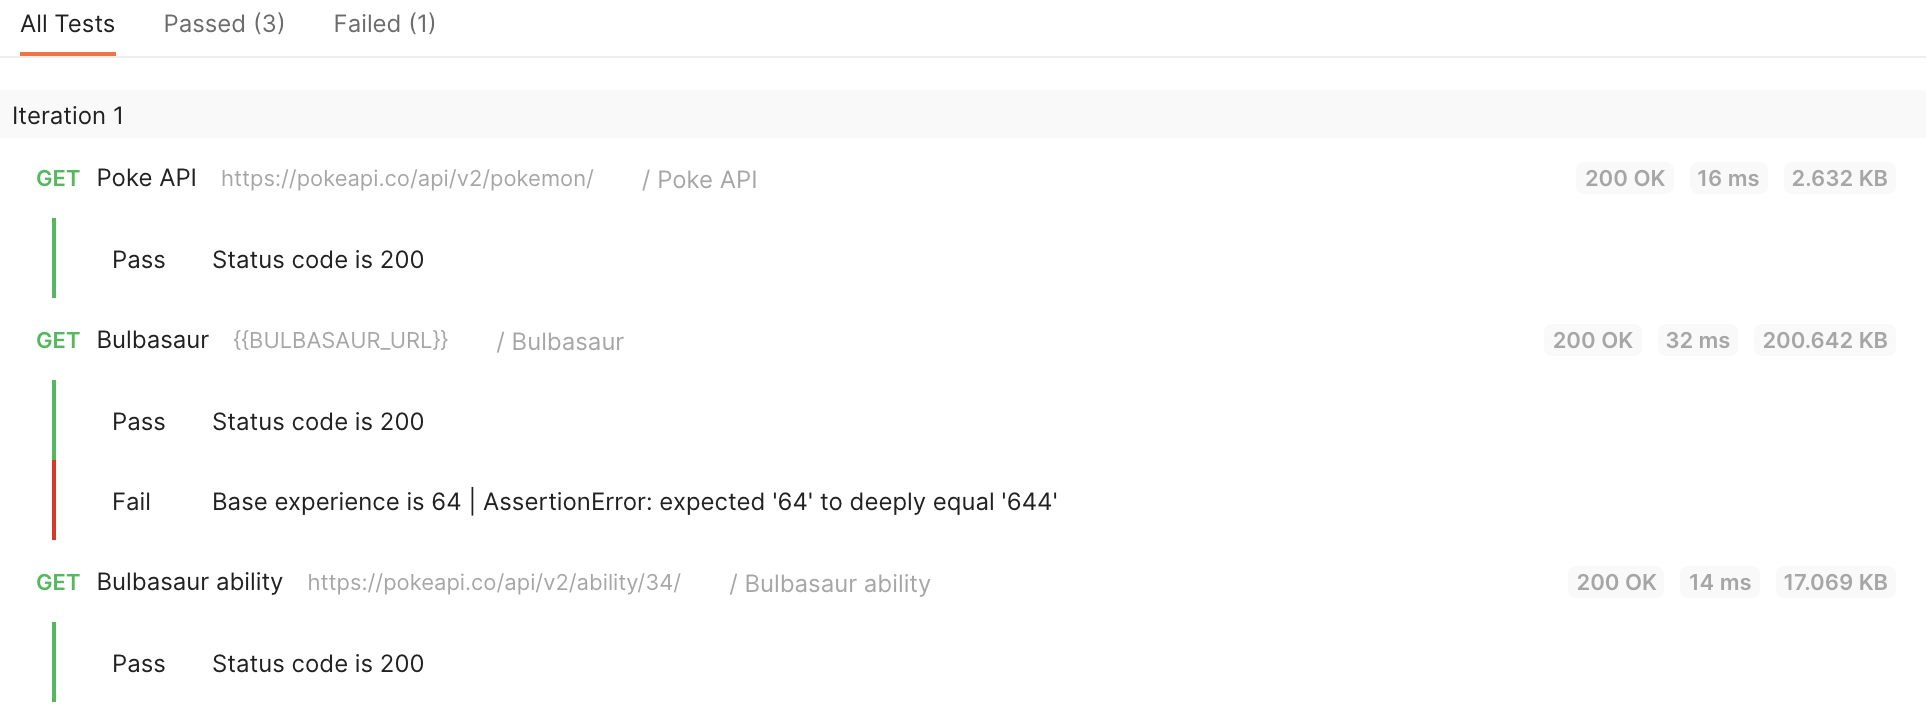
Postman will display request executions and test results in real-time. If any test in a request script fails during the collection run, the request will be listed as failed but with proper response status.
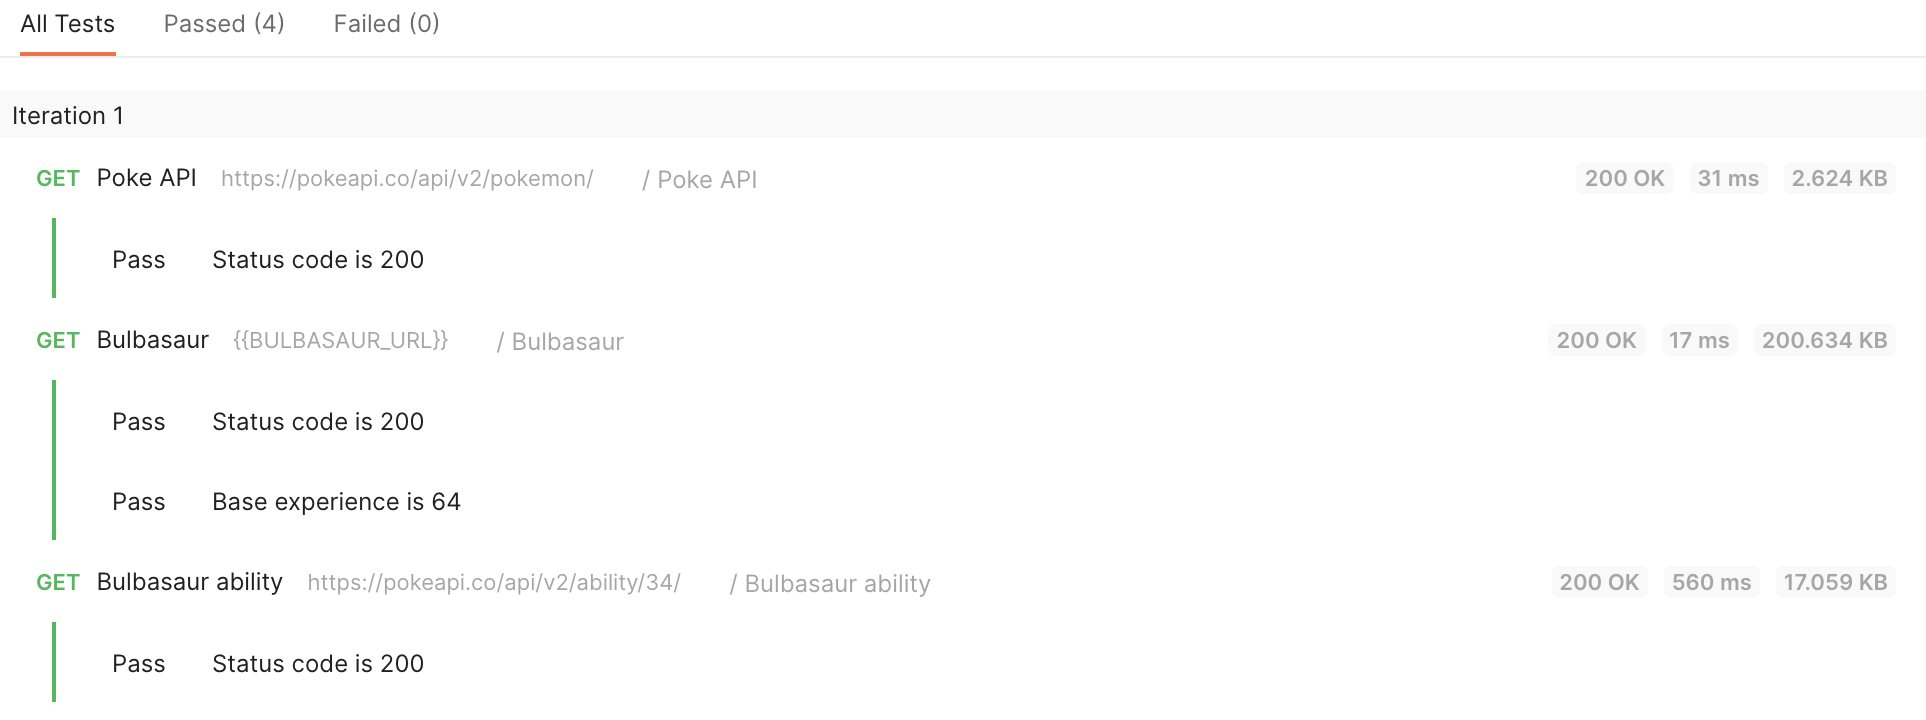
If all tests from the list are listed as passed then the request will also be listed as passed.
TIP: Results can be exported by clicking on the Export Results button and attached to the regression test or any other type of test if it is required.
Collection monitoring
The collection monitor is a scheduled collection runner. Setting up the monitor, your collection will be run as frequently as you want and if one of the tests fails, you will automatically receive an email notification.
Setting up collection monitoring
- Click Monitors in your Workspace menu on the left side of Postman
- Click Create a Monitor
- Add monitor name
- Select the collection that you want to monitor
- Select the environment for your collection
- Set a time when you want your monitor to be executed
- Select the "Receive email notification for run failures and errors" checkbox
- Enter the email address where you want to get a notification
Great, now your collection will be run at the set time and you will be notified if one of your requests failed.
Postman Flows
Postman Flows is an excellent built in feature that can help QA in day-to-day work!
Here is why:
- You can avoid scripting - This is a big plus for QA engineers without JS knowledge
- It is easy to connect data from a response to a new request (Add a block and choose desired data - no need for coding)
- The “Output” block gives visual confirmation if, for example, the test passed or failed
- Storing data to a variable can be done without using an environment
- Everything can be logged to the console - and from there, debugging is easy
- Sensitive data stored in an environment variable can be used in a flow without exposing them
- And the best thing is that Flows look nice and clean
Take a look at flows, they look cool! Right?
Additional resources:
Check out one of our blog posts: Writing API Tests? Postman Delivers
Read this interesting article: Testing APIs with Postman: 10 common challenges & solutions
For further insights, don't forget to revisit the Postman workshop, which covered advanced testing strategies and real-life API testing challenges.