Don’t just fix the bugs. Fix whatever permitted the bugs in the first place.
Summary
This article is a compendium of useful tips & tricks for testing mobile apps.
General
- Basics
- Selecting test devices
- Testing biometrics
- Testing Facebook analytics
- Testing valid IBAN numbers
Android
- Changing the ROM on Pixel devices
- Devices supported by Google
- Don't keep activities
- Enabling Developer options
- Getting nice device logs
- How to download a beta version of the app on Android
- How to fake your location on Android
- Installing an app from a foreign Google Play
- Setting up an Android emulator
iOS
- Enabling iOS dev settings
- Installing an app from a foreign App store
- Testing production builds on iOS
- How to install iPhone or iPad apps on M1 Mac
General
Basics
Have a look at an one of our blog posts on testing mobile apps.
Selecting test devices
You cannot test your app on all possible devices. That is why it is important to intelligently decide on a set of devices on which you will do you your testing.
The two major mobile operating systems are:
- Android
- iOS
Some parameters to keep in mind:
- The minimum supported OS version (varies from project to project)
- The current OS version
- What the intended audience uses
- Screen size and resolution
- Chipset
For instance, if you had time to test a Croatian mBanking Android app on a mobile device, it would make sense to have:
- A current large flagship Samsung or Huawei device
- A smaller mid-range device which is two or more years old
- An old device running the minimum supported OS version
The device usage percentages of our apps can be retrieved from the Google Dev Console or iTunes Connect. Contact your team lead to get that info.
The usage of particular devices in general can be found on web sites such as StatCounter.
Device-wise, make sure to use:
- Smartphones
- Tablets (if the project supports it!)
Browsers that will almost always fit the criteria in a mobile environment are:
- Chrome (Android)
- Safari (iOS)
Another important parameter in testing is orientation:
- Portrait
- Landscape
Testing biometrics
When you test Android and iOS apps which allow the user to login with TouchID (iOS) or fingerprint (Android), you should check the following cases when the fingerprint login is enabled in the app:
- WHEN a new fingerprint is added to the currently saved fingerprint(s) in the phone's settings, THEN a "Fingerprint settings were changed" message should appear when logging into the app to reactivate the fingerprint login
- WHEN one of multiple saved fingerprints is deleted, THEN a "Fingerprint settings were changed" message should appear when logging into the app to reactivate the fingerprint login
- WHEN all fingerprints are deleted, THEN a "Fingerprint disabled" message should appear when logging in and the fingerprint login toggle should be disabled in the app settings
When testing iOS apps which allow the user to log in with FaceID, you should check the following cases:
- WHEN none FaceID scan is saved in the phone's settings, THEN the FaceID toggle in the app settings should be turned OFF and disabled
- WHEN a FaceID scan is added and the FaceID permission is given for the app, THEN the FaceID toggle in the app settings should be enabled
- WHEN a FaceID scan is added and the FaceID permission isn't given for the app, THEN the FaceID toggle in the app settings should be turned OFF
Testing Facebook analytics
Ensure Facebook SDK is implemented in the application, and that those analytics are set up correctly.
Find FacebookID of the account which you will use for testing. There are two ways of finding this ID, you either login to FB account and click on your profile name in the top left. Your ID will be visible in URL in the browser.
Facebook Analytics Admin needs to add this account to Facebook analytics. Account must be verified; otherwise, it cannot be added.
Go to developers.facebook.com
Click My apps in top right corner and select app you want to test from the dropdown menu. From the dashboard, click on View analytics. On the left side, click on Activity and then on Events
By default, Facebook tracks standard events such as App install and App launch. You can find events that are tracked out of the box by default and list of standard events here.
How to test?
See implemented platforms, check which event is implemented and its requirements. Then try to trigger that event, and if everything is done correctly, the event should show up on the event screen mentioned above.
Facebook analytics dashboard will not show triggered events instantly.
Testing valid IBAN numbers
Check out the list of valid IBAN numbers if you test your application's IBAN validation and make payments through the app using (foreign) IBAN numbers.
Android
Changing the ROM on Pixel devices
- Use a Windows PC, it's easier
- Visit the page https://toolaio.tk/
- Click the Download tab and download the .zip file
- Extract the .zip file and install the app
- Grab you Pixel device
- Ensure the device has Developer options turned ON (if not, click the Build number in the phone's Settings 5 times in a row)
- Open the Developer settings and turn ON OEM update and USB debugging
- Connect the Pixel device with your PC
- The dialog "Trust device?" will appear, click "Allow"
- Open the "TOOL ALL IN ONE" app on your PC
- Ensure the Pixel device is listed
- Click the "Unlock" button under the "Bootloader" section. This step will reboot the device
- After device is turned ON, it could be that you'll need to setup everything again
- Open the "TOOL ALL IN ONE" again, and click the "Flash Factory Image" under the "Other options" section
- Click the "Download Stock Rom" button and find the image you need (it will bring the page based on connected device. In our case, the list of stock Android versions (OEM) will appear)
- Download the zip and without unzipping it, open the "TOOL ALL IN ONE" again
- While you're on the "Generic Fastboot Rom Flasher" dialog, click the "[...}" button
- Find the location where the zip is stored and click select
- Click "Flash Rom"
- After this step, the desired Android version will be installed on a device
- As a final step, you should lock the bootloader by clicking the "Lock" button in the app
Devices supported by Google
Find them here.
If a device is not on this list, we usually cannot guarantee it is fully supported either.
Don't keep activities
A good practice when testing Android apps is to thoroughly circumnavigate the app with the "Don't keep activities" option enabled.
Users will usually not have this enabled, but it might point to issues that happen when the operating system decides to kill your activity, which it might do as part of its automatic memory management.
Enabling Developer options
You can unlock the Developer options on any Android smartphone or tablet by locating the Build number in your Settings menu and tapping it multiple times.
The exact location of the aforementioned build number may differ depending on your phone’s manufacturer.
Getting nice device logs
- You need to install pidcat:
brew install pidcat - You need a debug build
- Device has to be recognized (open Terminal, input
adb devicesand verify that the device is listed) - You can start pidcat with
pidcat package.name - You can find the package name by searching every installed app with
adb shell 'pm list packages'(or with the Package name application).
How to download a beta version of the app on Android
- Login to G+ community for beta testing with your @infinum.com account
- Force close Google Play Store and delete the cache and data for it
- Run TunnelBear or some other VPN and connect through the country that you need to work on desired app.
- Run Google Play Store, accept the T&C and skip the payment info
- Find the app and install it (log in, activate it, etc.)
- Accept that you are a beta tester for the app (the best way is to open https://play.google.com/apps/testing/package.name.of.theapp/)
- Wait for a little while for the change to propagate to Google Play (mostly for a few minutes)
- Go to Google Play page for the app and update it
How to fake your location on Android
On Android you can use Lockito or FakeGPS.
As always, iOS is a bit more complicated and deserves a special guide.
Installing an app from a foreign Google Play
In 1Password we have stored Google accounts for different countries:
- Germany
- USA
- Austria
- Netherlands
- Slovenia
Steps:
- First, make sure that you have installed some VPN client on your test device
- Next, go to Settings —> (Users &) Accounts and delete all Google accounts
- Then go to Settings —> Apps —> Google Play Store —> Storage —> Clear data - basically, delete cache for Play store
- Open your VPN client and connect to an appropriate country
Login with appropriate Google account:
- Settings —> Users & accounts
- Agree with T&C and accept back up
Open Google Play Store
- Find your app & click Install
- When Complete account setup appears, click on Continue then Skip
After you’ve installed the app, delete the appropriate Google account & log in with our test account
That's it, enjoy testing your app!
Setting up an Android emulator
We usually do not test apps on emulators, but sometimes they can come in handy.
To get an Android emulator, do the following:
- Make sure you have Android Studio installed (Ensure "Android Emulator" and "Android SDK" are checked during installation process).
Open Android Studio and on the Welcome screen select More Actions > Virtual Device Manager:
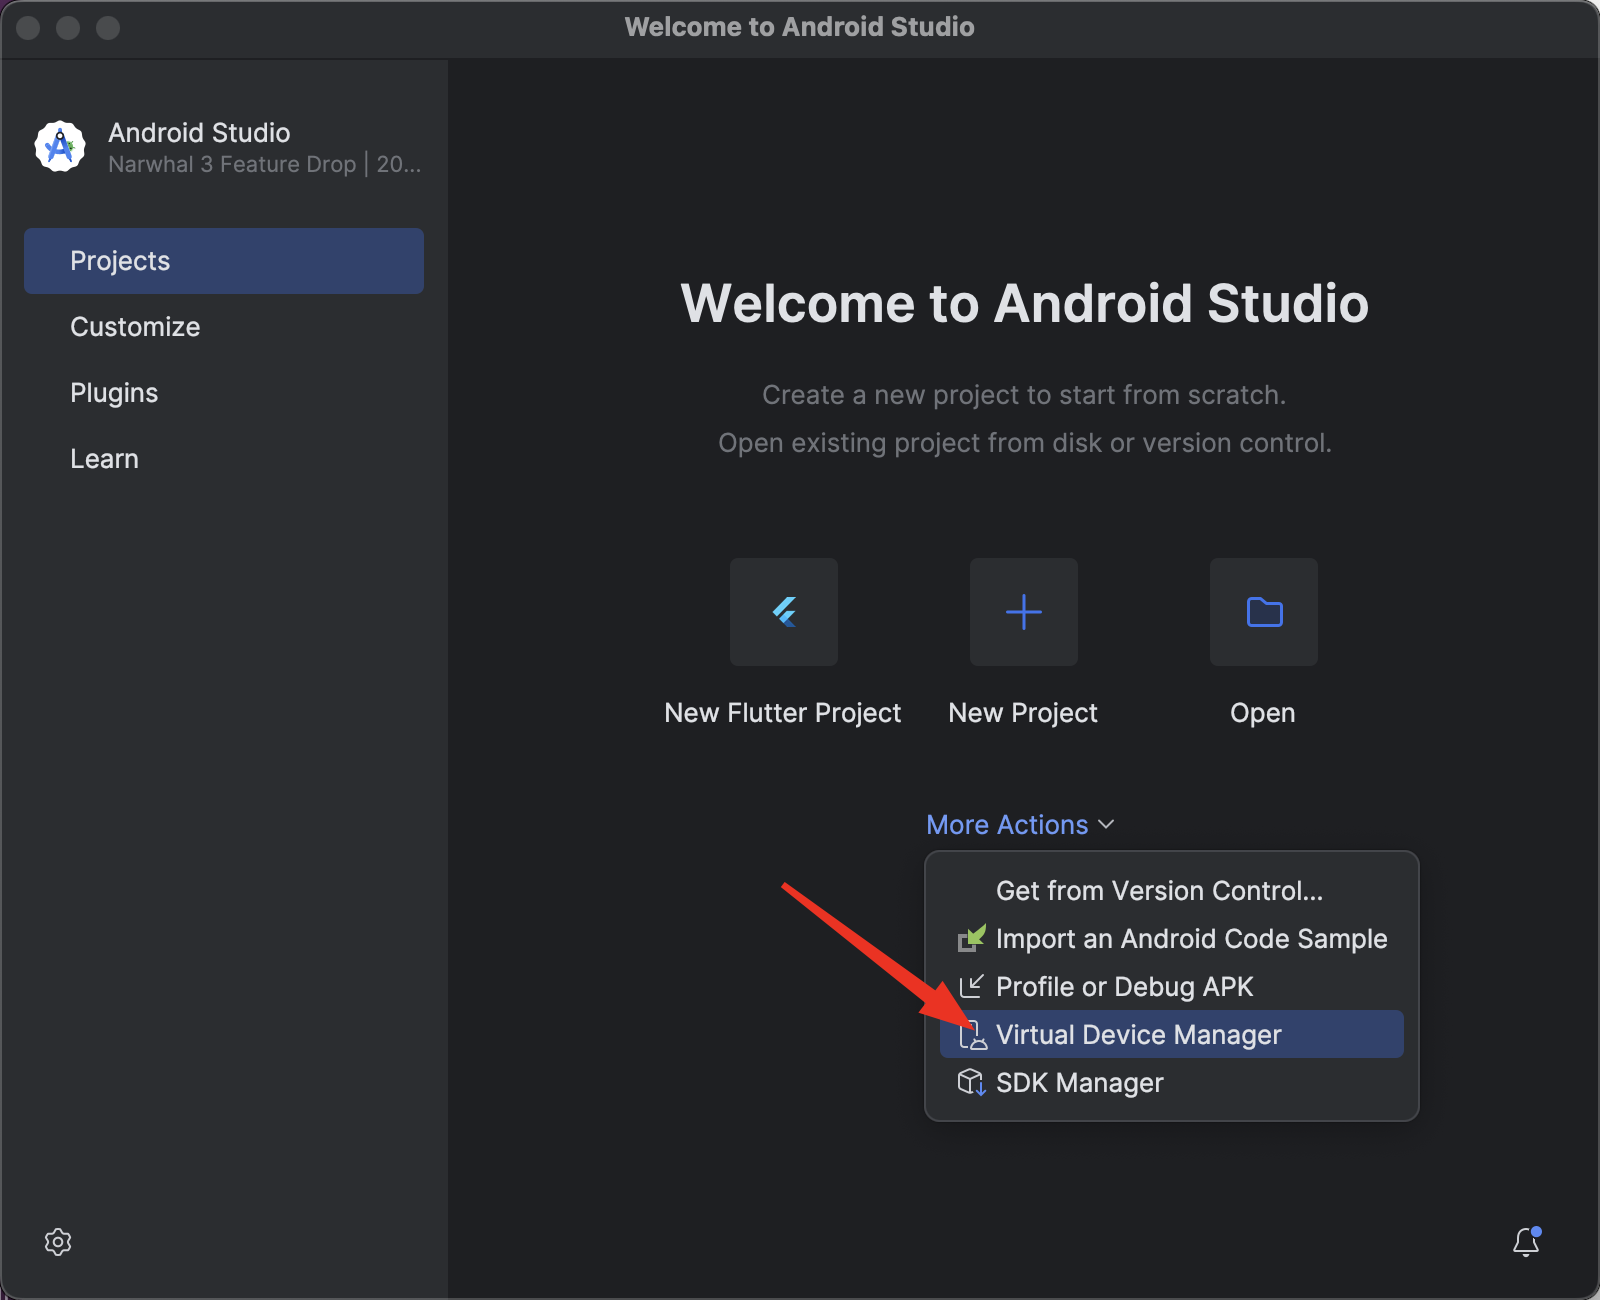 (If you already have a project open, go to Tools > Device Manager)
Click the + (Create Virtual Device) button.
Select a device category (e.g., Phone) and pick a model (Pixel 8 for example). Then click Next.
Select System Image - the version of Android the phone will run. If you see a Download icon next to it, click it and wait for the files to download. Click Next and then Finish.
Once you added virtual device, you can start using it. In the Device Manager, click the Play icon next to your new device. Note that the first launch can take several minutes as it "boots up" for the first time.
iOS
Enabling iOS dev settings
- Open Xcode and connect your phone with an USB cable
- Open Settings on your iOS device
- Scroll down and tap ON "Developer"
Installing an app from a foreign App store
In 1Password we have stored Apple accounts for different countries:
- Germany
- USA
Steps:
- First, launch App store & tap on Apple ID (your avatar in the top right corner) & Sign out
- Then, open Settings, tap on General --> Language & Region --> Region & select the appropriate country
- Open the App store & once again click on your avatar in the top right corner & sign in with the aprropriate Apple ID account
- Type in the app you are looking for
- Click on Get & enjoy testing your app
- Don't forget to repeat step #1 & sign in with our regular test account
How to install iPhone or iPad apps on M1 Mac
New Apple desktop devices with M1 chips have a neat ability to install any iPhone or iPad apps on the M1 Macs. This is possible due to the common architecture shared by the two operating systems. The only way to install apps that are made for iPhone or iPad is to download them directly through the AppStore!
No porting required!
iPhone and iPad apps on the App Store are automatically available on the Mac App Store on Apple silicon Macs, there is no need to modify the app. The same frameworks that your apps use on iPhone and iPad are available and tuned just for Mac, taking advantage of the same shared architecture.
Here’s how you can download an app to install on an M1 mac:
- Open the Mac App Store and click your profile from the bottom-left of the page.
- Click ‘iPhone & iPad Apps’ tab situated under Account.
- Select the app from the list and click the download button.
Once the app downloads, you can access it from the Launchpad or the Applications folder.
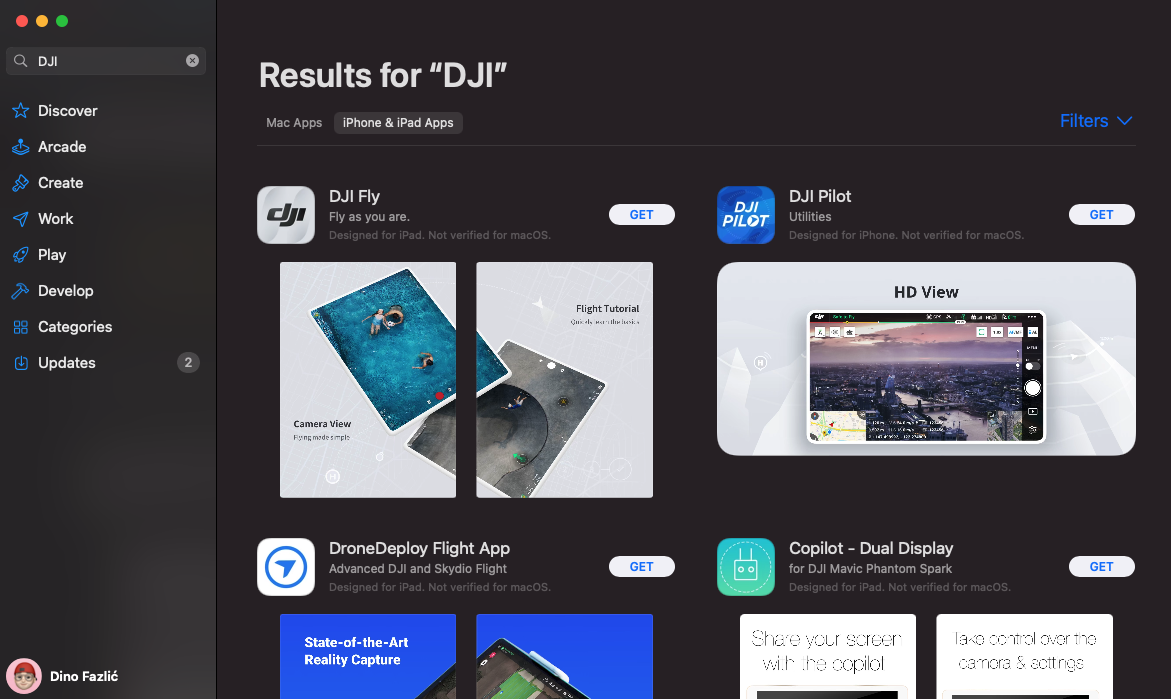
Some of the apps that you see in the Mac App Store are labeled with a warning that says "Not Verified for macOS," these apps are not optimized for use on a Mac.
Mac App Store availability
By default, apps are published automatically on the Mac App Store. App availability can be managed at any time in App Store Connect.
Circumventing the App Store or "sideloading" apps
Apps could be downloaded and installed via a third-party app (sideloaded) but Apple has disabled this feature on M1 Macs running macOS Big Sur 11.1 or newer. Currently, the only way to install the iPhone or iPad app on the M1 machine is to download it through the App Store.