Quality is never an accident; it is always the result of an intelligent effort. - John Ruskin
What is a Python Virtual Environment and why should you use it
Python virtual environment is a workspace inside your Python project that helps you isolate the dependencies and settings for that particular project from other Python projects that you might have on your machine.
For example, you could use Python 3.8 for one project, Python 3.9 for another, and again Python 3.9 but with additional libraries for a third project. Each of those projects can also have different packages installed, different versions of those packages, and so on.
If you ever decide to change the Python version or dependencies in one of your projects, you don’t have to worry about those changes affecting other projects.
NOTE:
- The article explains how to manage virtual environments using the venv module from the standard Python library, and PyCharm.
- For info on how to manage Python versions and virtual environments with
pyenv, check the Using pyenv article.
How to install
If you are using Python 3, then you should already have the venv module from the standard library installed.
How to create and activate Virtual Environment
From Python 3.6 and above, the recommended way to create a virtual environment is using the following command:
➜ ~ python3 -m venv
To the command above, simply add the name you want your virtual environment to have. Let’s say env. Running the following command creates a virtual environment called env:
➜ ~ python3 -m venv env
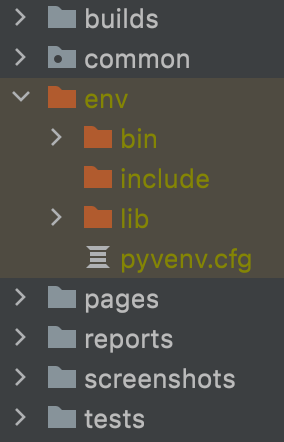
When created, the virtual environment shows up as a directory in your project. The directory contains Python executable files and other installed libraries.
How to activate Virtual Environment?
To use the virtual environment, you have to activate it. The virtual environment is activated by running the activate command:
➜ ~ source env/bin/activate
Once activated, you’ll notice the (env) prefix in the terminal, indicating that the env is active. Now you can add dependencies that will be used for this project only.

How to deactivate Virtual Environment?
To deactivate the virtual environment and use the system / global settings, run the deactivate command:
➜ ~ deactivate
Now the (env) prefix is no longer displayed in the terminal. Any Python command you’d now run would refer to the global Python.
What is Python Interpreter?
The interpreter translates your code into the language the computer hardware understands. To be able to run your scripts, you have to configure at least one interpreter. You can either use a system interpreter that comes with Python installation or you can configure a virtual environment that takes a system interpreter but can be further modified for your project.
NOTE:
- Make sure you have the desired Python version installed. When configuring a Python interpreter, you have to specify the path to the Python executable in your system.
Create a new project
When creating a new project from scratch, the virtual environment named venv (specified in step 4 by default) becomes active once the project is created.
Open PyCharm
Select New Project
- If an existing project opens, select File -> New project…
In the Location field type in the path to the project with the project folder name at the end, e.g.:
- Mac:
/Users/username/Documents/Code/myPythonProject - Windows:
D:\Code\myPythonProject
- Mac:
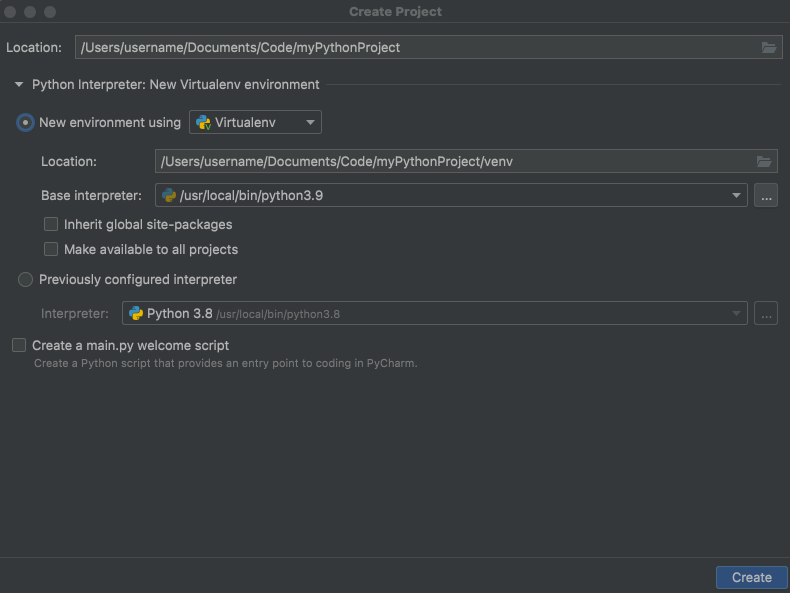
If not selected by default, select the New environment using button. Next to it, the option Virtualenv should be selected
The Location field in the Python Interpreter section should look like this:
- Mac:
/Users/username/Documents/Code/myPythonProject/venv - Windows:
D:\Code\myPythonProject\venv
- Mac:
In the Base interpreter field select a path to a Python executable in your system. As shown in the image below, Python 3.9 was selected as the base interpreter for the project.
Deselect the checkbox to create a main.py script
Click Create to create the project
Create & activate virtual environment for an existing project
When starting your work on an existing project, you have to activate the virtual environment through the terminal. You also have to select the desired interpreter in the settings.
For Windows, let’s imagine we have cloned a project named myPythonProject to D:\Code.
Open the project and position to the project root folder
Create a virtual environment called venv:
- Mac:
python3 -m venv venv - Windows:
python -m venv D:\Code\myPythonProject\venv
- Mac:
Activate the virtual environment
- Mac:
source venv/bin/activate - Windows:
venv\Scripts\activate
- Mac:
To deactivate the active virtual environment, while in the project root, run:
- Mac / Windows:
deactivate
- Mac / Windows:
Select / Edit an interpreter
Open the Settings / Preferences
- Mac: PyCharm -> Preferences
- Windows: File -> Settings
In the left-hand side menu find Project: myPythonProject -> Python Interpreter
In the Python Interpreter field, select the desired interpreter
- Additionally, while on this window, you can add / remove packages used in the project
Apply the changes
Project dependencies: requirements.txt file
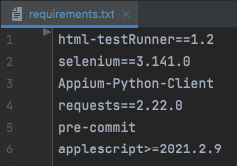
As mentioned in the example above, you can add packages (dependencies) while on the Python Interpreter window. However, a better approach would be to use the requirements.txt file. In the requirements.txt file, you can specify Python packages required for the project to run and install them all using a single command.
You can also specify a specific version of the package, indicated by an equality sign. The double equal (==) indicates the specific version to be installed, while the greater than (>=) specifies the minimum version. Or you can omit the sign completely which will install the latest stable version.
How to install the required dependencies
Make sure you have the virtual environment active and the requirements.txt file ready.
Open the terminal and position to the folder where the
requirements.txtfile isRun the following command:
➜ ~ pip install -r requirements.txt
You should now have all the dependencies specified in the requirements.txt file installed for the current project.