You can see a lot by just looking.
How to generate personal access token
To make the git commands pull / push / clone work with two-factor authentication (2FA), you need a personal access token which you will then use for authentication when performing clone / pull / push operations, instead of the user password.
Go to the GitHub
Click the profile image and select Settings
Select Developer settings in the menu on the left-hand side
Select Personal access tokens in the menu on the left-hand side
Click the Generate new token button
Confirm your GitHub password, if prompted
In the 'Note' field type in the token name
Select the scopes (permissions) for the access token
- Select repo to have full control of private repositories
Click the Generate token button
Make sure to copy the token because you won’t be able to see it again
Source: https://webkul.com/blog/github-push-with-two-factor-authentication/
How to use the access token
Open the terminal and position to a folder in which you want to put your new project (e.g. Documents folder)
cd ~/Documents
Clone the repository to your machine
git clone https://github.com/username/repository.git
Enter your GitHub username when prompted
Don't use your Github password when prompted, instead enter the generated access token
Wait for the cloning to finish and continue to work on the project locally
How to connect to GitHub using the SSH protocol and ssh-agent
By default Git connects to remotes using the HTTPS protocol which requires you to enter your username and password every time you run a command such as git pull or git push.
Using the SSH protocol, you can connect and authenticate to remote servers and services. With SSH keys, you can connect to GitHub without supplying your username or password with each visit.
First, check whether you have any existing SSH keys. To do this, open the terminal and enter
ls -al ~/.ssh
If you don't have an existing public and private key pair, then generate a new SSH key.
Open the terminal
Create a new SSH key with the provided email as a label by running the following command (substituting in your GitHub email address):
ssh-keygen -t rsa -b 4096 -C "your_email@example.com"
Press Enter when prompted to "Enter a file in which to save the key" to accept the default file location
Enter a secure passphrase when prompted
How to add SSH key to ssh-agent
If you don't want to re-enter your passphrase every time you use your SSH key, you can add your key to the ssh-agent (a helper program that runs in the background while you are logged in to the system and manages your SSH keys and their passphrases).
Start the ssh-agent in the background
eval "$(ssh-agent -s)"
The command outputs the ssh-agent process identifier:
> Agent pid 59566
If you're using macOS Sierra 10.12.2 or later, you will need to modify your
~/.ssh/config
file to automatically load keys into the ssh-agent and store passphrases in your keychain:Host * AddKeysToAgent yes UseKeychain yes IdentityFile ~/.ssh/id_rsa
Add your SSH private key to the ssh-agent and store your passphrase in the keychain. If you created your key with a different name, or if you are adding an existing key that has a different name, replace
id_rsa
in the command with the name of your private key file:ssh-add -K ~/.ssh/id_rsa
Enter the passphrase to add your identity
Add the SSH key to your GitHub account (see How to add SSH key to your GitHub account)
How to add SSH key to your GitHub account
To configure your Github account to use your new (or existing) SSH key, you'll also need to add it to your GitHub account (after adding a new SSH key to your GitHub account, you can reconfigure any local repositories to use SSH).
Open the terminal and run the following command to copy the SSH key to your clipboard (make sure that you don’t copy any whitespace while copying the public key’s content):
pbcopy < ~/.ssh/id_rsa.pub
Open Settings on your Github page
Select SSH and GPG keys in the menu on the left-hand side
Click the New SSH key button
In the Title field type in a descriptive label for the new key. For example, if you're using your work Mac, you could call it "work-Mac"
In the ‘Key’ field paste your SSH key
Click the Add SSH key button
Confirm your GitHub password, if prompted
How to change remote repository URL
Let’s say you want to clone someone's GitHub repository but wish to continue pushing the changes to a new (your) remote repository.
Use the git remote set-url
command to change your remote’s URL.
Clone a repository to your machine
git clone https://github.com/username/repository.git
Create a new GitHub repository
Open the terminal and change the current working directory to your local project
cd repository
Change your remote's URL
If updating to HTTPS:
git remote set-url origin https://github.com/USERNAME/REPOSITORY.git
If updating to SSH:
git remote set-url origin git@github.com:USERNAME/REPOSITORY.git
Verify that the remote URL has changed
git remote -v
Stage, commit and push :)
Working with branches
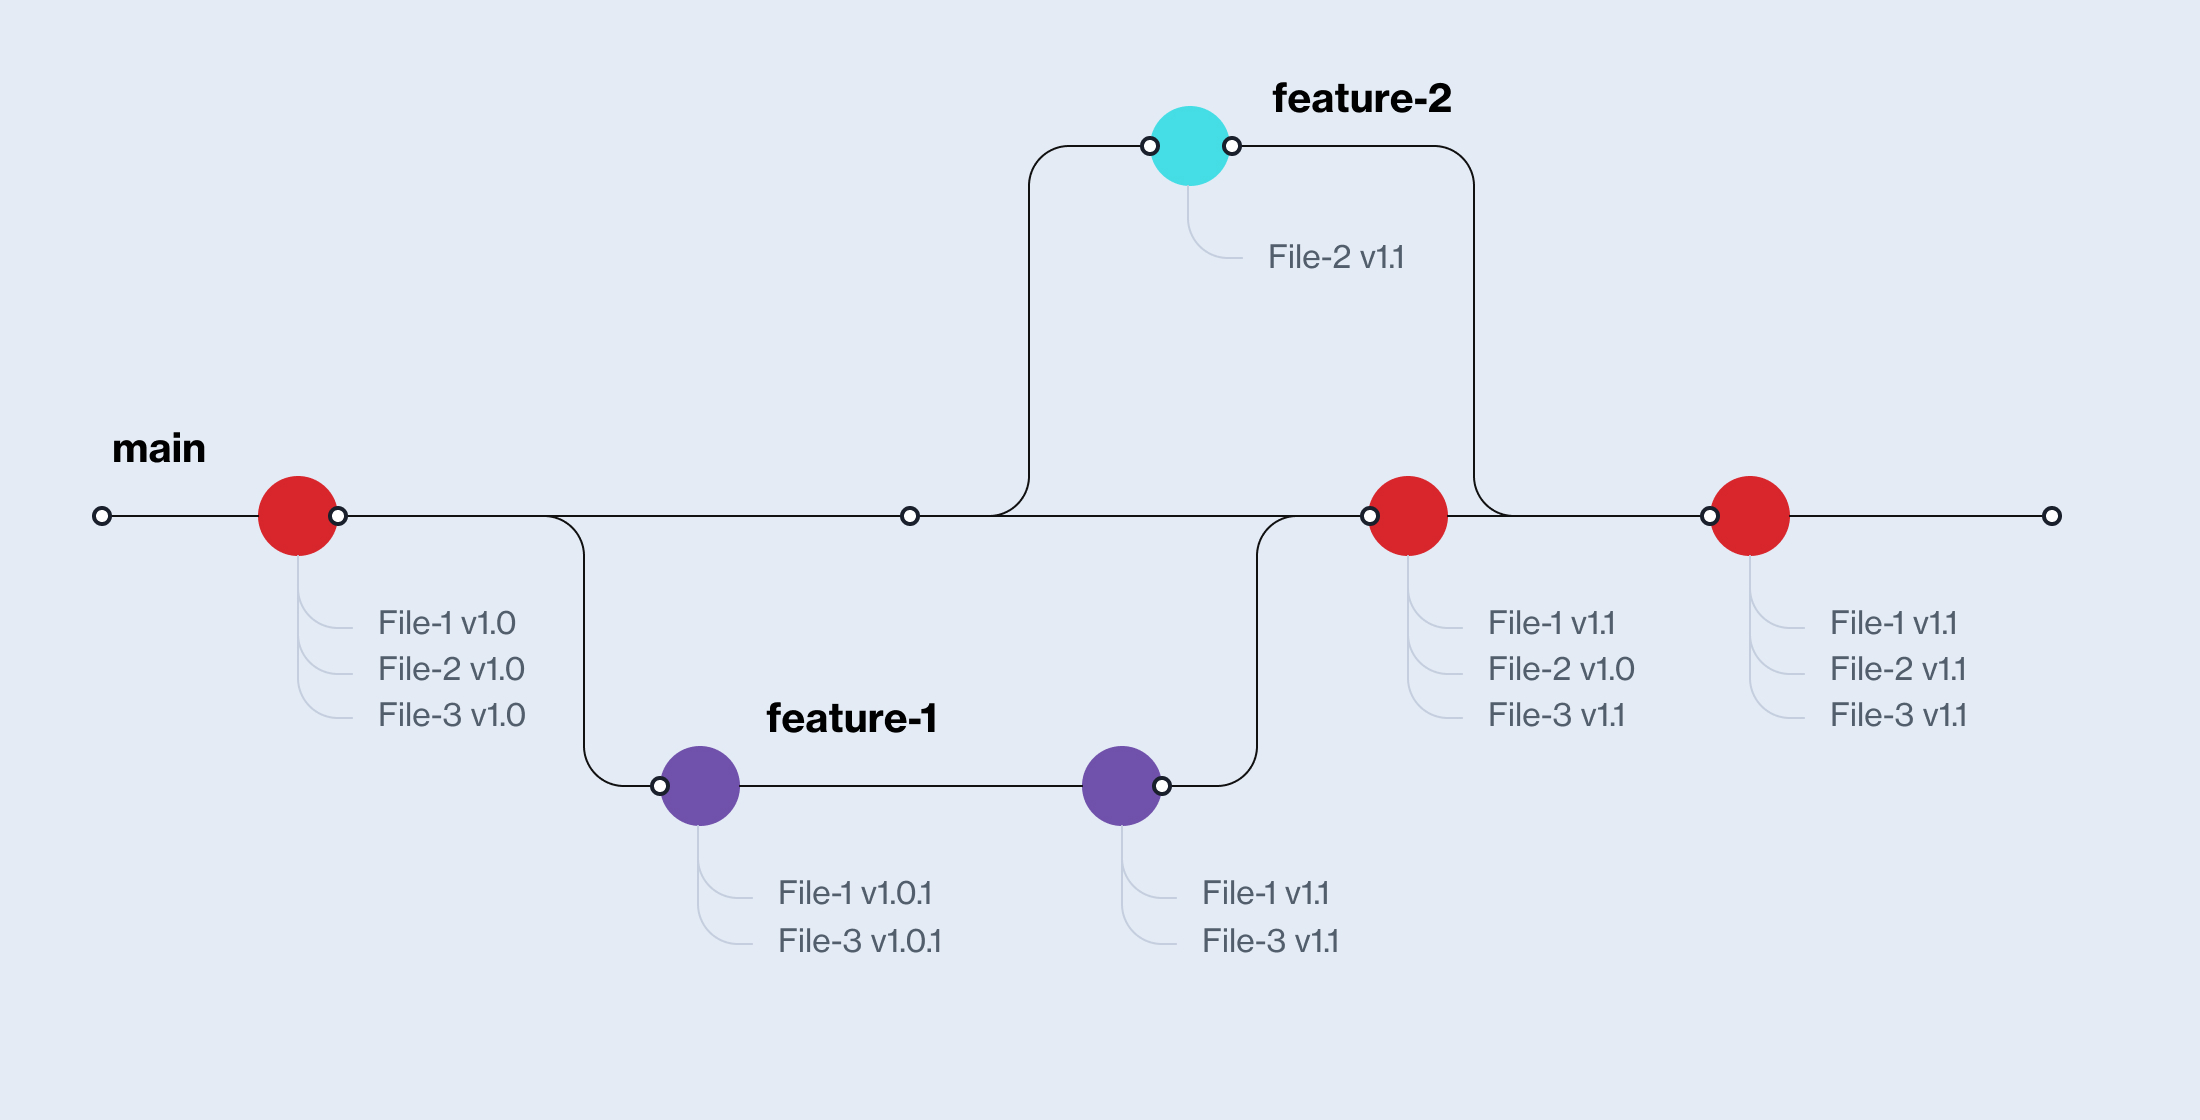
Every project starts with the main branch, i.e. a main line of development. Sometimes you may want to try something out, have another version of your work or start working on a new feature and have it separate from the main. This is where branching comes in handy. By creating a branch you are creating an independent line of development in which you can continue your work without having to fear messing something up in the main branch. Branching is a common practice among developers when introducing a new feature.
How to switch branches
Let’s say a project already exists and you want to pull the updates and continue working on one of the branches.
Open the terminal and position to your project
cd repository
Pull the updates from the remote repository
git pull
Change into the existing branch called
feature-1
git checkout feature-1
Make the changes to files
Stage, commit and push :)
How to create a new branch
There are multiple ways to create a new branch. This example shows how to create a new branch from the branch you are currently at.
Open the terminal and position to your project
cd repository
Create a new branch called ‘feature-abc’ from the branch you are currently at
git branch feature-abc
View the branches on your local machine
git branch
Switch to the newly created branch
git checkout feature-abc
Edit, stage and commit your files
Push the new local branch to the remote repository
git push
How to merge branches
To merge branches means to join their development histories together, i.e. to integrate the branch you worked on back into the branch from which it was created.
For example, you created a new branch from the main branch and after you committed the changes and made sure everything works, you want to merge it into the main.
Note that git merge
merges the specified branch into the currently active one. If you want to merge into the main branch, you have to be on the main branch.
Open the terminal and position to your project
cd repository
View the branches and make sure that you are on the main branch
git branch
Merge the branch into the main branch
git merge feature-abc
How to create a pull request
A pull request is a way of notifying the collaborators on the project about the changes. Those changes can then be reviewed before being integrated into the main branch.
Go to GitHub and open the repository’s main page
From the branch dropdown menu in the upper left corner, select the branch that contains your commits
Click Pull request (on the right-hand side of the greyed-out box)
In the base: [branch-name] dropdown menu select the branch you'd like to merge your changes into
In the compare: [branch-name] dropdown menu choose the branch you made your changes in
Type in a title and comment for the pull request
Click the Create Pull Request button