
More and more applications today rely on real-time technologies. Data is a critical aspect of every product, and users want to know what’s happening with their data now, not what was happening a minute ago.
Countless chat, dashboard, and other applications base their success on the speed and reliability of their data updates. If you’re looking to equip your app with these types of functionalities, this article explains how to use SignalR and Blazor WebAssembly – a perfect combination for displaying real-time data with little effort.
What is Blazor?
Blazor is an open-source framework developed by Microsoft used for creating web applications with C# and .NET. This approach makes it easier for .NET developers to enter the world of client web applications.
It might seem unusual to use C# for developing web applications since browsers understand JavaScript, but it can be achieved by compiling a .NET runtime into the WebAssembly bytecode.
In fact, it’s not just C#; we can run any language in the browser through WebAssembly. With Blazor, we can share client and server codes. On top of that, integration with Docker and other hosting platforms is available.
Blazor offers multiple hosting options:
Blazor Server
Blazor WebAssembly
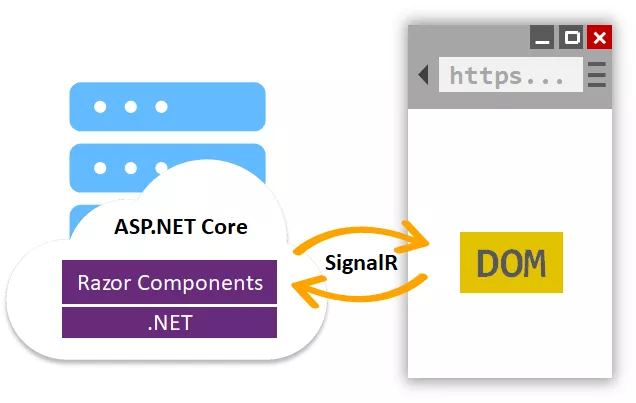
Blazor Server
This option hosts Razor components in the ASP.NET Core Web App, which means that the application is 100% run on the server. Blazor Server uses SignalR to communicate between the server and the client via the WebSockets protocol. It allows for full .NET API compatibility.
With Blazor Server, each new browser window requires a new instance of a server-managed component state. Because of that, there is a constant bi-directional connection between the client and server, so it would be smart to consider scaling the application.
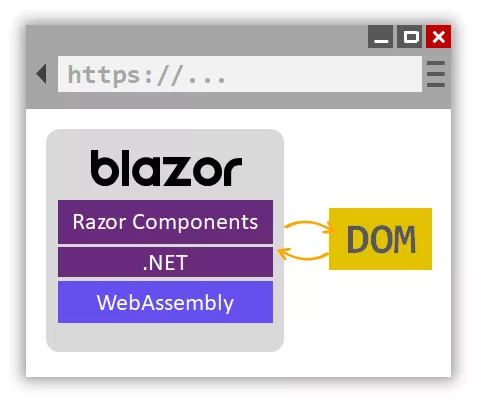
Blazor WebAssembly
Blazor WebAssembly (WASM) allows us to build SPA (Single Page Application) client applications. Opening the application in a new browser window will download the source code.
However, this is not the only reason to use Blazor WebAssembly. Standard libraries and NuGet packages are still available with Blazor WASM. Another essential aspect is its performance, which is close to native.
Since WebAssembly runs in the JavaScript sandbox, we can use the following:
File API
DOM
Web Sockets
Utilizing C# and JavaScript capabilities at the same time? Not bad at all.
Blazor WebAssembly ASP.NET Core Hosted
There is a new hosting option that comes with Blazor WebAssembly. It is an upgraded version of the standard Blazor WASM, which works well with browsers.
If we choose Blazor WASM ASP.NET Core Hosted, the Blazor client and the backend code are hosted on the same website. On the other hand, with the standard Blazor WASM option, the backend app doesn’t have to be ASP.NET Core. It can be anything, hosted anywhere.
If you’re a C# lover who wants to use C# and .NET for everything, this hosting option is your best bet.
In our example, we will use .NET Web API for the backend and Blazor WASM for the frontend. In our case, the communication happens through SignalR, but there are other possibilities with this hosting option. On the other hand, Blazor Server communication is restricted to SignalR only.
Differences between Blazor hosting options
All Blazor hosting options have a specific purpose and can be useful in different cases. Here’s an overview of the pros and cons of each option.
Blazor Server pros and cons
| Pros | Cons |
| Faster initial load; HTML content is pre-rendered, and application libraries are not downloaded | An internet connection is required |
| Support for older browsers that don’t support WebAssembly | Potential scalability issues because each client requires a connection to the server |
| Better security because the source code isn’t sent to the client | Higher latency because the data is sent from the server to the client |
Blazor WASM pros and cons
| Pros | Cons |
| Offline support is enabled since the source code is downloaded | Older browsers without WebAssembly support are not available |
| Servers are not required | The initial download size is much larger |
| Once the source code is loaded, the performance is close to native. The only thing that needs to be re-rendered is the DOM (Document Object Model), without external API calls | Limitations regarding .NET tools and debugging capabilities |
Blazor WASM ASP.NET Core Hosted pros and cons
| Pros | Cons |
| Complete solution deployed in one place with one tech-stack | An internet connection is required |
| Works well with database connections since the Web API is the backend | Client-side debugging is still in its early stages |
| Suitable for solutions entirely written in ASP.NET Core |
Choosing the hosting option
Deciding what would be the best hosting option for our case, we need to ask ourselves what the goal is. We want to create a solution for refreshing data in real time. Because dynamic data is involved, we need a server that will fetch data from the database, and we want to implement all the aspects with .NET and C#.
Our best bet is the Blazor WASM ASP.NET Core Hosted option.
Sending data with Hosted Service and SignalR
To send data from the backend Web API to the Blazor Client, we need to create a solution first.
Creating Blazor WASM ASP.NET Core Hosted solution
We can create the Blazor solution in two different ways:
Command Prompt (.NET CLI)
IDE (usually Visual Studio)
To create a Blazor WASM ASP.NET Core Hosted solution with the command prompt, we can use:
<em>dotnet new blazorwasm -–hosted</em>
We can also create a new solution in Visual Studio:
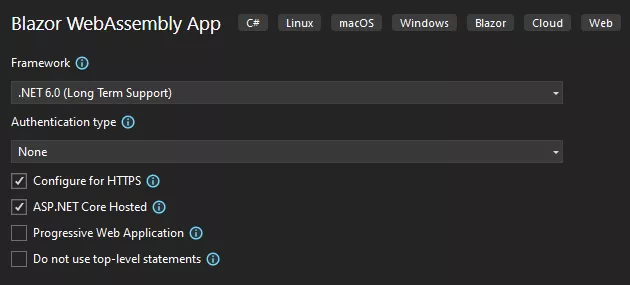
It is important to select the “ASP.NET Core Hosted” option.
After the scaffolding is done, we can check the solution structure:
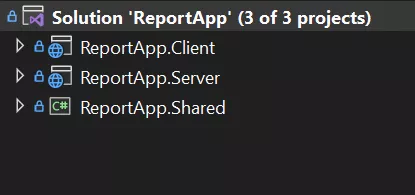
By default, this hosting option consists of three different projects:
ReportApp.Client (Blazor WebAssembly)
ReportApp.Server (.NET Core Web API)
ReportApp.Shared
SignalR server configuration
To send data to the client, we need to configure SignalR on the server. First, we need to create a SignalR Hub, which enables communication between the client and the server:
public class ReportHub : Hub<List<Report>> <br>{<br>}
Our hub is now configured to send a list of reports to the client. However, before the configuration is ready, we also need to add SignalR to the service collection:
builder.Services.AddSignalR();
Lastly, we need to register SignalR to the request pipeline:
app.MapHub<ReportHub>("/reports");
With this in place, the client can communicate with the server through the specified path.
Sending data to the client with Background service
Great, we are now ready to start sending data to the client.
We want to send our data to the client continuously in the background, and Hosted Service is the way to go. That way, we can do our job without offering an interface to interact with because we don’t need it. Our background worker already knows what to do. It’s pretty simple; it only needs to send data.
In our case, we use the BackgroundService base class, which implements IHostedService:
public class TimeWorker : BackgroundService
{
    private readonly IHubContext<ReportHub> _reportHub;
    private readonly IServiceProvider _serviceProvider;


    public TimeWorker(IHubContext<ReportHub> reportHub, IServiceProvider serviceProvider)
    {
        _reportHub = reportHub;
        _serviceProvider = serviceProvider;
    }


    protected override async Task ExecuteAsync(CancellationToken stoppingToken)
    {
        while (!stoppingToken.IsCancellationRequested)
        {
            using var scope = _serviceProvider.CreateScope();
            var reportDataService = scope.ServiceProvider.GetRequiredService<IReportDataService>();


            var reportData = await reportDataService.GetReports();
            var methodName = "TransferReportData";


            await _reportHub.Clients.All.SendAsync(
                methodName,
                reportData,
                stoppingToken);


            await Task.Delay(TimeSpan.FromSeconds(1), stoppingToken);
        }
    }
}
First, the method gets data from the database or any other data source and then sends it to all SignalR clients that are listening. The method is executed every second.
Next, we need to register the background service in our Program class:
builder.Services.AddHostedService<TimeWorker>();
Paying attention to how we use scoped services in background services is vital. Since a background service is registered as a singleton, all constructor injections will become singletons. To avoid issues, it’s better to use IServiceProvider when working with scoped-type instances.
Listening for SignalR updates on the Blazor client
The data is ready to be fetched; there’s no point in waiting. In our client Blazor app, we need to install the SignalR.Client NuGet package:
<em>dotnet add package Microsoft.AspNetCore.SignalR.Client</em>
The first step to get the data is to set up the connection in the Blazor component:
private async Task StartHubConnection()
{
    var apiAddress = "https://localhost:7077";


    var sensorDataUrl = ($"{apiAddress}/reports");
    _reportDataHubConnection = new HubConnectionBuilder()
                    .WithUrl(sensorDataUrl)
                    .Build();


    await _reportDataHubConnection.StartAsync();
}
Here we specify the server URL with the SignalR endpoint, which has to be the same as the one configured on the server. Next, we create a new HubConnection object and start the connection.
Our next step is to set a listener to fetch the data from the server:
private void SetRefreshDataListener()
{
    var methodName = "TransferReportData";


    _reportDataHubConnection.On<List<Report>>(methodName, (data) =>
    {
        reports = data;
        StateHasChanged();
     });
}
Here we specify the method name that corresponds to the one on the server and store the data in the variable. Later, we can use this variable to generate HTML data on the page.
Finally, the last step is to call the methods from the OnInitalizeAsync method inside the Blazor component:
private List<Report>? reports;
private HubConnection? _reportDataHubConnection;


protected override async Task OnInitializedAsync()
{
    await StartHubConnection();
    SetRefreshDataListener();
}
And this is it, success.
Summarizing our real-time journey
Step by step, we’ve made our way to successful implementation. You are now ready to start creating your own fantastic real-time solutions with Blazor and SignalR. As you can see, real-time solutions like this are actually not hard to implement. At the same time, they are in high demand for many different scenarios and can definitely come in handy in the future.