


Implementing IoT device onboarding in a mobile app is a complex process dependent on a number of factors. Discover what challenges to expect and how to approach them best.
To achieve its full potential, any Internet of Things device needs to be connected to a network, usually one with access to the internet.
When bringing a shiny new device home for the first time, a user will be met with the task of establishing this connection. To make it easier for them, the device’s interface can guide the user through setup and the network connection process.
Some IoT devices also come with a companion mobile app that takes the users through the onboarding process. There are various benefits to having this type of app, but a smoother and altogether better onboarding experience is the main one. When a companion app is used, a connection must be established between the phone and the IoT device – typically over Bluetooth or WiFi.
In this article, we’ll go over the expected hurdles in this multi-layered process and present some best practices for mitigating them.
IoT device onboarding is complex
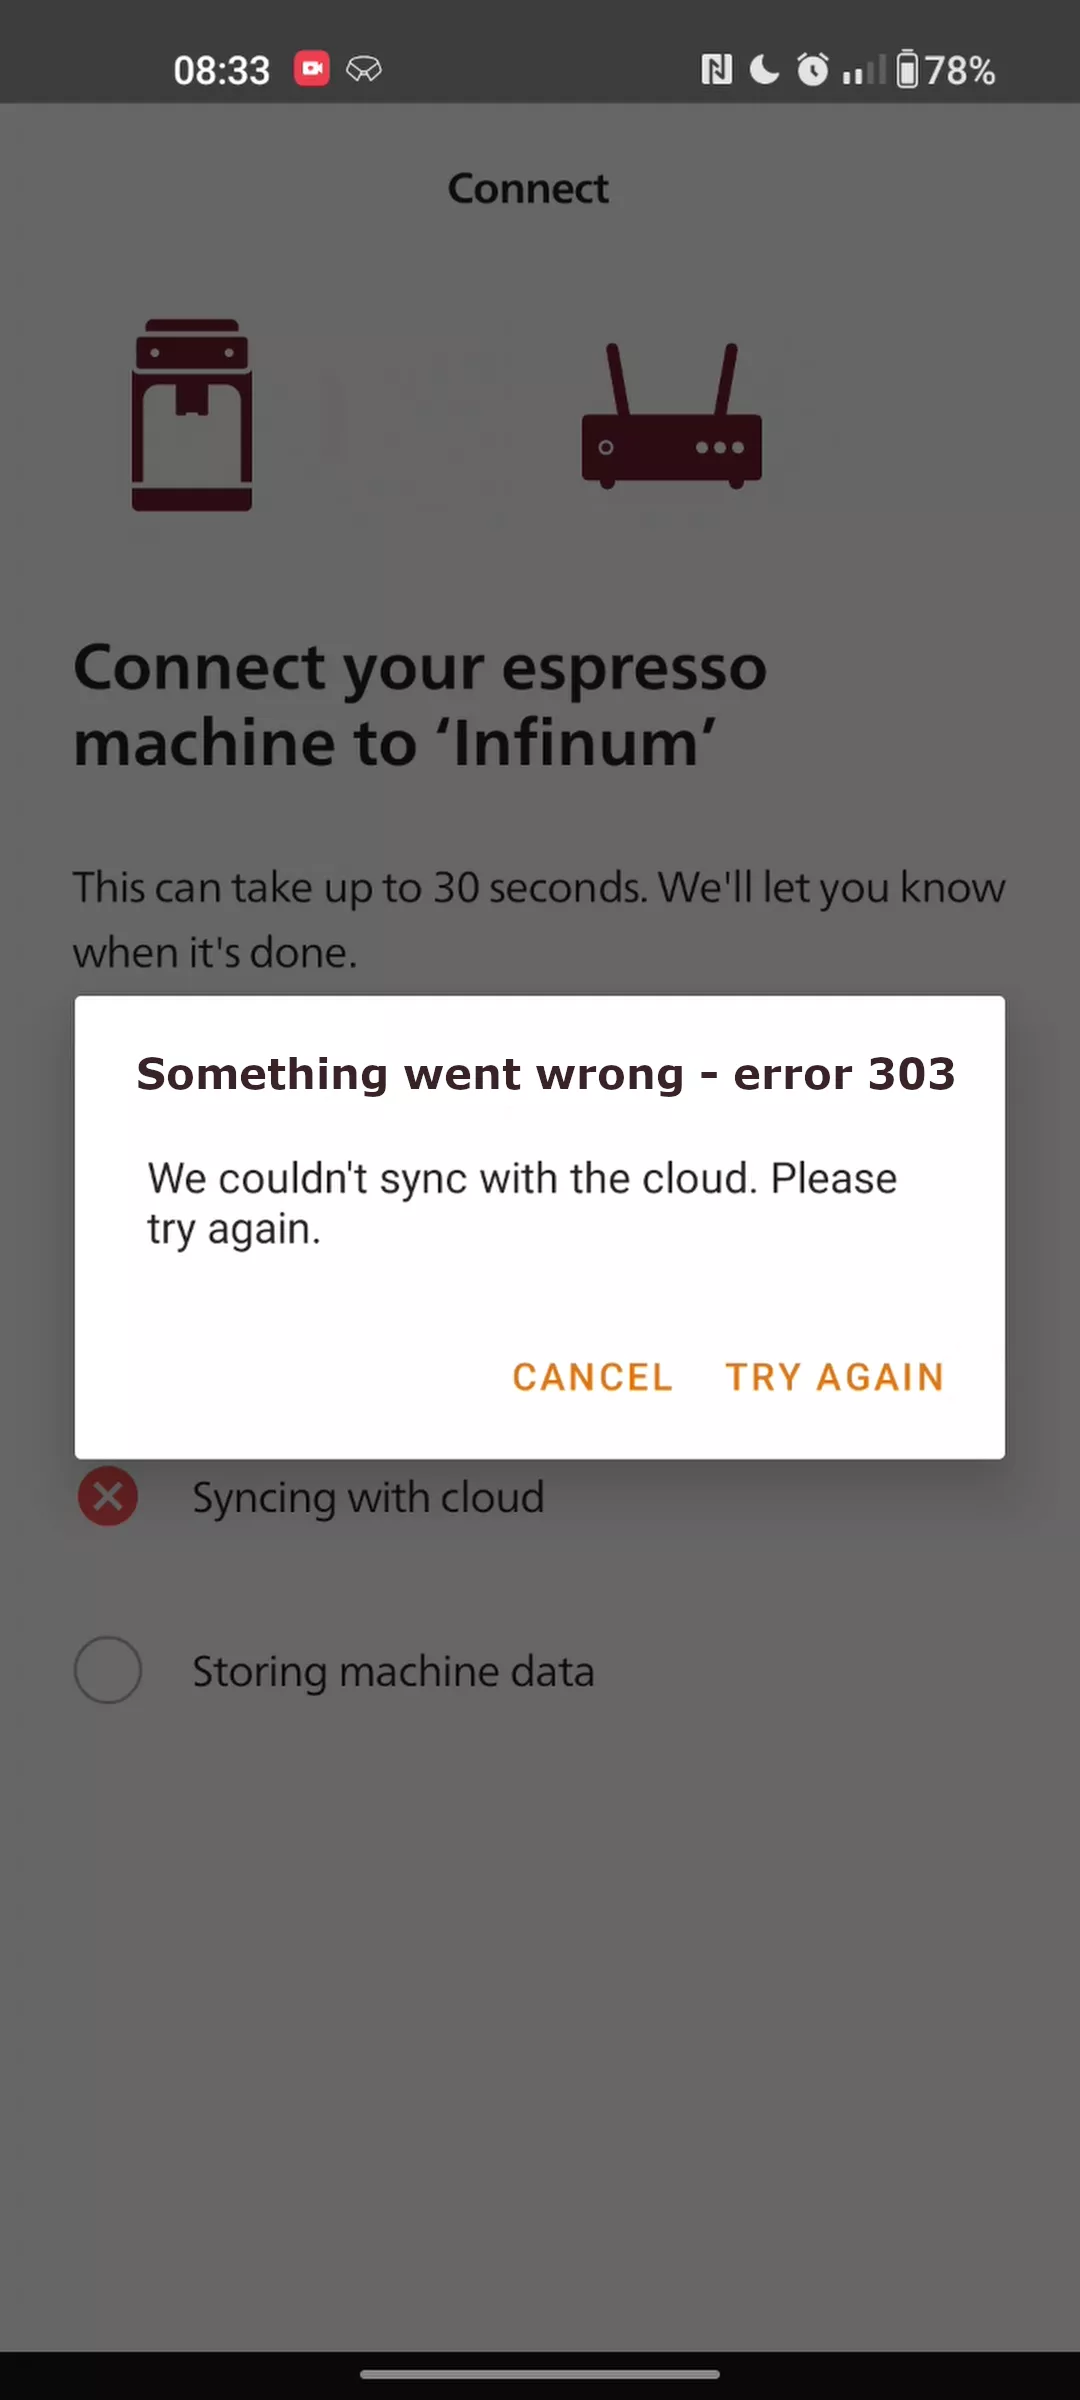
Let’s demonstrate the steps to onboarding an IoT device through a mobile app with a real-world example: the onboarding of a smart coffee machine to its companion app, Coffee+.
As we can see in this example, IoT device onboarding is quite a complex process. To give a high-level explanation, we first need to establish a connection with the device (in this case, the coffee machine) by connecting to its Wi-Fi network. Then, we need to connect the coffee machine to the internet (via the local Wi-Fi network) by sending network credentials. After that, we need to do the final configuration to sync the mobile app, the coffee machine, and the cloud.
As you can imagine, there are many things that can go wrong here. Not just for the end user but also for the development team working on the implementation.
Covering the unhappy flows in IoT device onboarding
Setting up everything correctly during IoT device onboarding makes for what we call a happy flow. Most users will go through one of those. However, if there’s a problem in the process, they end up in an unhappy flow.
Problems can occur on any side – they can be caused by the phone, the IoT device, the backend, or the network. In the example below, the user is having issues with their internet connection and the Wi-Fi being turned off on their phone.
Ideally, to create a great user experience, all the unhappy flows need to be covered. In practice, this usually means forking the happy flow and navigating the user back to the screen containing instructions on how to resolve the problem. We can present the user with a “Retry” action or take them back a step or two in the flow to reset all the necessary logic.
Unfortunately, covering all the unhappy flows takes a lot of time and involves several members of the project team, not just the developers but also QA engineers and designers.
However, failing to cater to the unhappy flows correctly, we can bring the app to an unexpected state, and the user can get stuck in a flow. Very often, that will result in the user leaving the app and possibly leaving a bad review.
To cover unhappy flows (and avoid unhappy users), the development team should follow a couple of core principles.
Documentation is a valuable resource
Not favored by many, but useful to all, the first line of defense against unhappy onboarding flows is documentation. Quality documentation should be produced at three levels:
- Developers can use UML diagrams to visually document each step in the onboarding process or specific error cases. UML sequence diagrams are a great choice for this use case.
- Designers can use tools for visually displaying the whole happy flow and all the unhappy ones. A visual representation of a flow is an excellent reference for anyone involved in the project, including stakeholders or non-technical persons. On Coffee+ we used Figma, but there are many similar tools available.
- The QA team can define the test cases. In those cases, the steps to replicating unhappy flows should be explained in detail. This shouldn’t be limited to what to do in the mobile app but should also include information on how to get the device in a specific state, how to modify the network, etc.
Another benefit to documentation is that it will also be useful for troubleshooting down the line.
Communicate efficiently
Not necessarily limited to IoT device onboarding flows in supporting apps, good communication is another key factor for success. Of course, the whole team should strive for efficient communication, but let’s focus on the communication between the developers and the designers to illustrate.
Sometimes, developers can’t allow retries of specific actions because they would bring the app or the device to some undefined states. It is very important to communicate this clearly to the designers – what actions are safe to retry, where the flow needs to fork, etc.
Furthermore, the UX needs to be as simple as possible to hide the technical details, which are not relevant for the user.
A great example of this is one of the final screens in the Coffee+ onboarding flow. This screen contains multiple checkpoints and a lot of things are going on under the hood. The user is unaware of them, but they get a sense of complexity and progress via the checkpoints.
In this example, this is what the developer should tell the designer before implementing the screen:
- A couple of operations that take some time are going on
- There is no need for multiple screens
- A singular loading spinner might be too simple of a solution for this case because the user might feel the process is lingering for too long.
Taking these insights into account, the designer can make the user feel much more comfortable in this situation.
Sometimes you need to compromise
Hand in hand with good communication comes another key tactic for success – compromise. If we want to unify the UX, including the unhappy flows, on all the platforms, sometimes we will need to compromise.
Android, iOS, or even different versions of the same OS can handle crucial system calls that are needed for onboarding in different ways. For example, this happens when the user needs to connect to the Philips network in Coffee+. It might be possible to develop automatic network switching, meaning the app would connect to the network automatically. That kind of implementation would make for a better UX, surely. However, due to the differences in APIs between Android OS versions, custom restrictions some manufacturers add to their phones, and iOS guidelines on network change, this simply isn’t achievable in all scenarios.
To resolve this issue and keep just one version of the flow (as well as cover all related unhappy flows), we had to find a compromise through constant communication between developers working on different platforms, the QA team, and the designers. In this case, we settled for the user manually choosing the preferred network, Phillips.
Supporting customers experiencing issues
Of course, there are always cases of something unexpected happening during device onboarding, a case not covered by the development team. Did a user leave a bad review due to an onboarding problem or contact customer support? This is where analytics come into play.
Before diving into analytics, let’s not forget that we need user consent to track them. What is useful to track here? Many metrics come into play, but let’s just mention a few.
- The percentage of successful onboarding sessions can be an early warning that something wrong is happening in the system. The cause might not be in the app itself, but in backend deployment, the device’s firmware update, or the like.
- Information about the screens the user visited can provide insight into the most common issues or point to the screens that need UX improvements.
- Details about the user’s phone (version of OS, model, etc.) can help pinpoint phone-specific issues. They can also suggest where additional effort from the development team is needed.
- Information about the circumstances in which crashes occurred. It is always a good idea to have a crash reporting system like Crashlytics to know what fixes the app needs.
Monitoring analytics is important because we can improve the UX based on data. And to reduce the number of issues as much as possible, good UX is of paramount importance.
Sometimes, the details can make all the difference. For example, the user experience in the Coffee+ app needed to ensure that the app, the device and/or the cloud are ready for the next step in the onboarding process. Before the current implementation that included a required checkbox, the “Next” button was always enabled, which allowed some users to just speedrun the process without following the instructions. This way, the device would not be in the required state, the onboarding would eventually fail, and the users would get frustrated.
However, based on user feedback and analytics, the development team iteratively improved the screen. With the new and improved UX, the failure (frustration) rate is much lower.
Apart from analytics, there are other solutions that can help with resolving user issues. For example, when an error dialog is displayed, the development team might also provide the user with some additional info in the dialog itself. This might be an error code that customer service can use later on or a link to a guide with solutions to common issues.
Users can have all kinds of network equipment and configurations. From routers with packet loss to a network configuration that blocks protocols used for IoT (e.g. SSDP). Customer service must be aware of this. As an addition, they can always reference developer documentation for troubleshooting.
What if the app is not the problem?
Not all IoT device onboarding problems are caused by errors in the mobile app. The device and the cloud/backend can also be counted among the usual suspects. As explained above, analytics and customer support play a crucial part in troubleshooting, but the production team can also take certain steps during development to make troubleshooting easier. This can help identify current issues as well as future ones the users may face.
Use multiple environments
First of all, it is always a good idea to use multiple development/operating environments. Here’s one possible approach:
- The development environment can be used, as the name suggests, for feature development. At times, it can be unstable.
- The staging environment should be more stable and can be used for testing before deploying to production.
- The production environment that will be used by users should be rock solid.
Of course, it is possible to use both fewer or more environments, depending on your needs and preferences. For example, the device can only have two environments (development and production) and the mobile app and cloud can have three (development, staging, production). However, that way of working isn’t recommended because it can create confusion about which environments are compatible.
Expose relevant information
Next, it’s important that the information about the device/app/cloud can be easily accessed. This means a delegated part of the development team needs to expose the relevant information to everyone else.
The device team (also known as the embedded team) needs to expose the device’s firmware version and the environment the device is running on. This can be done by showing information on the device’s display, if available. Sending info to a database in the cloud or simply printing it in logs (either local logs via UART, for example, or cloud logs). The mobile app team can use that info to learn about the device’s capabilities, for example.
The mobile team needs to expose the app’s version and the environment in which it is running. The best way for mobile teams to expose that info is to use a visual approach because team members who will use the app to test the onboarding process can have varying technical skills. This can be achieved by changing the app name and/or icon based on the environment and displaying it in the “About” section. Moreover, it is good practice to expose info about the app (client) to the cloud. This can be accomplished by sending the OS info, app version, build number, etc., in the User-agent header for HTTP requests.
Finally, the cloud (backend) team needs to provide the info about different environments. They can take it one step further and allow dynamic configuration of the mobile app or the device. This means the device or the mobile app switches environments based on the configuration sent by the cloud. Although this is not always achievable, it can make the development process less susceptible to errors. And as already mentioned, they can keep extensive logs to make troubleshooting easier.
Never lose focus on making your UX even better
Implementing an onboarding flow for IoT devices in mobile apps can present many challenges – for the end users, developers, and the QA team alike. Following these key principles can make them much easier to navigate.
Supporting efficient communication in the whole project team and maintaining meticulous documentation can go a long way. Further, creating a system that allows the team to detect problems early on can help predict and mitigate many future issues.
And finally, the key to making our UX the best it can be is our willingness to improve it constantly.
If you’re interested in gaining a competitive advantage in the Internet of Things realm, check out our IoT solutions page.


