


If you ever made a website, it probably contained some assets like images, CSS and JavaScript. In order for a page to be fast, it’s a good idea to concatenate all your JavaScript assets into one file and all your CSS assets into another. Caching might also be tricky…
Working with assets 101
If you want to concatenate files, use SASS or make sure your files are not cached when they shouldn’t be, you’ll need to use a tool that will take care of that. Most web frameworks have tools that work out of the box, but that might not be good enough for everyone.
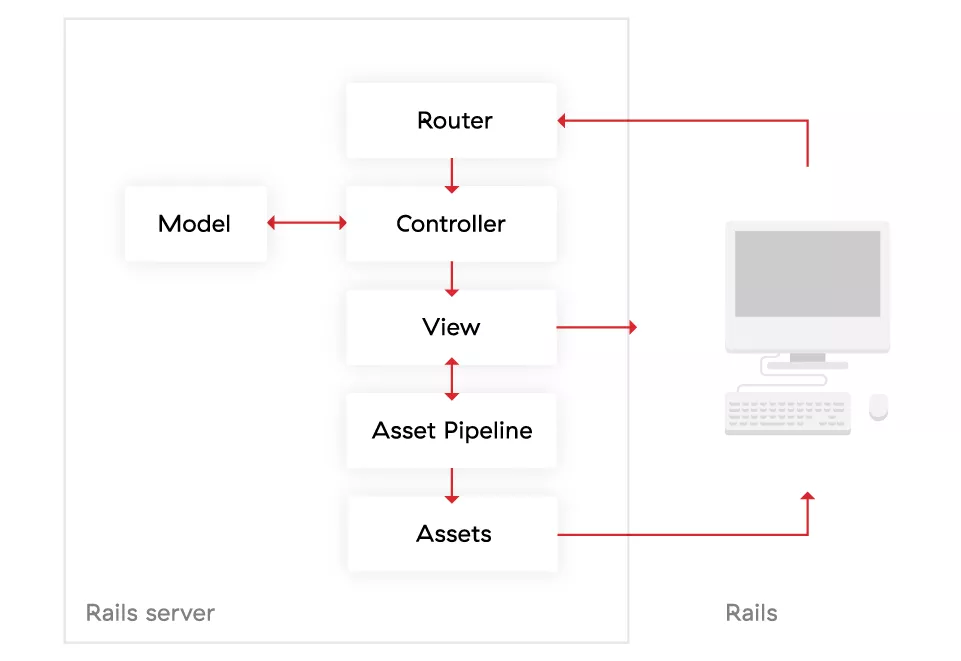
The asset pipeline
The asset pipeline is Rails’ way of preparing files for production. Other frameworks might use different names for it, but they all mostly do the same thing.
Module bundlers
A module bundler does a similar thing, but it is generally more flexible. The final product (files) might be similar, but it does more things in between.
Webpack – the good parts
Webpack is a module bundler that is getting more popular day by day. Although this is mostly because of the React community, it gained a lot traction in other communities, e.g. the Angular 2 CLI also switched to Webpack recently.
The reason why it’s so popular is that it’s very fast and extendable. Therefore, it can be adapted to a lot of different use-cases.
Here are some things that Webpack can do with very little configuration that would be impossible or very hard in the Rails asset pipeline:
- Dead code removal – remove unused code to decrease the final JS size
- Code splitting – break the code into multiple parts that can be loaded only when needed
- Linting – stop the build process if there are some errors that might cause issues
- Treat assets as modules – every asset (images, fonts, etc.) can be required and used anywhere
Webpack handles assets in a different way, which might be weird at first, but is very powerful. Your application has only one entry point (in most cases this will be a JavaScript file), and from there, you can require all other files as you need them. You can include other JavaScript files, but also CSS, JPG, PNG, or any other format you want. The important thing is to define a loader for a specific file format, and you’re good to go.
What is out there
When we decided to use Webpack with Rails, we looked at the available options and tried a few. Although they were good, none of them covered all our use cases:
- The Pixelated approach – It’s very similar to our approach, but the difference being in how assets are handled in production. Since they’re using the same fingerprint for all files, it means that it will change when any of the files changes. What that means is – if you change one icon and redeploy your site, the visitors will need to download all the assets again, even if nothing has changed for them. We think this is very inefficient, especially if you’re doing multiple deploys per day.
- webpack-rails gem – It requires you to change how you’re using the assets from the Rails side. It also has a very specific (tightly coupled) setup that might limit us in some situations.
- webpack-assets gem – The whole configuration is done through Rails and it makes some assumptions about your client-side setup
- webpack-manifest-plugin – this plugin was our starting point, but we realized there were some features missing, like the very powerful
mapAssetPaththat allows us to do manual adjustments in some cases that aren’t covered out of the box.
Rails 5.1
It was announced a few weeks ago that Rails 5.1 will get an official (but experimental) support for Webpack. The release date for Rails 5.1 is still unknown. Given that Rails 5 was released in June, and the current progress of 5.1 is just above 50%, it might still be a while before you’ll be able to use it.
The missing link
Our approach was simple – find a common ground for communication between Webpack and Rails. With this approach, we’re avoiding the tight coupling – Rails doesn’t know much about Webpack, and Webpack doesn’t know a lot about Rails. There are two parts of the solution:
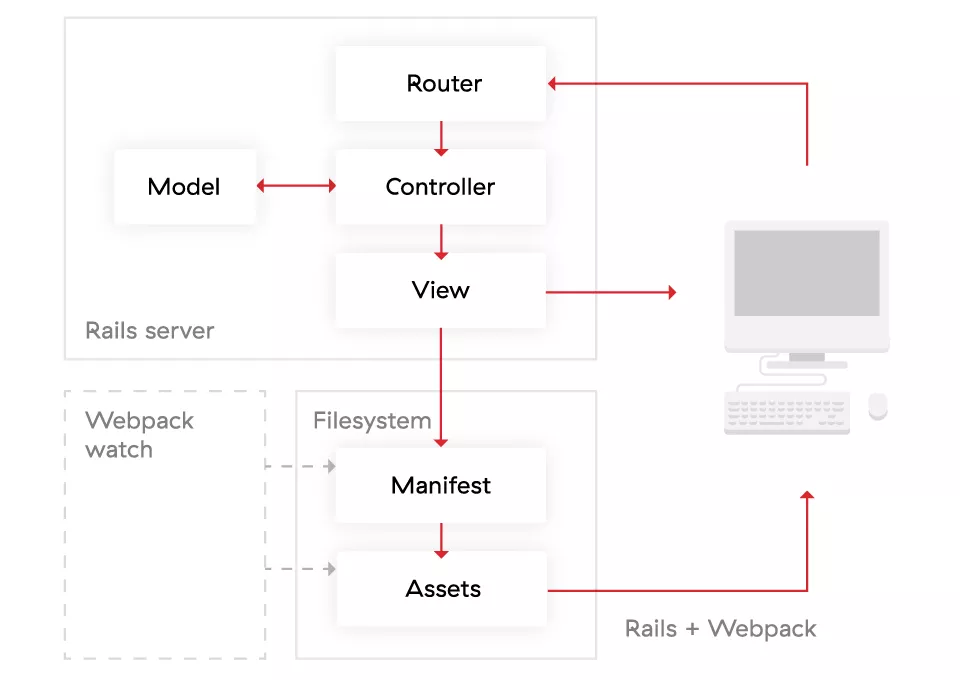
The Webpack part
Webpack will be responsible for all the assets in the project. Since it will also add fingerprints to the files, we’ll need to let Rails know what the new files are, and to which folders they’re saved. To make this part simple, we created webpack-asset-pipeline. The plugin will intercept all requires and imports from your JS and CSS and add them to the manifest JSON file:
var WebpackAssetPipeline = require(’webpack-asset-pipeline’);

module.exports = {
  // The usual Webpack configuration
  entry: ’main.js’,
  // etc.

  plugins: [
    new WebpackAssetPipeline()
  ],
  output: {
    path: ’public/’,
    publicPath: ’/’,
    filename: ’[name].js’
  }
}
When you run Webpack, the plugin will create a manifest.json file that will contain all the asset mappings.
An example of JavaScript code with requires:
// application.js

require(’application.css’);
require(’images/file1.jpg’);
require(’images/file2.jpg’);
require(’images/file3.jpg’);
The mappings you’ll get in the manifest file:
{
  "application.js": "application-63eb3290f4d9a09812716b989a0808f3.js",
  "application.css": "application-07eb3299a08b981290763eb32962808f.css",
  "images/file1.jpg": "963eb32907744d9a0d6b98127162808f.jpg",
  "images/file2.jpg": "162808f4d9a0963eb3290774127d6b98.jpg",
  "images/file3.jpg": "d6b98127162969a0808f3eb32907744d.jpg"
}
To run Webpack on every relevant file change (for development), you should run it with the –watch flag:
webpack --watch
The Rails part
The only thing Ruby on Rails needs to do is to replace the assets helpers. This can be done in one of two ways (depending on your preferences). In both cases, you should remove Rails sprockets because they will not be used, and you won’t be able to use their methods by mistake. The easiest way to do this is with the following command when you’re creating your app:
rails new app --skip-sprockets
Adding a new webpack_asset_url helper
You’ll need a helper to replace the asset pipeline. Here is an example of how you can do this:
# app/helpers/webpack_helper.rb

module WebpackHelper
  def webpack_asset_url(asset)
    "/assets/#{manifest.fetch(asset)}"
  end

  def manifest
    @manifest ||= JSON.parse(File.read(’manifest.json’))
  rescue
    fail ’Please run webpack’
  end
end
An example how to use the helper:
<img src="#{webpack_asset_url(’logo.svg’)}" alt="logo" />
You’ll need to add the main JavaScript file to your layout with this helper. Also, keep in mind that you shouldn’t use Rails image_tag, stylesheet_link_tag or javascript_include_tag helpers.
Monkey patching Rails assets helpers
The second solution means a little more work in the start, but your application code will stay the same. Although removing sprockets is optional in the first method, in this case you have to remove them. The code for monkey patching is available in the plugin documentation.
After you’re done with monkey patching, you’ll be able to use the assets in the same way you used the asset pipeline:
= image_tag(’logo.svg’)

= stylesheet_link_tag ’application’, media: ’all’
= javascript_include_tag ’application’
Hot reloading
If you want to use all the features Webpack can offer, you can. One of the biggest features is hot reloading. Since JavaScript hot reloading depends on the JavaScript framework, this is out of scope for this blog post, but CSS hot reloading can be set up with relative ease:
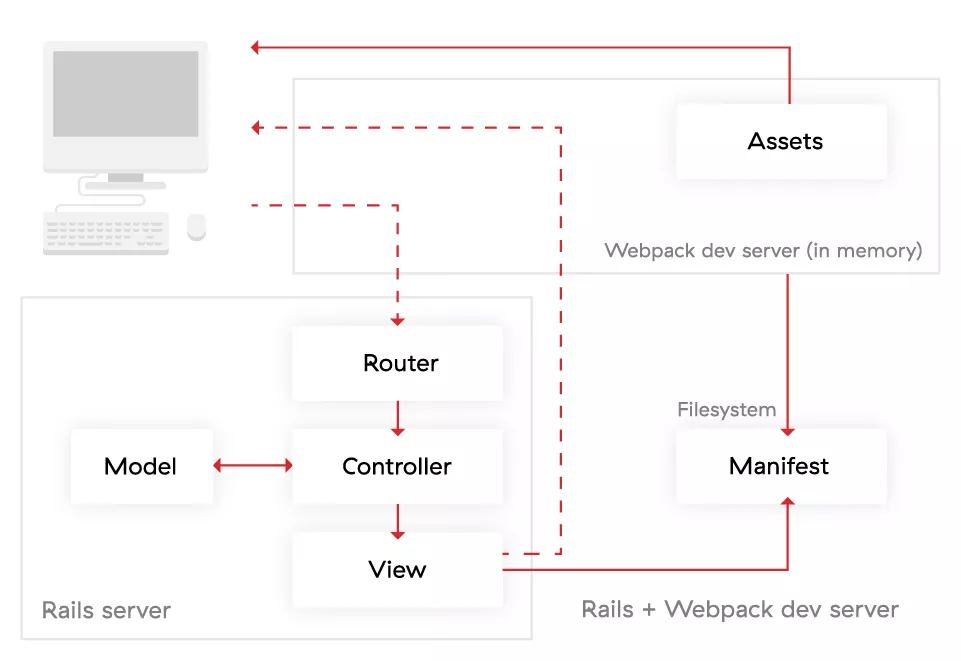
Configuring Webpack
To use hot reloading, all assets will need to be served from the Webpack server. To work correctly with the rest of the setup, you’ll need to proxy the rest through the Webpack server to your original app server. For that, you can use webpack-dev-server, or if you need more control, webpack-dev-middleware in combination with express. An example of how to configure the webpack-dev-middleware to enable CSS hot reloading is available in the webpack-express-dev-server-boilerplate.
You’ll also need to set the writeToFileEmit property in webpack-asset-pipeline to true to ensure the manifest is saved to disk and therefore accessible by the app server.
Caveats
There are still some issues we didn’t solve, but they’re just features that are nice to have – nothing essential:
Running the server
Since both Webpack and Rails have their servers or watch commands, we’ll need to run them both at the same time. We can do this either by having two terminals running the processes or by using something like the foreman gem.
Requiring assets
A great thing about Webpack is that it only processes those files that are explicitly referenced in JavaScript or CSS. That works great as long as you don’t need the assets somewhere else (e.g. in Rails). If you need an asset in Rails, but not in JS/CSS, you’ll still need to require the file in JS so Webpack will know it has to process it. The best way to do this is to have a separate JS file where you require all the assets that are used in Rails, but not in JS/CSS.
What if I’m using some other framework instead of Rails?
You might not be using Rails on your projects, but the plugin could work just as well with other server-side frameworks like Laravel, Django, Spring or ASP.NET MVC – the only thing you’ll need to do yourself is write the helper that will be used to fetch the asset names from the manifest file.
Want to contribute?
We’re looking to cover as many platforms as possible, so if you created helpers for your framework, you can send us a pull request with instructions on how to set it up. I’m sure others will appreciate it.


