Coffee+ is the accompanying application for Philips coffee machines that allows users to control certain functions of their machines remotely. The app provides a seamless user experience and offers various ways of interacting with the machine over WiFi. Users can turn their machine on and off, set a timer to turn it on at a specific time, adjust water hardness and standby time.
As part of the 2.0.0 release, we finally launched the most requested and most challenging feature so far – remote brewing.
This feature allows coffee machine users to choose a specific drink, customize it to their liking, start and track the brewing process without having to physically interact with the machine.
However, implementing the feature was no simple task. This blog post will discuss a problem we encountered on the way and how we solved it.
The elusive brewing status
The remote brewing flow is far from simple. It required adding new activities as well as updating some old ones. Apart from the standard happy flow, we had to implement an error-handling flow as well as various checks and handles throughout the brewing process.
The biggest challenge we encountered during implementation was keeping track of the brewing status in different activities and navigation graphs. Also, during the brewing process the machine couldn’t be a single source of truth for the current state of brewing due to the lack of emitted properties. This means that simply renewing the subscription and reading the properties wouldn’t suffice if we wanted to determine the latest state. If we wanted to show a snackbar at the bottom of DashboardActivity immediately after remote brewing is canceled, reading machine properties wouldn’t provide enough information for us to do it.
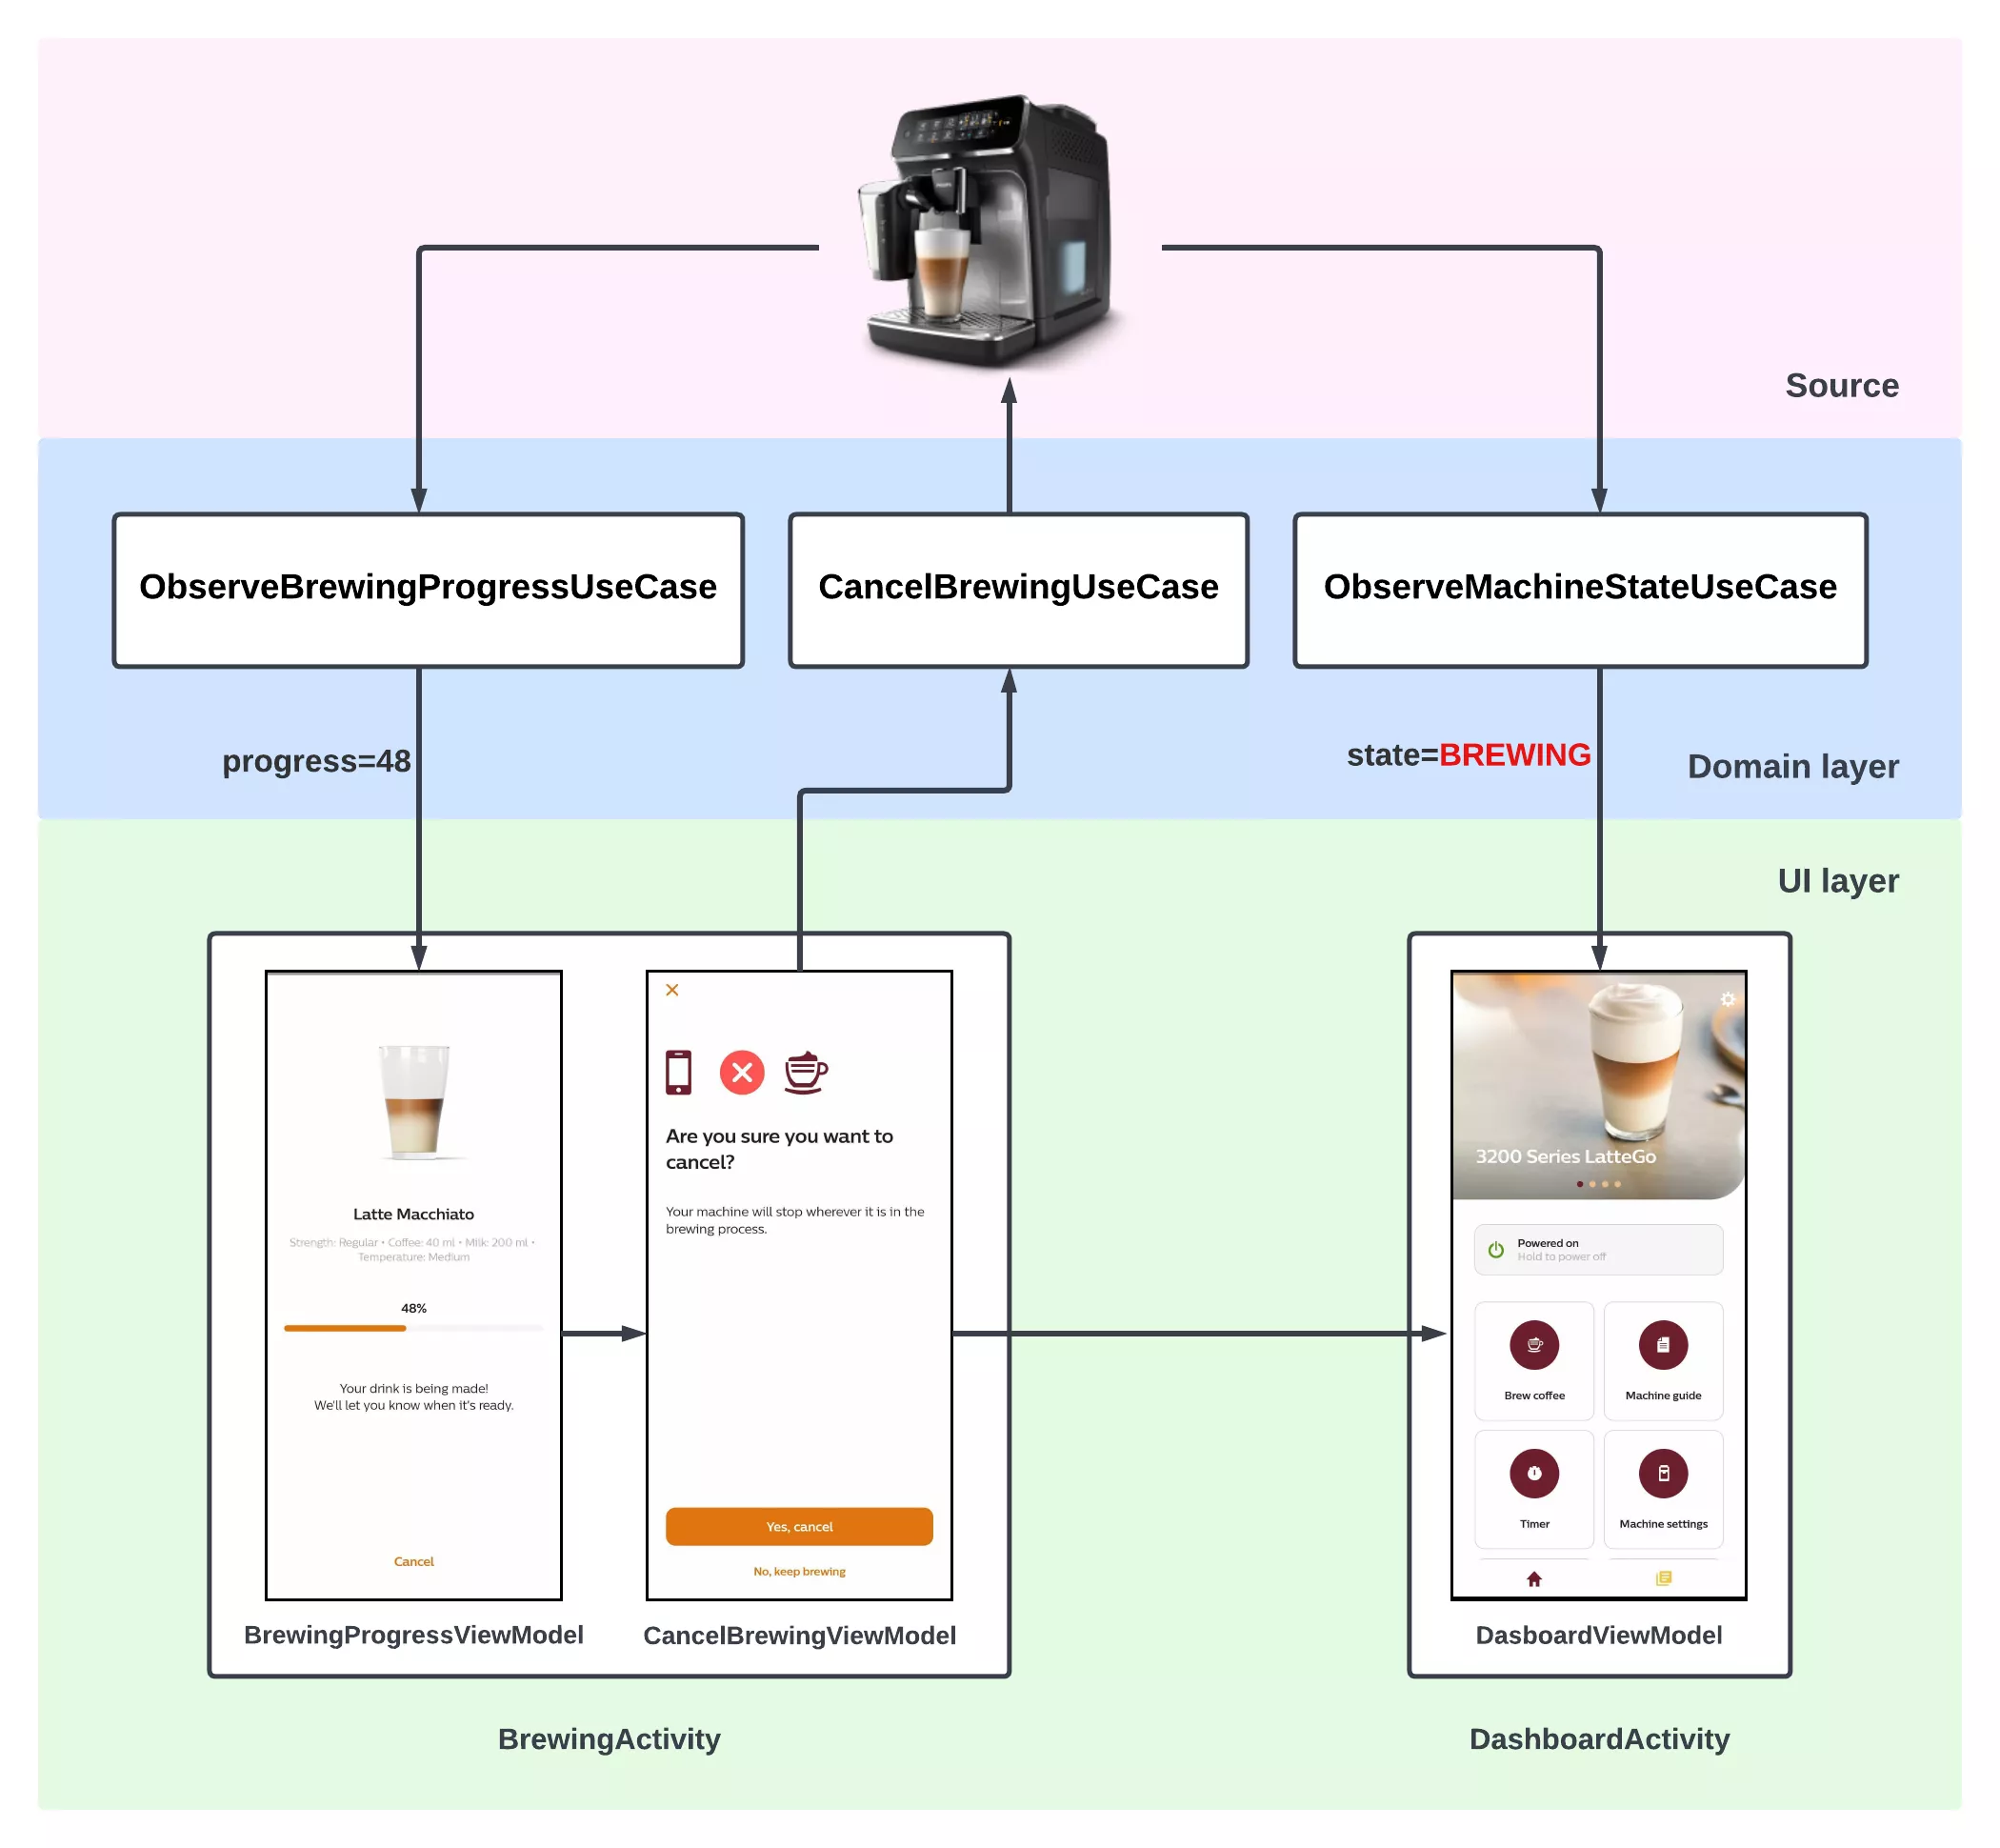
As you can see in the example above, once brewing is canceled by calling CancelBrewingUseCase and we close BrewingActivity, the machine state remains at BREWING for some time until the whole process is completed. So there is no real way of determining if the brewing process was canceled just by observing machine properties.
On top of that, we wanted our logic to be handled in one component for easier logging and testing, as well as reducing the amount of repetitive code. Since there is always a chance we will expand upon this feature sometime in the future, we also wanted our code to be clean and scalable.
Envisioning a solution
We’ve defined the problem, and now we can start looking into potential solutions. There are several aspects we’ll need to consider.
Scope
Because the brewing process spans multiple activities, we cannot use a shared ViewModel, meaning we need a separate component independent of any activity lifecycle. We can conclude that we need a component with a scope that lasts throughout the entire remote brewing flow.
States
How do we present the state of the brewing process? The machine can go through various states during the process. For example, before brewing is started, the machine is considered to be in an IdleState. When it starts brewing, the machine switches to ProgressState and the updated progress value should be shown in the app UI.
If an error occurs during brewing, for example, someone pulls the drip tray out, the machine switches to ErrorHandlingState, and user action is expected. Some of the states can be observed directly from the values emitted by the machine, but some are more dependent on the user’s interaction with the app.
As mentioned, when a user decides to cancel brewing, we should switch to CancelledState, which cannot be determined from the machine properties. We can conclude that brewing should be reflected in various states. These states can change depending on the properties observed from the machine or from the user’s interaction with the application.
State machine
All of these requirements point towards the finite-state machine or FSM. FSM is a mathematical model of computation, an abstract machine that can be in exactly one of a finite number of states at once. FSM can then change states depending on the current state and input. These are called transitions and in our case, inputs that will trigger transitions can either come from the machine side (a change of value observed) or from a user’s interaction with the application.
Therefore, to determine where the input came from, we want to make a lifecycle-independent state machine component with a single current state that will always reflect the state of remote brewing.
Implementation
Now that we’ve defined what our solution requires, we can dive into the implementation in more detail.
State
First let’s see how a state is defined through the BaseState interface:
interface BaseState<State : BaseState<State, Output, Action>, Output, Action> {

    suspend fun onAction(action: Action): State

    fun toOutput(): Output
}
If we look at the definition of BaseState, we can notice two generic types, Output and Action.
Outputis a model that holds state properties. By emitting anOutputrather than the wholeStatewe protect state values and functions from other components.Actionrepresents inputs that lead to transitions. Each state can handle a certainActionthrough the call ofonActionfunction and return a newState(or itself). That way states perform transitions by handling actions.
Now let’s take a look at a simplified example of ProgressState:
class ProgressState(
    private val progress: Int = 0
) : BaseBrewingState {

    override fun toOutput(): BrewingOutput =
        BrewingOutput.ProgressState(
            progress = progress
        )

    override suspend fun onAction(action: BrewingAction): BaseBrewingState =
        when (action) {
            is BrewingAction.UpdateProgress -> action.handle()
            is BrewingAction.StartErrorHandling -> action.handle()
            is BrewingAction.CancelBrewing -> action.handle()
            else -> this
        }

    private fun BrewingAction.UpdateProgress.handle(): BaseBrewingState = ProgressState(updatedProgress)

    private fun BrewingAction.StartErrorHandling.handle(): BaseBrewingState = ErrorState()

    private fun BrewingAction.CancelBrewing.handle(): BaseBrewingState = CancelledState()
}
Function toOutput is implemented and returns BrewingOutput.ProgressState which holds the latest progress value. The other function onAction handles three types of BrewingAction, otherwise the same state is returned and no transitions are made. In case the UpdateProgress action is received, a new ProgressState is returned with updated progress value. Action StartErrorHandling will return ErrorState and the last handled action CancelBrewing will return CancelledState.
If we wanted to visualize these state transitions with a diagram, they would look something like this:
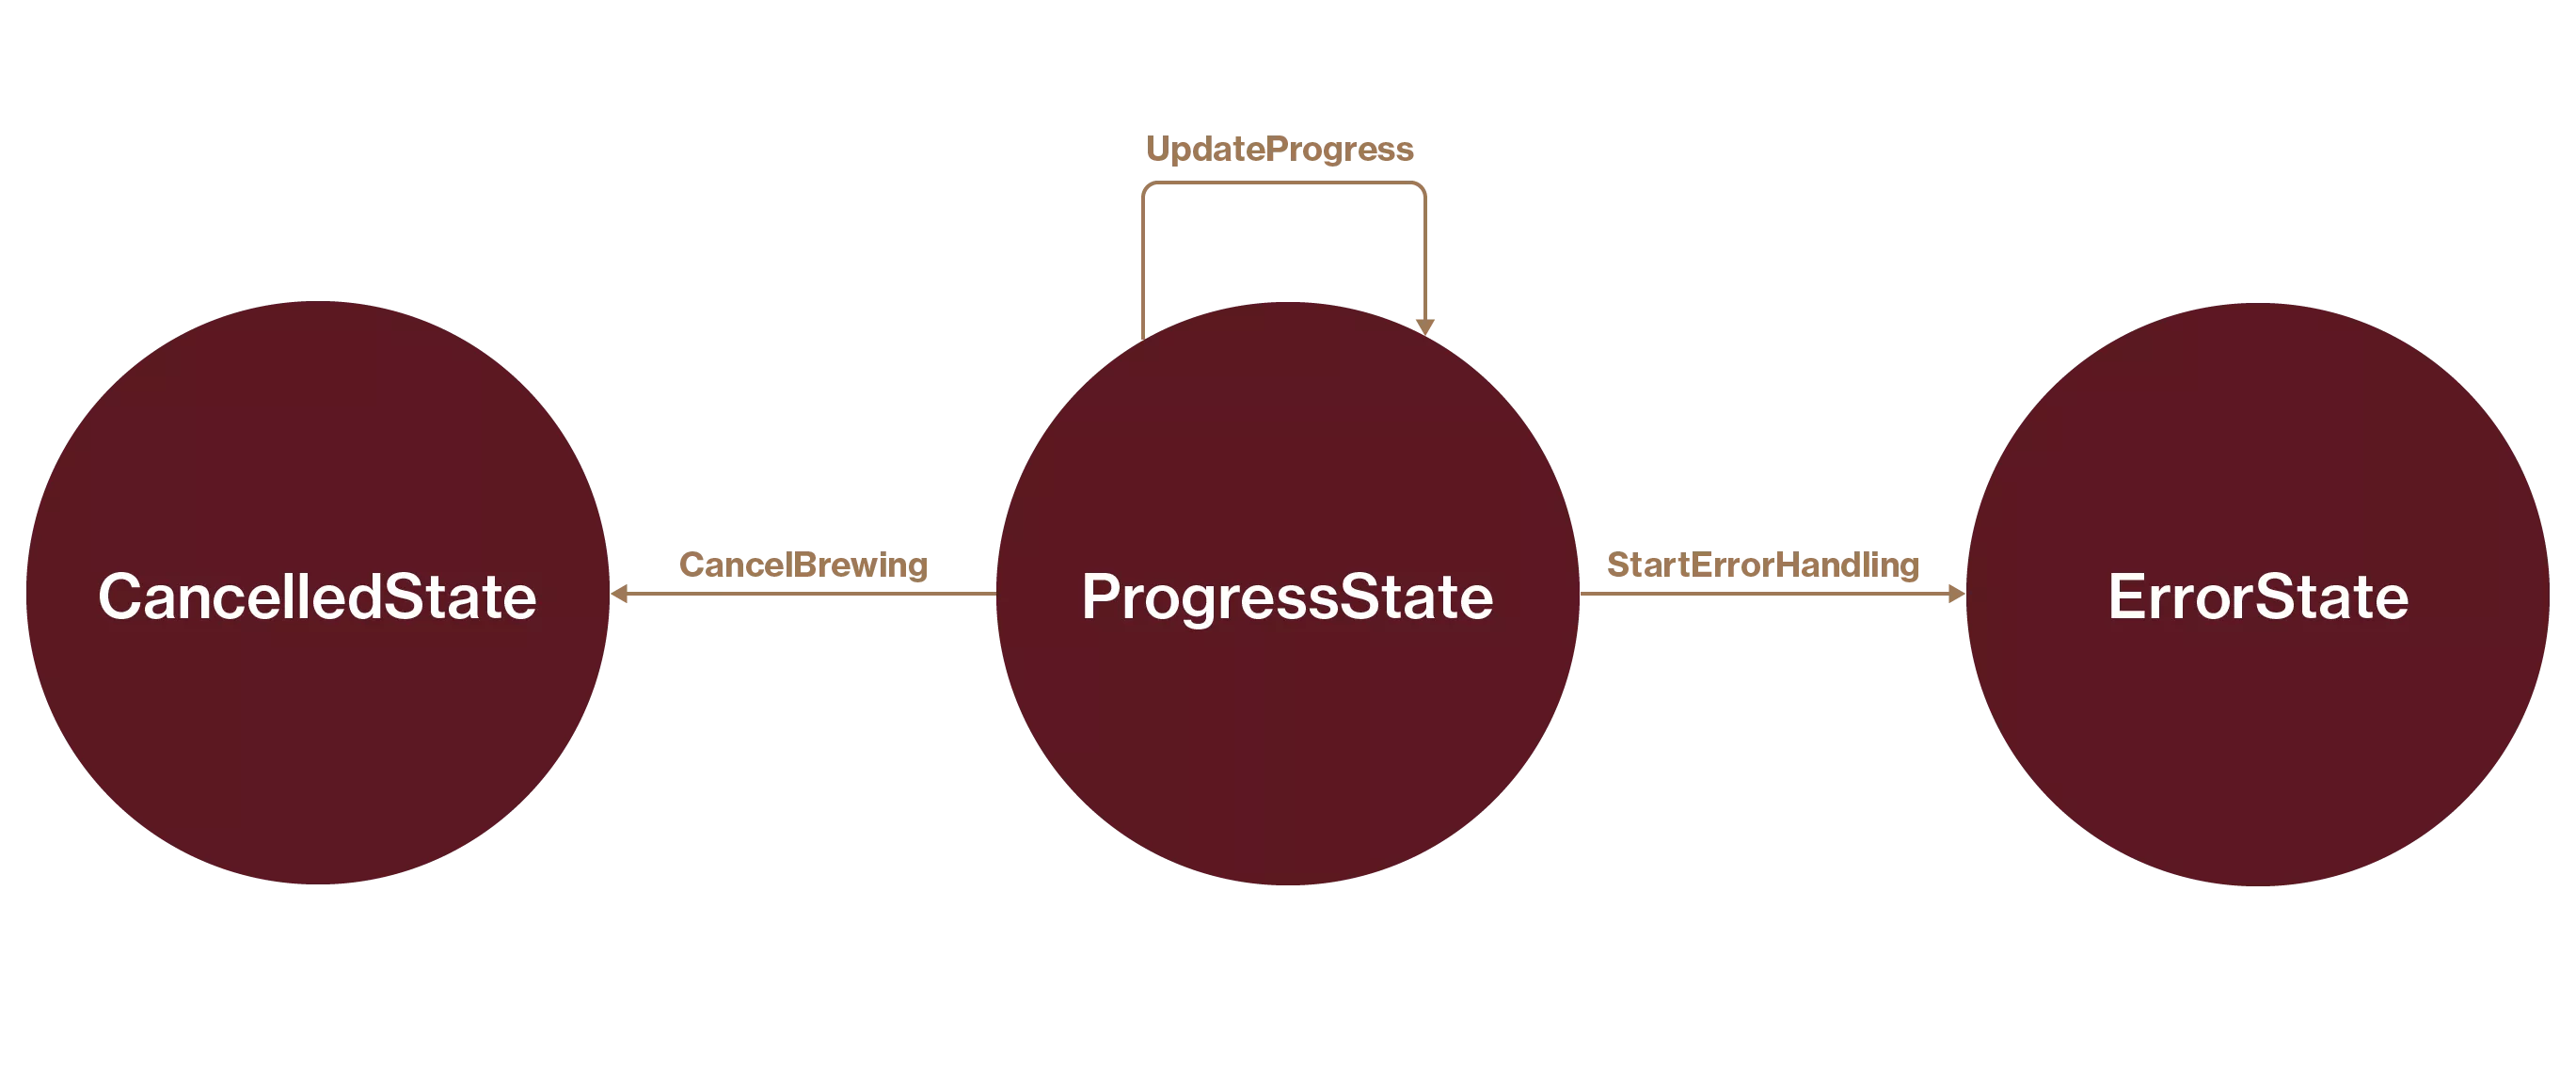
If our ProgressState receives the CancelBrewing action from a user’s interaction with the UI it will immediately transition to CancelledState. Otherwise, if the brewing progress property changes from the machine side, ProgressState will receive the UpdateProgress action and transition to a new ProgressState with updated progress value. Finally, if any errors are observed from the machine side, the StartErrorHandling action is received and ProgressState transitions to ErrorState where it will wait for the user to resolve the machine error.
State machine
Now that we have a good understanding of how states and transitions work, the only thing left is to implement a state machine. Following is an example of BaseStateMachine:
abstract class BaseStateMachine<State : BaseState<State, Output, Action>, Output, Action> {

    protected abstract val scope: CoroutineScope

    abstract val stateFlow: StateFlow<Output>

    protected abstract val currentState: State

    abstract suspend fun update(action: Action)
}
The first value to implement is the scope. As mentioned earlier, we want our state machine to have its own independent scope. In this example we are using CoroutineScope:
override val scope = CoroutineScope(dispatcher + SupervisorJob())
When initializing CoroutineScope, we are using an injected dispatcher combined with SupervisorJob. That way we can be sure that failing jobs will not cancel the whole state machine process. Inside the scope the state machine can observe machine properties, perform actions, and make state changes. If we wanted to observe the brewing progress flow and perform actions on each updated value, we would do it inside the mentioned scope:
 private fun observeProgress() =
    observeBrewingProgress().onEach {
        // update state
        // log tracked progress
    }.launchIn(scope)
The second value implemented is the stateFlow, which is the output of the state machine. Other components can subscribe to stateFlow changes and observe the state of brewing. Here is an example of stateFlow used in the implementation with its initial value set to BrewingOutput.IdleState:
 private val mutableStateFlow =
     MutableStateFlow<BrewingOutput>(BrewingOutput.IdleState)

 override val stateFlow: StateFlow<BrewingOutput> = mutableStateFlow
The next value implemented is currentState, which holds the reference to the latest state the state machine was in:
override var currentState: BaseBrewingState = IdleState()
     private set(value) {`
         field = value
         mutableStateFlow.tryEmit(value.toOutput())
         log("New state set: ${value.toOutput()}")
     }
Initially, the currentState is set to IdleState. The value setter is marked as private to ensure encapsulation and prevent other components from altering the state. Once a new state is set, the state output value is emitted to the mutableStateFlow to notify all of the observing components about the latest state change. This state change is also logged.
The last to implement was the update function, which acts as the only input to the state machine:
 override suspend fun update(action: BrewingAction) {
     currentState = currentState.onAction(action)
 }
Certain app components can use this function to interact with the brewing process. Once this function is invoked with a specific action, the result of currentState.onAction(action) is going to be the next currentState. For example, if our currentState is ProgressState from the previous chapter, once update(BrewingAction.CancelBrewing) is called, the resulting CancelledState will be the new currentState and all of the observing components will be notified of the change through stateFlow.
Architecture
By now we should have a deeper understanding of the state machine. Now let’s see how it blends into our app’s architecture. As mentioned before, the state machine has its own scope, meaning it differs from any other domain component (UseCase, Repository, Interactor). On top of that, we would also like to use these components for performing actions inside the StateMachine. For that reason, StateMachine is like a bridge layer between the UI and the domain layers.
Here’s an example of the way state machine interacts with the components from both UI and domain layers:
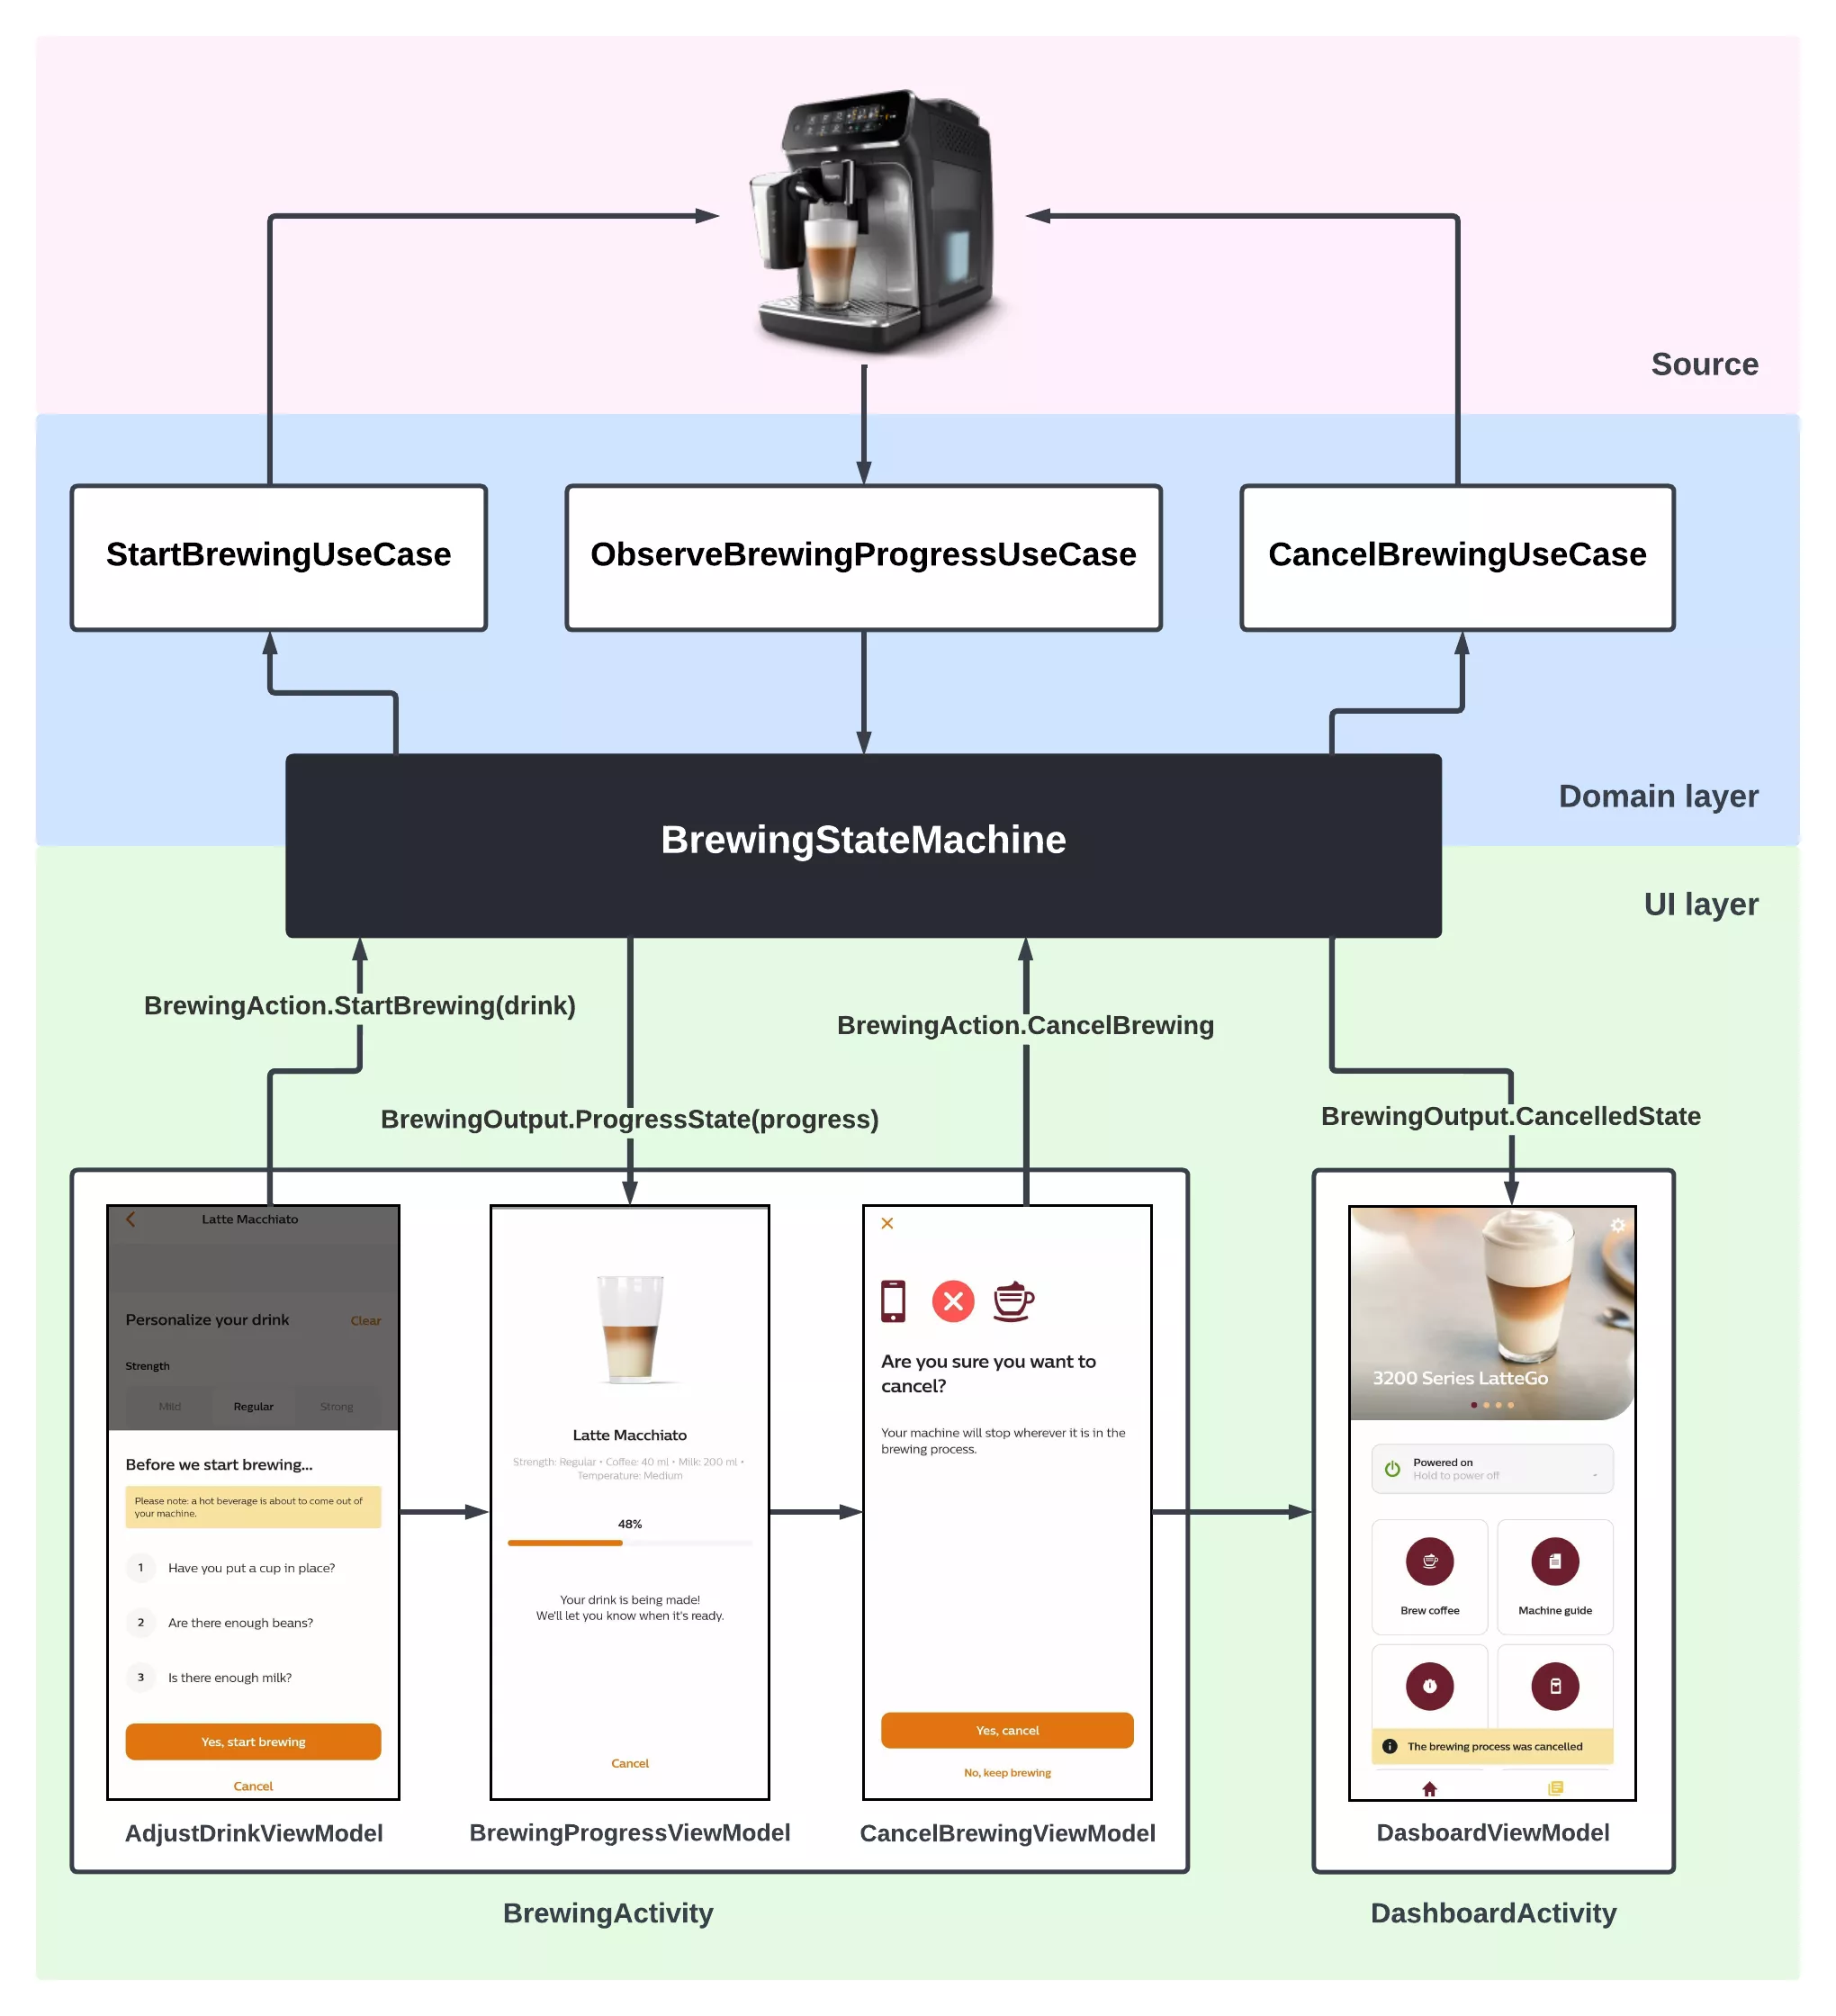
The example above shows a standard brewing navigation flow. First, when the drink parameters are defined, brewing is started inside AdjustDrinkViewModel by sending BrewingAction.StartBrewing(drink). BrewingStateMachine handles this action by calling StartBrewingUseCase and performs state transition to ProgressState. This state is updated by observing ObserveBrewingProgressUseCase, with each progress change from the machine being emitted as BrewingOutput.ProgressState(progress). The output is observed inside the BrewingProgressViewModel and the UI is updated accordingly. If the user decides to cancel brewing, BrewingAction.CancelBrewing is sent inside CancelBrewingViewModel and BrewingActivity is finished. Upon receiving this action, BrewingStateMachine cancels the brewing process by calling CancelBrewingUseCase and transitions to CancelledState. This new BrewingOutput.CancelledState is observed inside the DashboardViewModel and a snackbar is shown notifying the user that brewing was canceled.
State machine and onwards
We successfully added a much-anticipated feature for Coffee+ users. Enabling remote brewing was not a simple implementation, but we managed to tackle the challenges involved.
Working our way through the implementation, we got a very close look at the state machine. Let’s summarize some of its benefits:
- State machine acts as a single point of reference for controlling and observing the brewing process and can be used as such from any ViewModel inside the application.
- State machine is a lifecycle-independent component that has its own scope, meaning it will persist regardless of activity changes like in the example above.
- State machines are easily scalable by simply adding new states and actions, with states handling transitions without accumulating code inside the state machine.
- Most of the logic is stored inside the state machine component, preventing us from writing repetitive code elsewhere and having to test it individually.
The remote brewing feature is now fully functional, and our clean and scalable code will allow us to build upon it even further in the future.
To find out what else we can do in the Internet of Things realm, check out our IoT solutions page.


