


We explain the different ways of controlling Apple’s AUSampler and discover its hidden secrets – the essential features that didn’t make it into the documentation. Find out what they do and how to use them.
Developer documentation is an area in which Apple has recently made significant improvements. However, when it comes to audio documentation, some challenges persist, particularly for beginners.
A prime example of this is the case of AUSampler.
In the first two parts of this blog series, Exploring AU Sampler – Apple’s Mysterious Sampler Audio Unit and Can AU Sampler Survive Dynamic Chain Changes?, we delved into some of AUSampler’s secrets. In this blog post, we aim to provide a comprehensive alternative for the missing AUSampler documentation.
But, before we proceed, let’s take a step back and explore the various ways in which AUSampler can be controlled.
Designing an instrument for AUSampler
Apple frameworks offer various ways to utilize AUSampler. One of the simplest ways to start is by using a combination of AVAudioEngine and AVAudioUnitSampler. The very first problem that we need to solve here is to design an instrument that AVAudioSampler can understand, effectively outputting sound for the notes played.
AUSampler’s native instrument format is expressed in an AUPreset file, which is a standard property list file with a structure understood by each Audio Unit. Unlike some Audio Units with straightforward plist structures, AUSampler’s configuration is quite complex.
Instrument hierarchy and various options and keys were discussed in detail in Session 411 at WWDC 2011 (Music in iOS and Lion), unfortunately no longer available in Apple’s archive. In this article, we will take a brief look at the high-level workflow.
AU Lab AUSampler workflow
AU Lab is a digital mixing application that provides facilities for blending audio from the input of an audio device as well as audio generated by an Audio Unit Instrument or Generator. In addition, AU Lab can host Audio Unit effects and route audio through these effects.
AU Lab 2.3 Documentation
Due to the complexity of AUSampler’s instrument format, it is almost impossible to configure it manually. This is why AU Lab has emerged as the go-to tool for creating and editing AUSampler instruments. Packaged with the Additional Tools For Xcode, AU Lab can be downloaded on the Apple Developer website.
Once we install it, we can add an instance of AUSampler through the Edit → Add Audio Unit Instrument → AUSampler menu. This action will present a custom AUSampler view, allowing users to modify various instrument properties. Once satisfied with the configuration, the preset can be exported for further use.
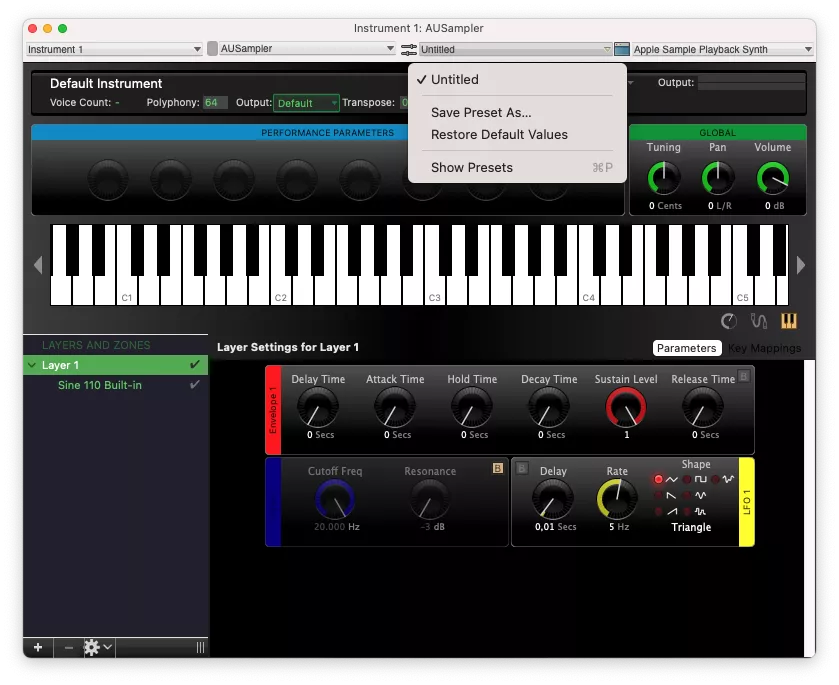
Saved presets are stored in a specific location. To access them, go to: ~/Library/Audio/Presets/Apple/AUSampler.
However, you can also easily navigate to them within AU Lab by pressing CMD+P, selecting a preset, and choosing ‘Show in Finder’ from the menu.

The default AUSampler property list files are more than 300 lines long! Here is an example of a preset’s high-level structure with irrelevant details removed:
<dict>
    <key>Instrument</key>
    <dict>
        <key>Layers</key>
        <array>
            <dict>
                <key>Amplifier</key>
                <dict></dict>
                <key>Connections</key>
                <array></array>
                <key>Envelopes</key>
                <array></array>
                <key>Filters</key>
                <dict></dict>
                <key>LFOs</key>
                <array></array>
                <key>Oscillator</key>
                <dict></dict>
                <key>Zones</key>
                <array></array>
            </dict>
        </array>
        <key>name</key>
        <string>Default Instrument</string>
    </dict>
    <key>fine tune</key>
    <real>0.0</real>
    <key>gain</key>
    <real>0.0</real>
    <key>pan</key>
    <real>0.0</real>
    <key>voice count</key>
    <integer>64</integer>
</dict>
Once you have obtained the AUPreset file, you can proceed to load it into AVAudioUnitSampler:
open func loadPreset(at url: URL) throws
This allows you to integrate the customized instrument into your audio app and take advantage of the rich capabilities offered by AUSampler.
Enabling a dynamic experience with AUSampler
While AUPreset files allow us to statically configure the sampler, music apps are more fun and enjoyable when they are interactive.
We would like to allow performers to play notes and adjust their instrument parameters in real-time. This dynamic experience allows them to receive immediate feedback and enhance their creativity.
How can we achieve such a dynamic experience?
Controlling AUSampler using Connections
In the context of AUSampler, connections provide a powerful mechanism to map source events to destination events, allowing for real-time updates and control. When we add an instrument in AU Lab or any other compatible environment, a default set of connections is automatically created.
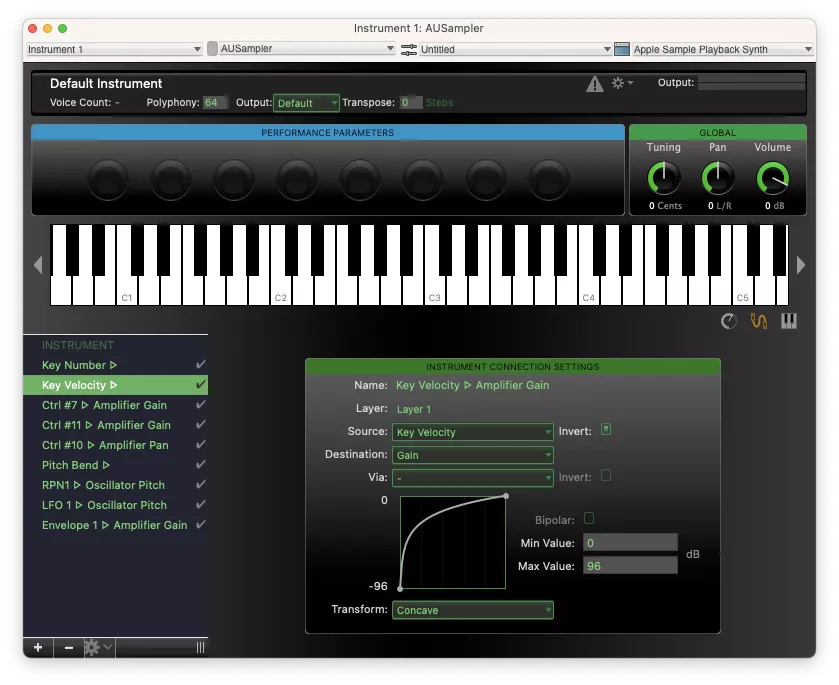
Let’s take a specific example to illustrate the concept of connections. One common connection is the ‘Key Velocity’ connection, which maps the velocity of the pressed key to the gain of a specific layer in the instrument. In simpler terms, when a performer hits a note with more force or velocity, it will cause a louder sound to be produced.
By establishing this connection, we can create a more expressive and nuanced playing experience.
Similarly, we can set up a ‘Gain’ connection, where the expression pedal controls the gain, or volume level, of the played notes:
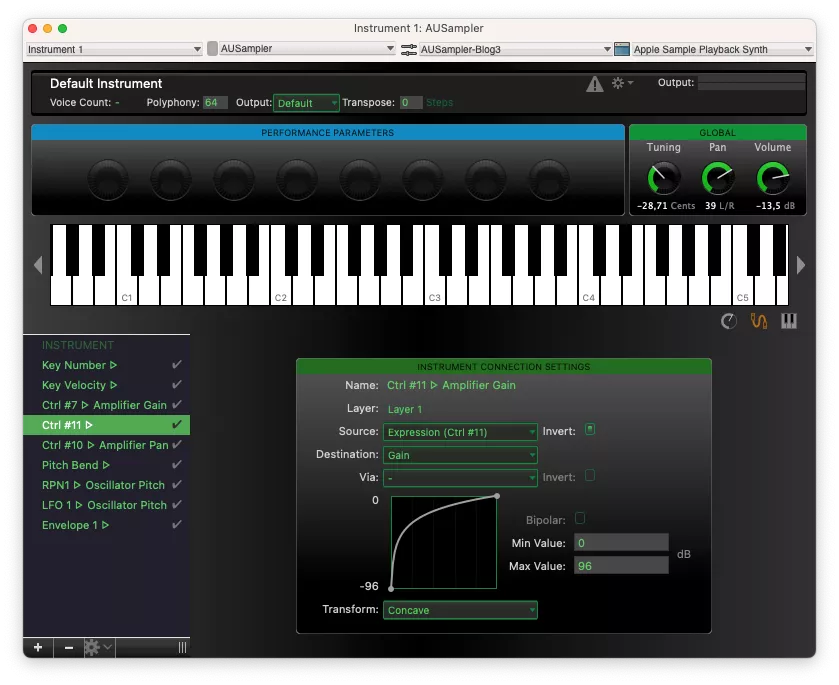
Let’s break down the structure of a connection:
- Name – The name of the connection. It helps users identify the specific connection within the system.
- Layer – A layer can contain multiple connections, and each connection belongs to a specific layer. This helps in organizing and separating different sound sources, effects, or parameters that are being controlled.
- Source – A source event that initiates or triggers the connection. This can be a range of things such as MIDI note on/off, controller input, or another parameter change.
- Destination – The destination is the parameter that the source event influences. For instance, the source event may be a MIDI note-on event, and the destination could be the pitch of a note or the volume of a sound.
- Via – The “Via” parameter often represents an intermediate control that the original source event has to pass through before it reaches its destination. It can be used to add additional control to the connection. For instance, the ‘Via’ parameter can be used to have a modulation wheel alter the effect of a key velocity-to-volume connection.
- Invert – This allows the control direction to be reversed. In an inverted connection, high source values result in low destination values, and vice versa.
- Transform – This determines the shape of the control curve (Linear, Convex, Concave, or Switch).
- Min Max – This controls the range of the destination parameter that the source can influence. “Min” is the value when the source is at its lowest, and “Max” is the value when the source is at its highest.
- Bipolar – A “Bipolar” parameter is one that has a center value, with both positive and negative deviations from this center value. This is often used with parameters like pitch bend or modulation, where the center value represents no change, and movements away from the center cause an increase or a decrease in the parameter.
Connections are a great and user-friendly way to set up a dynamic experience. Unfortunately, they only support a limited number of parameters that AUSampler exposes. Additionally, some of them simply don’t work.
Controlling AUSampler by updating in memory state
One useful feature of AudioUnit is its ability to load and export presets using AUPreset files. This functionality allows users to create and save their preferred configurations, making it convenient to switch between presets based on different situations.
When an AUAudioUnit is loaded with an AUPreset file, the state is stored in the fullState property. Any changes made to the configuration are reflected in this property as well. By dumping the contents of the fullState property into a new AUPreset file, users can save and load their customized settings at a later time.
We can use this to our advantage and dynamically modify the fullState property.
For example, if we want to control the resonance of the sampler, we can utilize the following approach:
func setResonanceAUPreset(value: Float) {
    let instrument = auAudioUnit.fullState!["Instrument"] as! NSDictionary
    let layers = instrument["Layers"] as! NSArray
    let layer = layers.firstObject as! NSDictionary
    let filters = layer["Filters"] as! NSDictionary
    filters.setValue(value, forKeyPath: "resonance")
    auAudioUnit.fullState?["Instrument"] = instrument
}
This method provides great versatility by allowing us to update any aspect of the sampler dynamically. It’s important to note that such modifications will require the sampler to reload its state, which will result in a momentary interruption in the sound output.
Controlling AUSampler by updating hidden properties
However, there is another approach that can be considered to be the most powerful. You might have noticed that the AUSampler custom view allows you to control sampler properties in real time. Taking our example of resonance, the resonance knob functions flawlessly in AUSampler custom view. We can play notes, and the resonance is updated instantaneously without any interruption in the sound output.
Can we somehow achieve the same effect, even when not in custom view?
In the first blog post of this series, we explored how to query the hidden Voice Count property by hooking into AudioUnitGetProperty. In our case, we need to go in the opposite direction and hook into AudioUnitSetProperty instead:
Intel:
rb "AudioUnitSetProperty$" --command "po $rsi" --auto-continue 1
ARM:
rb "AudioUnitSetProperty$" --command "po $x1" --auto-continue 1
This approach will provide us with the secret property ID (4162) that enables us to control the resonance property without any audio interruptions.
The missing AUSampler documentation
There is barely any mention of AUSampler property IDs in the Apple documentation. This is unfortunate because, as it turns out, following our approach of finding the property ID for resonance control, we can find a lot more powerful properties. But one more aspect of AudioUnitSetProperty remains unclear – inElement.
The documentation simply describes it as:
The audio unit element for the property.
For global properties, inElement is always zero, but how can we distinguish between resonance for Layer 1 and Layer 2?
There is a convention that AUSampler uses: every layer item has its base element ID, which increases by 0x00000100 for subsequent layers:
LFO – 0x10000000
Envelope – 0x20000000
Filter – 0x40000000
Zone – 0x70000000
Connections – 0x60000000
Thus, setting resonance for the given layer index requires the following code:
AudioUnitSetProperty(
    audioUnit,
    4162,
    kAudioUnitScope_LayerItem,
    0x40000000 + (0x100 * layerIndex),
    &value,
    UInt32(MemoryLayout<Float>.size)
 )
This provides us with the knowledge necessary to fully exploit the capabilities of AUSampler.
This table we’ve created contains the missing AUSampler documentation with hidden private property IDs and their descriptions.
This table we’ve created contains the missing AUSampler documentation with hidden private property IDs and their descriptions.
Drive AUSampler to its full potential
AUSampler is a powerful sampler that comes out of the box on both macOS and iOS. Its availability as a built-in tool makes it appealing to developers and musicians alike. By harnessing its Connections, AUPreset, and hidden properties mechanisms, we can drive AUSampler to its full potential.
With its unique features and reliable performance, AUSampler offers a compelling solution for incorporating sampled sounds into music applications. However, it is unfortunate that many of AUSampler’s features remain hidden from developers. We hope that this article has helped you to familiarize yourself with AUSampler and some of its lesser-known capabilities.
In the hopes of these features becoming more widely known and used, we’ve filed a feature request for Apple to publicly expose and document these properties:
If you want to go a little bit deeper, you can find the associated source code here.


