Approaching an accessibility audit
Accessibility is an organic thing and is something we have to have in mind at every stage of the development process. With EAA coming into effect, a bigger push to take digital accessibility to a higher level is present on all our projects. This requires us to perform large, all-encompassing accessibility audits. These take time and effort. But as we gather more experience and knowledge on the topic, we will all become more comfortable with it. Before we reach the state where we can develop fully accessible products and services continuously, we need to first make sure that our projects are meeting the standards. Here, accessibility audits come into play.
There are levels of possible scopes for these audits. They range from very detailed ones, where we check each WCAG criterion in detail on the defined flows, to performing shorter, more focused checks to quickly detect accessibility issues.
No matter which approach you take, there will always be two elements to the audit process - manual testing and automation tools.
Defining the audit scope
Accessibility audits are resource-heavy projects. Proper audits of projects can last for weeks or even months, depending on the scope. Usually, clients prefer shorter audits, which are limited in their scope. This already provides them with a clearer understanding of where their projects stand and provides them with concrete issues that they can start resolving. Oftentimes, resolving accessibility issues on projects comes in several iterations. This makes several shorter audits a viable option.
When defining such shorter scopes, it is a good idea to limit the audit to a few pages. It is best to define them together with clients, and tackle pages and user flows that are most important to their product. It is a good idea to audit the most impactful flows, or those that are visited most often. Ask them about the flows that serve the main purpose of the project or are the main revenue-making flow. We should recommend including those in the scope.
It is important to understand that projects are a living, ever-evolving thing, and accessibility is very much part of that. A meticulous audit that covers everything might quickly become obsolete after a few updates on a project that is changing fast.
Creating more accessible web products relies on iteration, education, and a continuous commitment to improvement.
The role of Lighthouse and other automated tools in accessibility audits
Performing accessibility audits is a lengthy process which we can improve using automated tools. Some focus on a wide range of accessibility issues, and some focus on testing a specific issue. In this chapter, we will take a closer look at Lighthouse, which is one of the more popular tools.
Lighthouse is Google’s open-source tool using the axe-core engine developed by Deque. It is an automated tool used for improving the quality of web pages. With it, we can test SEO, best practices, performance and, most importantly for us, accessibility.
Testing most of WCAG’s criteria cannot be automated in full. But some issues, particularly those tied to HTML semantics, can be detected with automated tools. Lighthouse can be used to check for alternative text for media, form labels, button and link names, correct use of ARIA attributes and contrast ratios, and many more.
Axe-core accessibility testing engine uses a different set of rules. It covers WCAG standards as well as several best practice rule sets that can help us identify common accessibility issues. A full list of rules that are checked with axe-core can be found in their documentation.
Lighthouse analysis settings
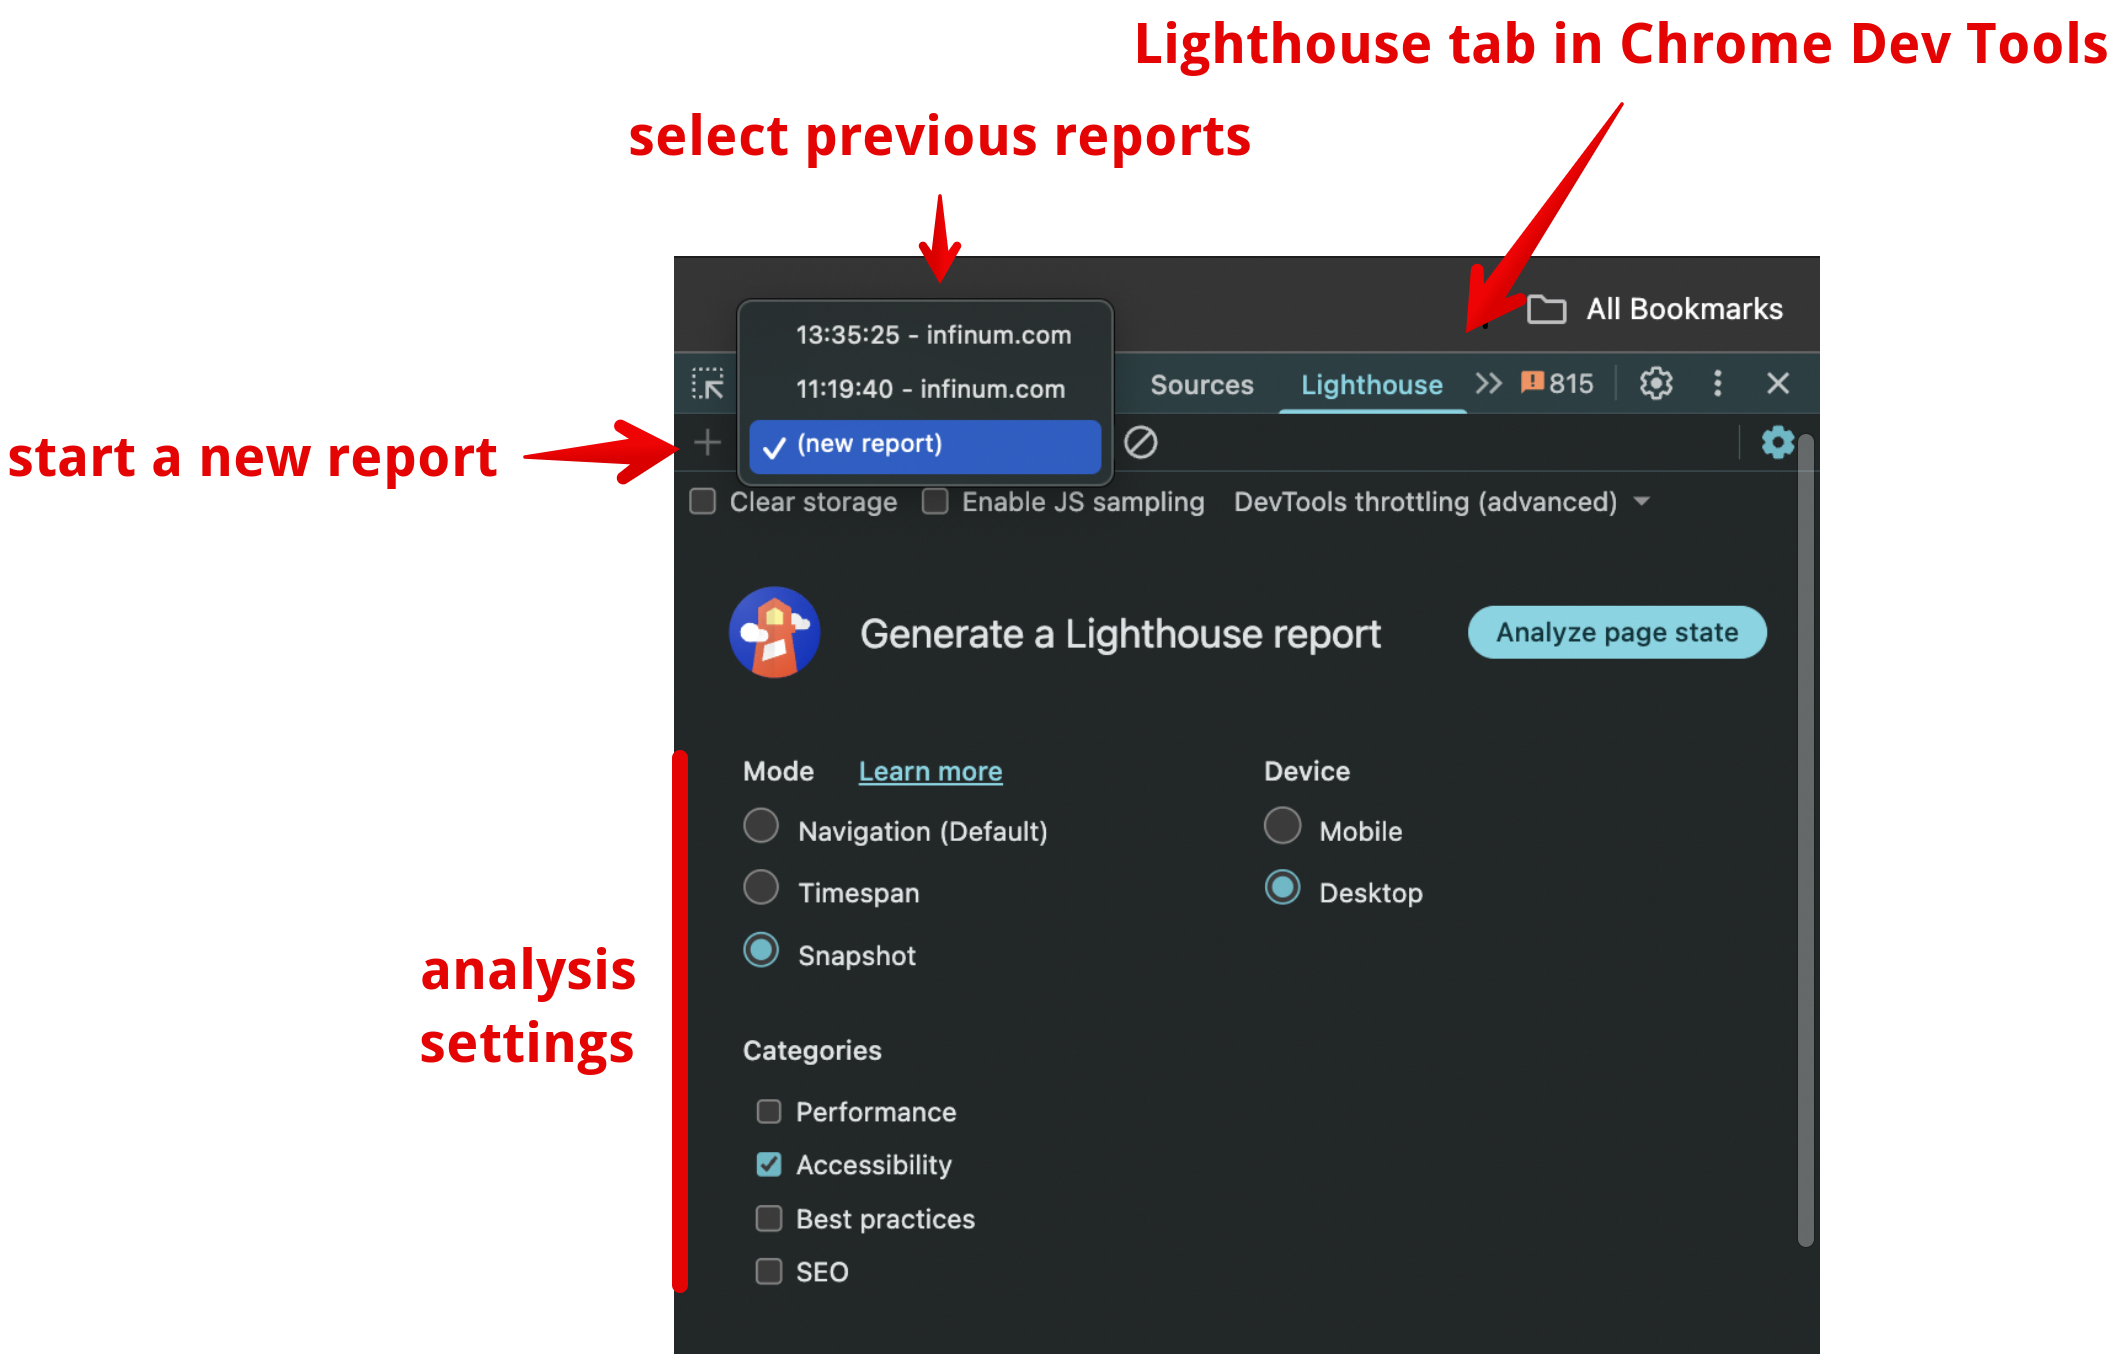
When starting with the Lighthouse run, you can define the analysis to fit your needs. You have several options to select, which are grouped into Mode, Device, and Categories. Categories are the different topics, and to save on time during audits, we can select only the option to cover accessibility.
Under Device, we can select either the Desktop or the Mobile option. This can be very useful, in case you are auditing a page where the mobile view is rendering different components. This also allows you to perform the mobile part of the audit on your desktop machine.
Mode group offers three options - Navigation, Snapshot, and Timespan. All three have their use cases, benefits, and limitations that we need to take into account.
- Navigation mode analyses a single page load. During the process, the page reloads and determines accessibility on the freshly loaded page that the users land on.
- Snapshot mode analyses a particular state of the page. This mode is useful when we want to analyse the page after some user interaction. This could be a semi-filled-in form (or already validated form with errors), opened modals, expanded collapsible sections, and in general, all situations that alter the initial state of the page through user input.
- Timespan mode analyses the page over a selected time period. This is useful if you want to test the performance of the page, but accessibility analysis is not possible in this mode.
When performing an audit on a longer flow that has several steps, Snapshot mode can come in very handy. Remember that each triggered analysis is displayed under its own “tab”, so you can keep them open during your session. This way, you don’t have to re-run them several times, in case you need to reference some findings from different steps.
Understanding Lighthouse reports
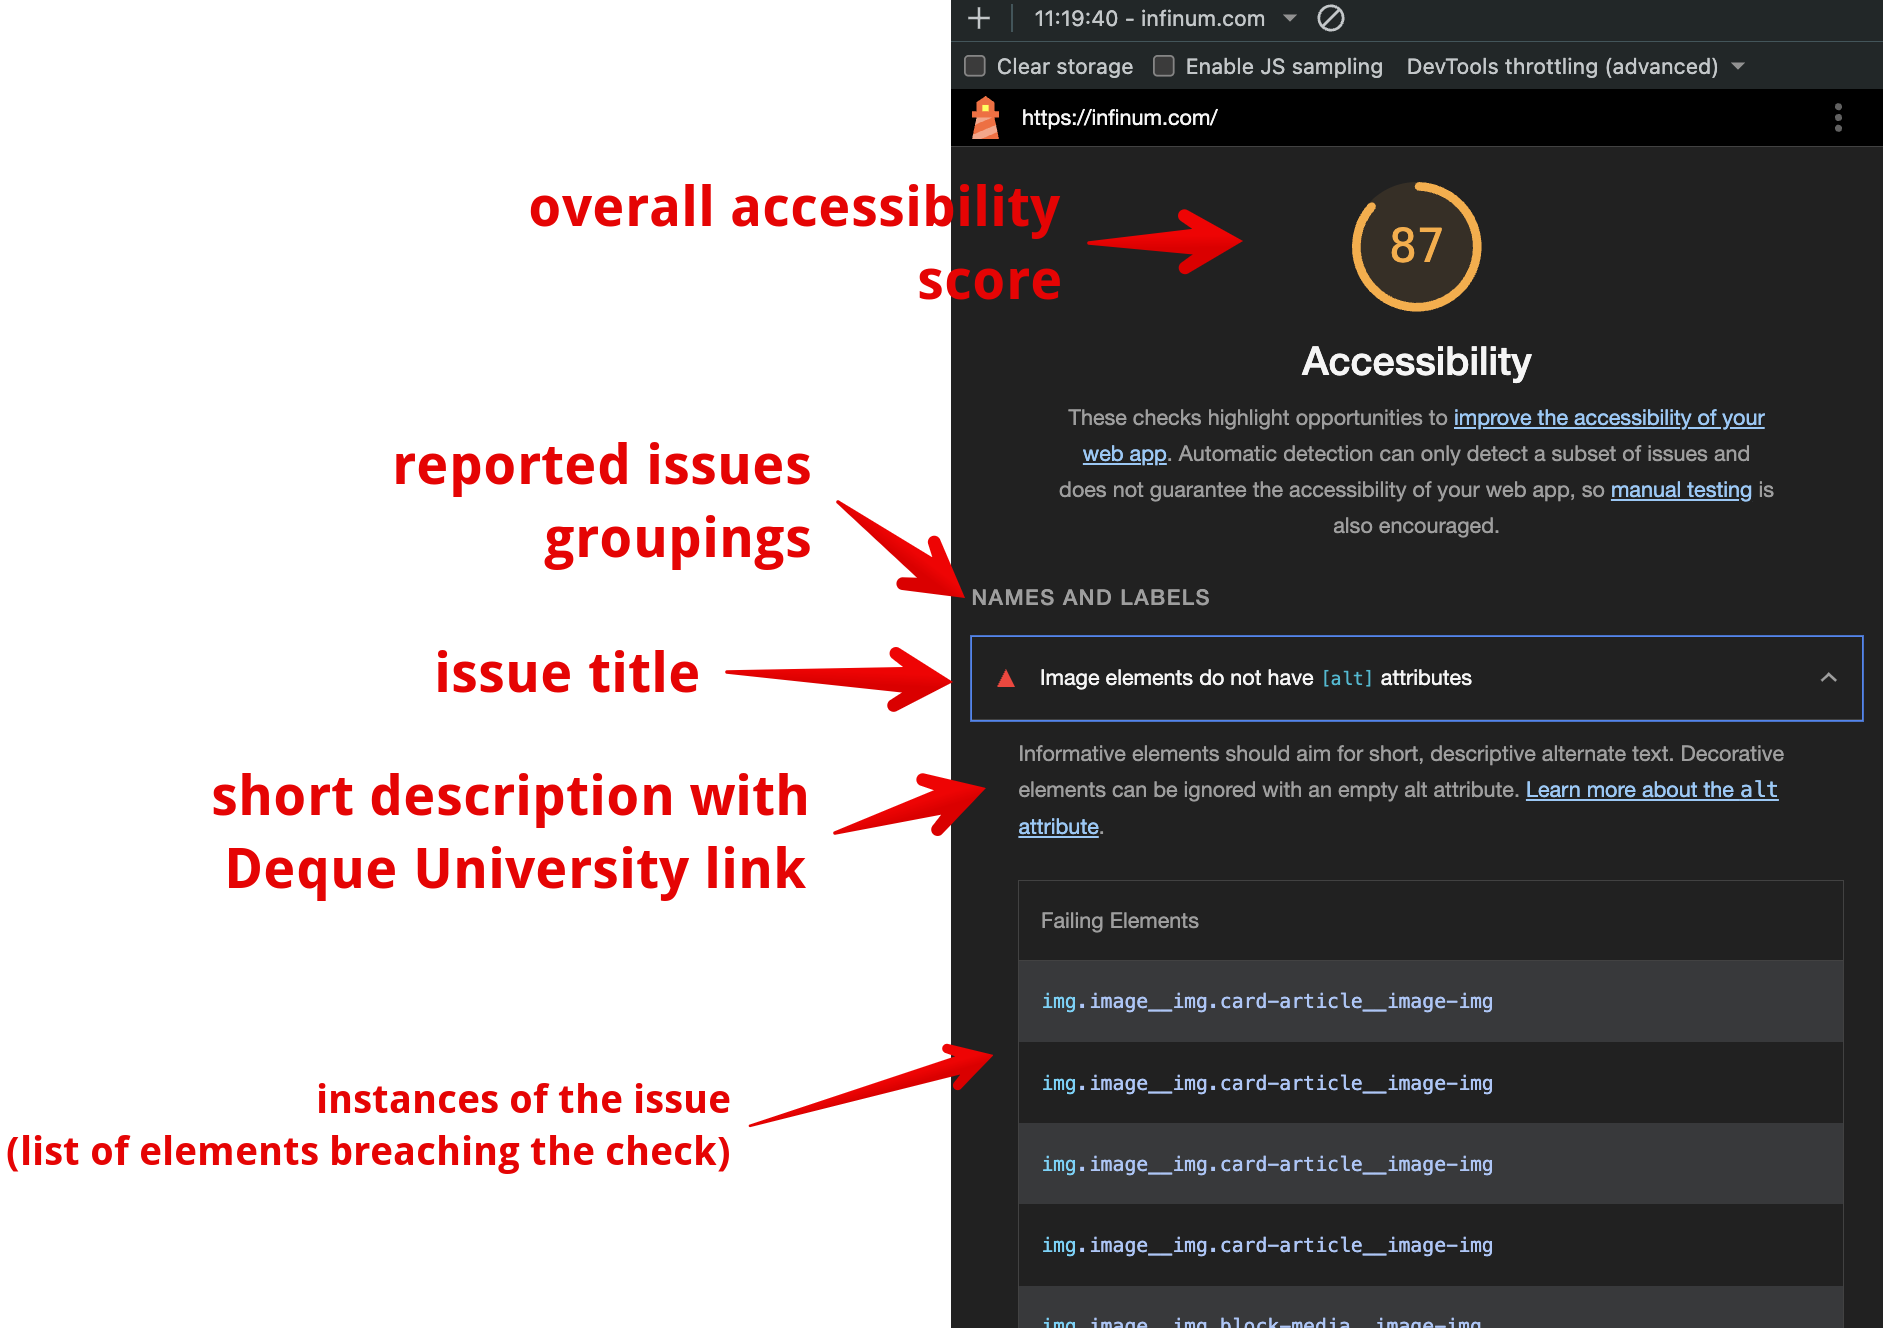
The overall accessibility score is returned using the Navigation mode (Snapshot mode gives the number of passed checks). It’s important to understand that this score should be taken with a grain of salt. A perfect score doesn’t necessarily mean that the page is fully accessible, and getting a score lower than 100 doesn’t mean that something is really wrong. There could be false positives that are lowering the score. Similarly, the perfect score can still mask some tangible accessibility issues.
Let’s take the alt attribute check as an example. Lighthouse looks for the presence of the alt attribute on media elements and reports the elements that don’t have it. But presence alone doesn’t mean that this alt attribute is implemented correctly. There are some new checks in the axe-core engine that check for any duplication of text values next to this element. For instance, an image next to a label or a heading element has the same alt attribute value as the text next to it, but this is only one of the possible issues. It’s always important to verify the results of the automated tests. If you are interested in how the overall accessibility score is calculated, you can read more about the individual checks’ weight in the Lighthouse documentation.
The analysis results have four main sections:
- Detected issues - grouped into different sections for better readability.
- Additional items to manually check - a helper list of topics to manually check, which the analysis determined could be at fault.
- Passed audits - a list of checks that passed.
- Not applicable - a list of checks that were determined not to be applicable based on the page structure.
Each reported issue is structured in the same way. It has a short description, a link to the Deque University page about this problem, and all instances of this issue found on the page. Each element that is in breach of the check is depicted visually, and with the DOM text representation. To find the elements easily, you can hover over the reported instance and the same element highlighting is set up as in the Elements tab of the Chrome Dev Tools, when you hover over an element in the DOM structure. The link to Deque University is extremely useful, as it explains why an issue was detected, how to test for it further, resolve it, and why it is important. It also has the information that is needed in our audit documentation, like severity, which WCAG criterion is in breach, and many others.
Alternatives
We focused here on Lighthouse because it is very approachable. All teams in Infinum can use it, and it doesn’t require deep technical expertise to detect and audit for accessibility issues. But it is by far not the only automated tool.
The strongest alternative is Axe, developed by Deque Systems. It utilises their axe-core engine, which is also used by Lighthouse under the hood. Axe is most approachable as a browser extension, but it shines as a CI/CD integration tool. In a future handbook chapter, we will delve deeper into how to use axe-core to continually audit all of our newly developed code.
Another popular alternative is WAVE, developed by WebAIM. This is a browser extension or an online tool that shines for visually spotting accessibility issues. You can read more about WAVE in the QA section of this handbook.
There are many more tools available, and in the end, they serve the same purpose - to make the web a more accessible and pleasant place for everybody. In the future, we will add additional chapters, where we will explore more tools in depth, and focus also on those that are not generally focused, but tackle very specific issues.
Shortcomings of automated accessibility tools
Automated accessibility tools can only do so much. It is estimated that they can test only about half of the necessary checks, with some numbers going as low as 20%. We should never rely only on them to gain a comprehensive understanding of the accessibility state of any given project. In the next chapter, we will focus on the manual part of accessibility audits, but before we move on, let’s take a look at where the automated tools fall short.
As already mentioned earlier in this chapter, there are false positives and negatives present in the reports. We covered the alt attribute example, but you might encounter other situations that would render some reported issues obsolete. For instance, when using the Snapshot mode when testing modals, the overlay over the page that is usually accompanying modals (and is also best practice) can be tricky. It often generates colour contrast reports with the content under the overlay. It is important to review the reports manually. You will go through most of the reports when preparing the audit documentation, but it is important to be mindful of the report shortcomings.
Automated tools don’t check for keyboard navigation and focus states, and they don’t use screen readers. This is one of the main points of the manual testing, and one of the main foundations of accessible web. We need to make sure that alt text is meaningful, section headers make sense (and that semantic HTML elements are used correctly). We need to determine if the links are structured correctly (the label is meaningful and provides enough tangible context). We also need to make sure that all parts of the page are accessible with a keyboard and that focus order and focus states are appropriate.
It is also hard to test dynamic content with automated tools. We need to check forms, notifications, modals, snackbars, and other dynamic flows. One big part of this is also components that are rendered fully only with user actions, like dropdowns and other expandable parts of the page.
And finally, context is everything. Testers can determine if different user flows, page interactions, and other dynamic parts are working in a meaningful, clear, and understandable way.
A note on writing audit documentation
Each reported issue should be checked through the linked documentation. There you can see what rulesets it breaches. Some reported issues are tied to some best practice rulesets and are not in direct breach of WCAG. You need to align with PMs or clients on whether these should be included.
When reporting an issue, you should add the severity assessment, define which WCAG rules it is in breach of, and provide a helpful description of the issue. This should include the location of the element that is in breach on the page, some short explanation of why it was listed as an issue, and your short suggestion on how to mitigate it. Of course, without access ot the code, it’s hard to give detailed suggestions, so covering a general idea on how to handle the reported situation is sufficient. If you can, you should add any helpful documentation.
To make things clearer, a screenshot should be included whenever possible.