


Snapshot testing is a simple way of comparing different states of the user interface, especially useful when refactoring code. Find out why, when, and how to use it.
Did you know that views can also take selfies? Yes, you read that correctly. Snapshot testing offers a simple way of capturing the current state of the user interface, proving to be incredibly useful in a number of situations in the development process.
While snapshot tests are sometimes mistaken for UI testing, they serve different purposes. Snapshot tests are designed to assess how content is displayed across various setups and screen sizes. On the other hand, UI tests focus on what is displayed on the screen.
It’s important to note that snapshot tests do not replace other forms of testing, such as unit or integration tests. Instead, they complement them by tracking visual changes in applications and act as a safety net during the process of refactoring UI code.
In this article, we’ll explore the realm of snapshot testing, including when and why it’s beneficial, its most common use cases, and provide a detailed guide on incorporating snapshot tests into your project.
The secret magic of snapshot testing
You might be wondering how snapshot testing works. Is it some sort of wizardry? It depends on your perspective, but it’s actually based on very straightforward principles.
The process takes place in three phases:
1
Recording the reference image.
A reference image or snapshot is a screenshot of the UI in a known good state.
2
Comparing the snapshot with the current state of the UI with a previous reference image.
This comparison is done pixel by pixel.
3
The reference image either passes or fails the test.
A test is considered passed if the pixels of the new screenshot match those from the previous snapshot.
We’ll delve deeper into the specifics of this comparison later on, including how closely these images need to match and how to make the appropriate adjustments (spoiler alert: it doesn’t have to be a 100% match).
How to write snapshot tests
Writing tests for SwiftUI and UIKit views
Before we get into writing the tests, we need to import the library that enables this, swift-snapshot-testing. It doesn’t matter whether your project is using SPM or CocoaPods, the library is very easy to add by following the steps of the repo’s README.
Creating the test class
The setup for creating snapshot tests is very straightforward. The first step is creating a test class. According to best practices, the name of that class should be the name of the class we are testing appended with the keyword Tests. Our test class needs to inherit from the XCTestCase class to facilitate testing.
Writing test cases
The test class can contain as many methods as we need to cover all test cases. In each method, we need to instantiate the view in a way appropriate for the case. We then check every test case with the help of the assertSnapshot method provided by the snapshotting library.
public func assertSnapshot<Value, Format>(
    of value: @autoclosure () throws -> Value,
    as snapshotting: Snapshotting<Value, Format>,
    named name: String? = nil,
    record recording: Bool = false,
    timeout: TimeInterval = 5,
    file: StaticString = #file,
    testName: String = #function,
    line: UInt = #line
)
As we can see by the method’s signature, the only two required parameters are of value, the view we are checking for accuracy and consistency, and as snapshotting, which allows us to set the precision with which the view is supposed to match the reference image. The rest of the parameters have default values that we can change on a case-to-case basis.
Here’s how we would write a test case for an AlertSwiftUIView.
class AlertSwiftUIViewTests: XCTestCase {
    func testAlertGeneralSetup() {
        let view = AlertSwiftUIView(
            item: .init(
                image: .MyProject.Images.Illustrations.success,
                title: "My success title!",
                description: "Very successful and nice description to celebrate your success.",
                buttons: [
                    .init(title: "CLOSE", theme: .primary, action: nil)
                ]
            )
        )
            .frame(width: 375, height: 600)
            .background(.black)

        assertSnapshot(
            of: view,
            as: .image(precision: 0.98, perceptualPrecision: 0.99)
        )
    }
 }
The same test case for the same view written in UIKit would look pretty similar.
class AlertViewTests: XCTestCase {
    func testAlertGeneralSetup() {
        let view = AlertView()
        view.configure(
            with: .init(
                image: .MyProject.Images.Illustrations.success,
                title: "My success title!",
                description: "Very successful and nice description to celebrate your success.",
                buttons: [
                    .init(title: "CLOSE", theme: .primary, action: nil)
                ]
            )
        )
        view.backgroundColor = .black

        assertSnapshot(
            of: view,
            as: .image(
                precision: 0.98,
                perceptualPrecision: 0.99,
                size: .init(width: 375, height: 600)
            )
        )
    }
}
It’s important to note that if you don’t specify the size parameter when generating the reference image for testing a UIKit view, the snapshot will not be recorded. Instead, we’ll get an image that displays the following error message:
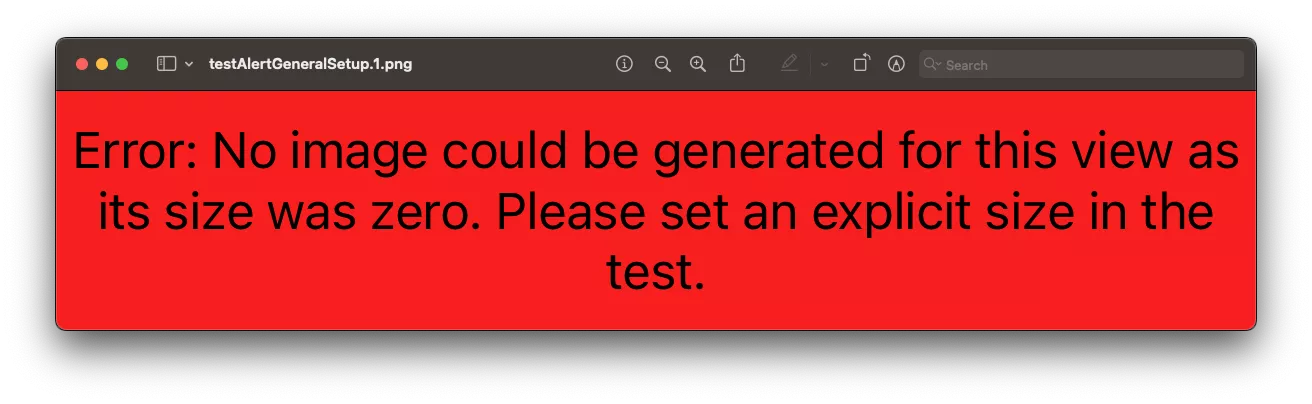
On the other hand, the snapshot image of a SwiftUI view will potentially appear in weird dimensions but still be recorded.
Generating the reference image
As we explained above, snapshot testing compares the current state of the user interface to a saved reference snapshot of it. Now, unless we have a reference image stored somewhere first, we have nothing to compare our current state with.
The first time we run these tests, we want to provide a record parameter to the assertSnapshot method and set it to true. This parameter generates and saves a reference snapshot. This way, we can keep running our tests and checking against this reference.
The cool thing about this is that if you forget to add this parameter the first time you try running the test and assertSnapshot fails to find the reference, it will create it for you regardless. However, we want to do this explicitly to avoid any random mistakes.
Important note: Make sure to remove the record parameter after running the tests for the first time. The tests will fail until you run them without the record mode on.
assertSnapshot(
    of: view,
    as: .image(
        precision: 0.98,
        perceptualPrecision: 0.99,
    ),
    record: true
 )

Writing tests for SwiftUI VIPER views
We’ve looked into writing test cases for views that were components, meaning they only took part of the screen. What if we wanted to test how the whole UI behaves when displayed on different devices with different screen sizes?
We tried out this scenario with SwiftUI views. When talking about views in this section, we are referring to the view component from the VIPER architecture since it’s our architecture of choice at Infinum. This also means that these views consist of multiple view components that we tested above.
Creating a test for these views is even simpler than the ones for testing components. We only need to initialize the view and then use the assertSnapshot method provided by the snapshotting library to check how the view looks on a smaller or bigger layout.
The record parameter is used only the first time we run the test so that a reference snapshot is saved. After that, we need to rerun the test with that line of code removed, just like we did when testing the components.
class PrepareForSetupViewTests: XCTestCase {
    let interactor = PrepareForSetupInteractor()
    let wireframe = PrepareForSetupWireframe()
    lazy var presenter = PrepareForSetupPresenter(
        interactor: interactor,
        wireframe: wireframe
    )
    func testPrepareForSetupView() {
        let view = PrepareForSetupView(presenter: presenter)
        assertSnapshot(
            matching: view,
            as: .image(layout: bigLayout),
            named: "iPhone13ProMax",
            record: true
        )
        assertSnapshot(
            matching: view,
            as: .image(layout: smallLayout),
            named: "iPhoneSe",
            record: true
        )
    }
}
The bigLayout and smallLayout are custom layout configurations representing a bigger and smaller screen size.
var smallLayout: SwiftUISnapshotLayout {
    var layout: ViewImageConfig = .iPhoneSe(.portrait)
    layout.safeArea = .zero
    return .device(config: layout)
}
var bigLayout: SwiftUISnapshotLayout {
    var layout: ViewImageConfig = .iPhone13ProMax(.portrait)
    layout.safeArea = .zero
    return .device(config: layout)
}
How we rewrote UIKit views in SwiftUI – a case study
We worked on a project that included a number of UI components that were used as building blocks for constructing large screens. From the perspective of the screen using the components, a component is just a simple UIView.
We decided to do a major rewrite of all of the components where we wanted to use SwiftUI for implementing them. However, there was a catch. We had to rewrite more than 50 components in SwiftUI. With a tight deadline, we didn’t want to make any mistakes in the rewrite process. Snapshot tests came to the rescue.
We were able to generate snapshots of the components in their initial state and then wanted to capture snapshots of the same component after the rewrite. If the tests failed, we would know that the rewritten component had a different visual behavior, which would mean the rewrite wasn’t successful.
However, there is a difference in how you create snapshot tests for UIKit and SwiftUI views, and we didn’t want to change the tests’ implementation after we rewrote the component to SwiftUI. The idea was to have the same code that generated the snapshots for UIKit to now generate the snapshots for the SwiftUI view.
Here’s an interesting fact about the architecture of SwiftUI and UIKit components – they don’t differ at all. We could have the exact same protocol defining the ComponentCreator for both SwiftUI and UIKit components.
protocol ComponentCreator {
    func createView() -> UIView
}
The caller of the ComponentCreator class was still implemented in UIKit. For that reason, we needed to supply a UIKit view to the caller, even if the component was written in SwiftUI.
Thanks to this approach, we were able to get both SwiftUI and UIKit components at the same time.
But how did we manage to create a UIView instance from a SwiftUI view? The implementation is quite simple, so let’s check out a concrete ComponentCreator class that implements the createView method:
func createView() -> UIView {
    let exampleComponentView = ExampleComponent() // SwiftUI view
    let hostingController = UIHostingController(rootView: exampleComponentView)
    return hostingController.view
}
It worked! The view was successfully created by the caller, and the implementation seemed to work correctly.
To return to the snapshot tests, let’s give an example of a component going through a rewrite.
First, we have a component that is implemented using UIKit with the name ExampleComponent. Let’s create some snapshots. For now, we will be using the default assertSnapshot method provided by the library.
class ExampleComponentSnapshotTests: XCTestCase {
    func testExampleComponent() {
        let creator = ExampleComponentCreator()
        let view = creator.createView()
        assertSnapshot(matching: view, as: .image, record: true)
    }
}
Snapshot:

Let’s rewrite the component in SwiftUI, remove the record flag from assertSnapshot inside the test method, and see if the rewrite was successful.
Unfortunately, this test has failed, and if we look at the snapshot, the component isn’t even remotely close to the original snapshot or the implementation.

To fix this issue, we decided to recreate the screen that the component is displayed on but in a test environment since the component looks good when we add it to a regular UIViewController. The assumption is that it will also look good in the snapshot when we recreate this behavior.
Let’s add two new methods:
extension XCTestCase {
    private enum Constants {
        static let iphone14Size = CGSize(width: 390, height: 844)
    }

    private func createScreenshotTestView(creator: ComponentCreator) -> UIView {
        let view = creator.createView()
        let containerView = UIStackView()
        containerView.addArrangedSubview(view)
        let scrollView = UIScrollView()
        scrollView.addSubview(containerView)
        scrollView.backgroundColor = .white
        containerView.widthAnchor.constraint(equalTo: scrollView.widthAnchor).isActive = true
        containerView.pinToSuperview()
        scrollView.frame = CGRect(x: 0, y: 0, width: Constants.iphone14Size.width, height: Constants.iphone14Size.height)
        scrollView.setNeedsLayout()
        scrollView.layoutIfNeeded()
        return scrollView
    }

    func assertComponentSnapshot(
        record recording: Bool = false,
        file: StaticString = #file,
        testName: String = #function,
        line: UInt = #line,
        creator: ComponentCreator,
        precision: Float = 1
    ) {
        let view = createScreenshotTestView(creator: creator)
        assertSnapshot(
            matching: view,
            as: .image(precision: precision),
            record: recording,
            file: file,
            testName: testName,
            line: line
        )
    }
}
When we have recreated the environment where we use the components that we are rewriting, we need to create a new snapshot of the original UIKit component. This way, when we rewrite the component in SwiftUI, we don’t need to change a single line of code. We can just run the tests again and check if the rewrite was successful. Now the SwiftUI and UIKit views should behave the same.
What if your views include remote images?
In iOS development, we often use images that are stored on a remote server. This could cause problems when generating snapshot tests since we don’t want to do remote resource fetching in our test environment. For example, a popular framework for fetching remote images in iOS is Kingfisher.
What would be the easiest way to handle remote images in the test environment? Let’s illustrate this with an example.
Let’s suppose we have an image of the globe hosted on Imgur and a view that fetches the image using Kingfisher:
struct ExampleComponentView: View {
    var body: some View {
        VStack {
            Text("Hello, World!")
            KFImage(URL(string: "https://i.imgur.com/hAgfcId.png"))
                .resizable()
                .frame(width: 100, height: 100)
        }
    }
}
Let’s also add this image to the local resources. If you decide to implement this on your project, you can use any mock image for snapshot tests. For this example, we will use the same image that is hosted on Imgur.
We are going to manually manipulate the Kingfisher cache and store the local mock image for the URL of the hosted image. This will prevent Kingfisher from fetching the image.
class ExampleComponentSnapshotTests: XCTestCase {
    private enum Constants {
        static let mockImageUrl = "https://i.imgur.com/hAgfcId.png"
        static let mockImage = UIImage.world
    }

    override class func setUp() {
        super.setUp()
        KingfisherManager
            .shared
            .cache
            .memoryStorage
            .store(value: Constants.mockImage, forKey: Constants.mockImageUrl)
    }


    func testExampleComponent() {
        assertComponentSnapshot(record: true, creator: ExampleComponentCreator())
    }

    override class func tearDown() {
        KingfisherManager
            .shared
            .cache
            .memoryStorage
            .remove(forKey: Constants.mockImageUrl)
    }
}
This implementation results in the following snapshot:

The precision trap in snapshot testing
As we mentioned above, snapshot tests can pass even when the new capture isn’t pixel-identical to the reference. You might be wondering how this works. The answer lies in the parameters we purposely didn’t go into until now: precision and perceptual precision.
A snapshot test can fail or pass depending on how you set the precision parameters so it’s important to carefully choose their values.
By default, precision is set to 1 or 100%, meaning each pixel of the capture should match each pixel of the reference. However, in some cases, we may not want to go for 100% precision because it might be causing our tests to fail.
For example, a common reason for failing tests are minor differences in interfaces arising from different architectures in hybrid teams using both Apple silicon and Intel machines or due to anti-aliasing. To avoid this, we can decrease the precision by 0.01-0.04, depending on how much we need these failing tests (that are fundamentally matching) to pass.
According to the library’s documentation, perceptual precision is “the percentage a pixel must match the source pixel to be considered a match”. This actually means that the pixels get compared on the basis of how similar they are according to the human eye, that is, if the human eye can see the difference between the pixel from the newly made snapshot and the reference image. The precision of the human eye is between 98-99%. For that reason, we can safely use 0.99, i.e., 99%, for the perceptual precision parameter.
assertSnapshot(
    of: view,
    as: .image(precision: 0.98, perceptualPrecision: 0.99)
)
Important note: Pay attention to your failing tests and make sure the reason they are failing is really some factor like those mentioned above and not a human error. If you find yourself decreasing the precision to less than 95%, you might want to ask yourself if you’re doing something wrong. It’s okay to slightly tweak the precision. It is not okay to completely invalidate the purpose of snapshot tests.
When to use snapshot testing
You might be wondering if snapshot tests are a good fit for your project. The answer is – it depends.
If you only have static views that don’t change visually, snapshot testing capabilities could be a great way of confirming that changes to the implementation don’t cause the view to change visually. Also, if you are considering rewriting your UIKit views in SwiftUI like in our example above, then you are in for a treat. Snapshot tests will work great for you. You can create snapshots of the UIKit view before the rewrite and then compare the rewritten view in SwiftUI with the old UIKit snapshot. If the test succeeds, you know you did a good job since the component didn’t change visually.
On the other hand, if you constantly make changes to your views and you’re not planning any kind of refactoring, snapshot testing doesn’t make much sense because the tests will constantly fail and give you headaches. You will constantly need to update the snapshots just so your tests don’t fail.
Another thing to consider is that snapshot testing requires you to include one more third-party library in your project because there are no native solutions for implementing snapshot tests.
Pros:
- Snapshot tests are great for UIKit to SwiftUI refactors since they will confirm that the views didn’t visually change.
- They catch unwanted visual changes in views. This is especially useful if you have a lot of views that shouldn’t change and you are doing some implementation changes in them.
- Easy to set up, especially if you follow this blog post.
Cons:
- They can give you a hard time if you need to visually change your views often. They will constantly fail, and you will need to create new snapshots.
- One more third-party dependency that needs to be added to the project.
Snapshot testing – a great asset to be used with care
Snapshot tests are very easy to set up and even easier to write. They provide important information about the look and consistency of our UI and therefore provide additional value, especially when combined with other types of tests.
However, you should assess whether adding these tests to your project is truly worth it. If the development is very dynamic and the UI is constantly changing, we recommend skipping them. We don’t want to spend more time modifying snapshot tests so that our builds pass successfully instead of having them show us that our UI is actually broken. So stay ahead of the curve with snapshot testing capabilities, but remember to use them with care.


