
As developers, we’re always looking for new ways to tailor OS X to our own needs. Here’s a rundown of apps that make our lives easier and tweaks that will probably change the way you’re using your Mac, too.
We’ve already covered a handful of tips in the previous article that deals with OS X optimization. While the first article is great if you’re just starting with OS X, this time around we’d like to dig deeper and point out some more advanced tips and tricks which are heavily developer-oriented.
Dock

First things first, let’s provide some more screen estate. Having the Dock take up a pretty big chunk of your screen is bad, especially on widescreen displays, where the Dock sits at the bottom and eats away precious height.
Dock position
With widescreen displays, it makes sense to put the Dock on either the left or right side of your screen (Dock Preferences – Position on screen).
Auto hiding
With Spaces and various shortcuts in place, the Dock takes a back seat in managing your apps. That’s why it makes sense to auto hide the Dock.
There’s just one problem – the Dock is a bit sluggish when popping up. There are two ways to tweak it.
Auto hide delay tweaking
Enter this into Terminal to make the Dock show without a delay :
defaults write com.apple.dock autohide-delay -float 0; killall Dock;
Maybe you want to have a long delay (5 seconds) so that you never accidentally trigger the Dock:
defaults write com.apple.dock autohide-delay -float 5; killall Dock;
To restore defaults:
defaults delete com.apple.dock autohide-delay; killall Dock;
Animation speed tweaking
Enter this into Terminal to make the Dock show without animations :
defaults write com.apple.dock autohide-time-modifier -float 0; killall Dock;
It’s still nice to have a short animation (0.2 seconds) and this line makes it possible:
defaults write com.apple.dock autohide-time-modifier -float 0.2; killall Dock;
To restore defaults:
defaults delete com.apple.dock autohide-time-modifier; killall Dock;
Finder

Show hidden files (dot files)
Enter this into Terminal (warning: it’s going to restart your Finder):
defaults write com.apple.finder AppleShowAllFiles TRUE; killall Finder;
To restore default behavior:
defaults write com.apple.finder AppleShowAllFiles FALSE; killall Finder;
XtraFinder
Use XtraFinder – it’s a free Finder tweak tool that adds lots of useful functions.
Our favorites:
- Chrome-like tabs
- Opening new Finder windows as tabs (by executing
open .from Terminal, for example) - Cut functionality (with the standard
Cmd + Xshortcut) - Arranging folders on top
- Hiding dot files on Desktop
Initial Finder view
This is more of a performance tweak. Having All My Files shown as the default screen when you open up can seriously slow down your initial opening of Finder.
Go to Finder Preferences and change New Finder windows show to something else, like your user folder.
Terminal

Terminal is a beast and you can find many tips and tricks for it. Here’s a selection of tweaks we use every day.
Reverse-i-search
If you want to find and execute a command that you know you’ve executed before, try using Ctrl + R and start typing any part of the command. You’ll get filtered results that let you narrow them down to the command you’re looking for.
zShell
zShell is a Unix shell that is a great replacement for bash.
It brings many new features to the table like plugin support and themes.
The plugins we use most of the time are: plugins=(git git-flow ruby sublime brew bundler gem osx)
z
For example, z pr would probably take you to your projects folder.
iTerm
iTerm is a great replacement for Terminal with many preferences to tweak.
Keyboard
Shortcuts
OS X has a really powerful Shortcut management system. Open up Keyboard preferences – Shortcuts and you’ll see lots of system shortcuts.
The real power lies in App Shortcuts – here you can define shortcuts for Menu entries in apps.
Here’s how:
- Add a new shortcut (click on +)
- Go to the app to which you want to assign a shortcut and find the Menu entry for which you need a shortcut. Remember the exact text of that Menu entry.
- Back to Keyboard preferences – select the app from the dropdown, enter the text of the Menu entry and input your shortcut of choice.
Tab switching
This is something that makes sense to have system-wide – switching to the left or right tab.
We assign this shortcut to Alt + Cmd + Left and Alt + Cmd + Right for navigating the tabs to the left or right, respectively.
Some apps have this shortcut hidden in their own preferences and you’ll have to look for it there (iTerm, for example).
Browsing all UI controls
OS X doesn’t allow you to navigate all UI controls like switching between OK and Cancel in a dialog with the Tab key. To change that, look below the list of your shortcuts and select the All controls radio button.
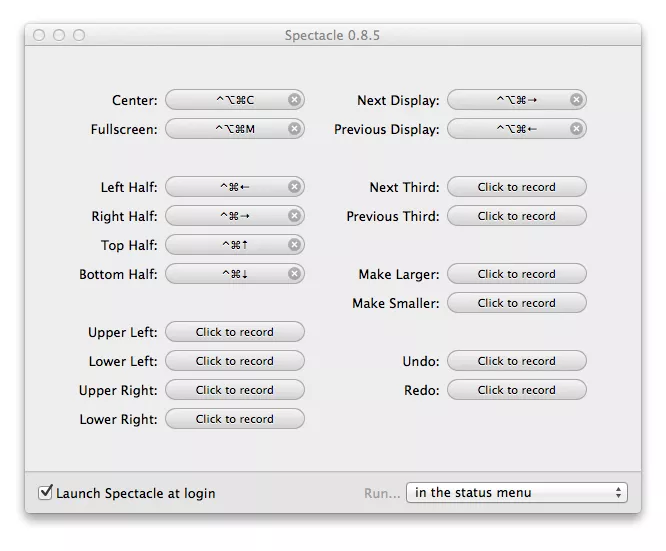
Spectacle
We’ve already covered Spectacle in our previous article, but here’s a rundown of how to configure it for a multi-display work environment.
After installing Spectacle, open up the Preferences dialog and disable all shortcuts. You’ll want a clean slate to avoid any shortcut clashing.
The settings we recommend are:
- Fullscreen
Ctrl + Alt + Cmd + M
Our most used shortcut, bar none. This doesn’t actually make an app full screen, but maximizes it, and that’s just what we need. Maximized Chrome or Sublime? Yes, please.
- Left Half and Right Half
Ctrl + Cmd + LeftandCtrl + Cmd + Right
Since all displays today are widescreen, it would be a shame not to use this to our advantage. Put one app on the left half and another on the right half and you’ve got a great setup.
Protip: Repeating this command makes an app use one third or one fifth of the screen. - Next Display and Previous Display
Ctrl + Alt + Cmd + LeftandCtrl + Alt + Cmd + Right
Quickly change an app from one display to the other. If you’re using multiple displays, this one is a great timesaver.
Multiple Spaces
Spaces are virtual desktops that allow you to place apps inside them. Organize apps into spaces and you’ll have an easier time remembering where each app that you’re using is located.
Example of app organization
One way of organizing apps is dividing your workspace into two Spaces: Development and Communication.
Put all your dev apps (Chrome, Sublime, Terminal…) into the Development space and all your communication apps (Skype, Adium, Airmail…) into the Communication space.
Assigning apps to spaces
To make these apps open up always in the same space – right click them in the Dock and select Options and then Assign to – This Desktop.
Need to have an app show up in all Spaces? Select Assign to – All Desktops.
Easy app handling
Open up Mission Control (F3 button or three-finger swipe up on your trackpad) and drag apps from one space to another.
In conclusion

There are lots of tweaks and great apps still left to discover. We’re building up our own list of industry standards, recommended libraries, beginner guides and best practices to bring such knowledge to a wider audience.
If you have any killer tips that make your workday easier, let us know in the comments below.