Commit early, commit often
Naming a repository follows this pattern:
{technology}-{project name}
with allowed characters [a-z\-]. technology is usually wordpress, but can be some other PHP framework like laravel or symfony.
Your repository should consist of several main branches: main, staging and some optional: preproduction, edge, and feature (depending on the project).
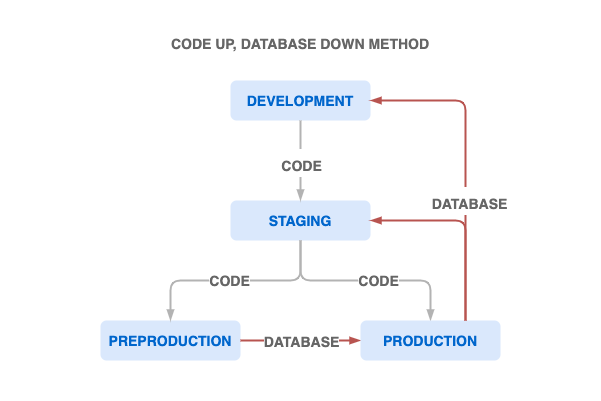
Modified Git flow
Before the DevOps set up deploy scripts and any kind of CI/CD (Continuous Integration/Continuous Deployment), a team lead will create an empty project from the project template. This template contains all the instructions on setting up the project.
Always branch off the main branch into a feature branch, and never commit directly to it. The main is usually protected against that, but better safe than sorry.
The main branch should always be deployable
When submitting a patch, fix or a new feature, always open a new branch and pull from the main branch. For example, a feature would be:
feature/adding-new-user-roles.
When you get at least one approve, you can locally merge the branch into the staging branch and then push it to the remote repository. The staging branch is usually connected with a staging server using build and deploy scripts.
Once you get confirmation from QA and/or the client that the feature is ready for production, you can merge it in GitHub to the main branch. Manual merges and direct pushes from the local main branch are not possible in the case of a main branch.
If the branch you want to work on depends on a branch that is still being worked on, pull the changes from that branch into your branch to get updates (cherry-pick or rebase on top of it). Be sure to track the changes on that branch.
The main branch has to be tagged according to SemVer before the release. A short introduction to SemVer can be found here.
Make sure to correctly label your releases. It would be best if all the features in Productive are tagged accordingly as well: features that will be in the initial release should be tagged with version 1.0.0, any feature after that will increase the second version number, and any bugfix the third number.
If some feature won't be ready for production, but you've already merged it to staging it's crucial that that PR is labeled correctly so that the release branch can contain only the relevant commits.
Staging should never be directly merged to production!
Conflict resolution
In case of conflicts, don't panic
Conflicts happen when two separate branches made a change to the same line in a file (or delete a file in one branch). When you're working alone on a project the conflict usually happens when you merged one change to one branch, and hadn't synced the new branch where you are developing a new feature.
Trying to merge such changes would mean one version would be overwritten, so in this case Git will say it cannot automatically merge changes, but must choose which change you want to include.
Don't fix conflicts on GitHub.
If you try to fix a conflict on GitHub, the GitHub will simply merge the branch you want to merge your changes to, and close your PR when the conflict is fixed. Which kinda makes the review process moot.
The best way to fix conflicts (if you are working alone on a branch) is to rebase on top of the branch you want to merge to. That way you will be able to fix any conflict and the commit will look cleaner.
If you're not sure what to do, ask someone who is. 🙂
Do not submit PR that has over 100 changed files
There are many reasons why submitting a huge PR is bad. The first one is that it can crash your browser if you are inspecting it on GitHub. The second one is that it will take a lot of time to review it, and the reviewer will most probably just skim through the PR because they have other things to do. When submitting a PR, ask yourself, "Would I want to review this?"
Also write good Git commit messages. Commit messages should be short and clear. Write the subject in the imperative mood. A properly formed Git commit subject line should always complete the following sentence:
If applied, this commit will *your subject line here*
More on writing good commit messages can be found here.
Make small commits, following the Single Responsibility Principle on Git. This makes commits easier to review when doing pull requests, and it's easier to see what is going on when something goes wrong.
Don't use git add . Review what you're adding to your repo—this is the #1 cause of making unwanted changes.
Here you can watch a presentation on common issues and reasons for writing good commit messages.
Release Procedure
Releases are deployable software iterations you can package and make available for a wider audience to download and use.
When deploying the site to production, it is expected that a bundled GitHub release is created. Releases also help us keep track of merged features.
Releases are based on Git tags, which mark a specific point in your repository's history.

Every PR preceding a release needs to be labeled with the upcoming release tag (milestone). Labeling provides an option to automatically add the markdown for all the merged pull requests from the diff and contributors of the release. Which can be useful if when combined with well written commit messages.
For the actual step-by-step guide it is best to follow the Creating a release official guide.
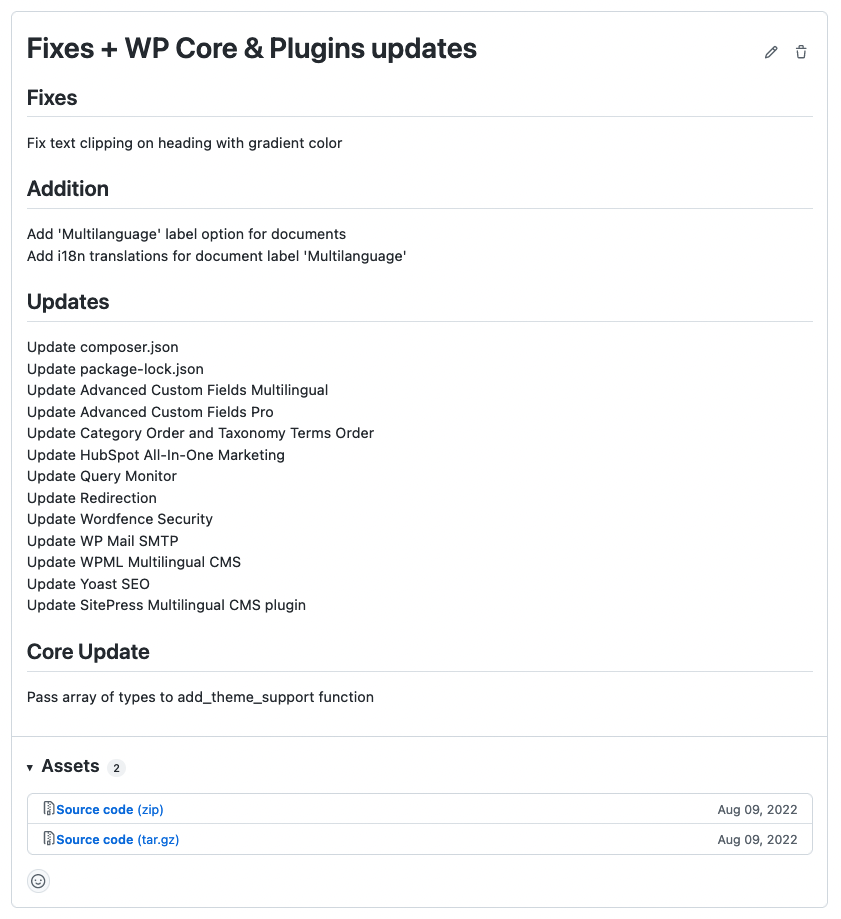
Releases usually contain either fixes, updates, additions or all of the above. So for the actual description it is best to create a section for each.
For example:
Official docs:
Project-specific Git flow
If you project uses a different Git flow, make sure to document it in the project's README file.
Important
All of these bullet points are important, and could result in a disciplinary action if not followed.
- You should never commit any sensitive data to the repository. This includes passwords, API keys, and other sensitive data. If you need to use sensitive data in your project, use environment variables.
- NEVER merge PRs to
main(default) branch without a review. If you are the only one working on the project, ask someone to review your PR. - If you see a a PR that is merged without a review, report it to the team lead.
- Main branch should always be protected, and no one should be able to merge directly to it. If you see that you can merge directly to the main branch, report it to the team lead.