Designing scalable and sustainable apps is always a challenge. When implementing a new feature, developers must constantly think ahead, looking for answers to questions like:
- Can I reuse this component?
- Is this implementation a standard for similar features?
- Can I extract a part of the logic?
- Will my colleague understand this approach?
- Can I test this code?
- Will this require large amounts of maintenance in the future?
- What are the potential requirement changes that could pop out in the future?
- How can we build this so it's easy to upgrade later without major refactoring?
- What is the most elegant way to solve the problem?
- Is there a design pattern that can help make the code cleaner and more understandable, robust and testable?
Answers to these questions, and many more, can be found in a good architecture setup. What is mobile architecture design anyway? A few seconds of searching will result in something like this:
Mobile app architecture is a set of techniques and patterns that are required to be followed in order to build a fully structured mobile application. These patterns and requirements are formulated by keeping the client's requirements and industry standards in mind.
Even though the definition is true, it's too generic. We still need to find out what a fully structured app is, and how it can adapt to client requirements and industry standards. With that said, it's important to mention that there is no silver bullet when talking about mobile app architecture. We simply cannot define something that is 100% applicable to all apps, because each is unique in terms of features, size, complexity, etc. What we can do is to identify the architecture layers, explain their purpose, describe components used in each layer and how those components connect to each other. Finally, we can describe an architecture setup that is most preferred in our team and that fits most of our needs.
Layers
The vast majority of all apps we ever made contained three high-level architecture layers:
- User interface (UI) layer
- Domain layer
- Data layer
The user interface layer is used to display content on the screen. Models that enter this layer contain only the minimum set of properties used to display UI state, setup a view, assign a value to the label etc.
The domain layer is used to prepare data for the UI layer. If we consider this layer as a black box, the input to this layer (Data layer) is a source specific data model that was defined by the API or database. The output from domain layer is a UI model, ready to be consumed by the UI layer. It goes the other way around as well. The models from the data layer are identified, organized and some logic is applied. Since the Domain layer does all the cleaning and preparation of the data, a change in the data layer (e.g. moving from JSON API to HAL) should rarely affect the UI layer.
The data layer is used to provide actual data content to the app through the domain layer. This layer usually works with remote APIs, local databases, memory caches or raw hardware output. Models in the data layer are unprocessed and unchanged, meaning they are served intact to an upstream layer. That is why we may find backend specific properties inside raw models or an ID used only inside a database. Each source (and its resource) should have it's own model. Mixing models from several sources (e.g. remote and database) is highly discouraged and considered a bad practice. Most popular dependencies that we use in this layer are Retrofit, Room, project specific SDKs, etc.
Components
In the next section we will dissect each layer into one or more components. Components are the basic building blocks of our architecture. We will describe reasons why we need a specific component, what problems it solves and what value it brings to the project. The picture below shows a high-level overview of the components and their matching layers.
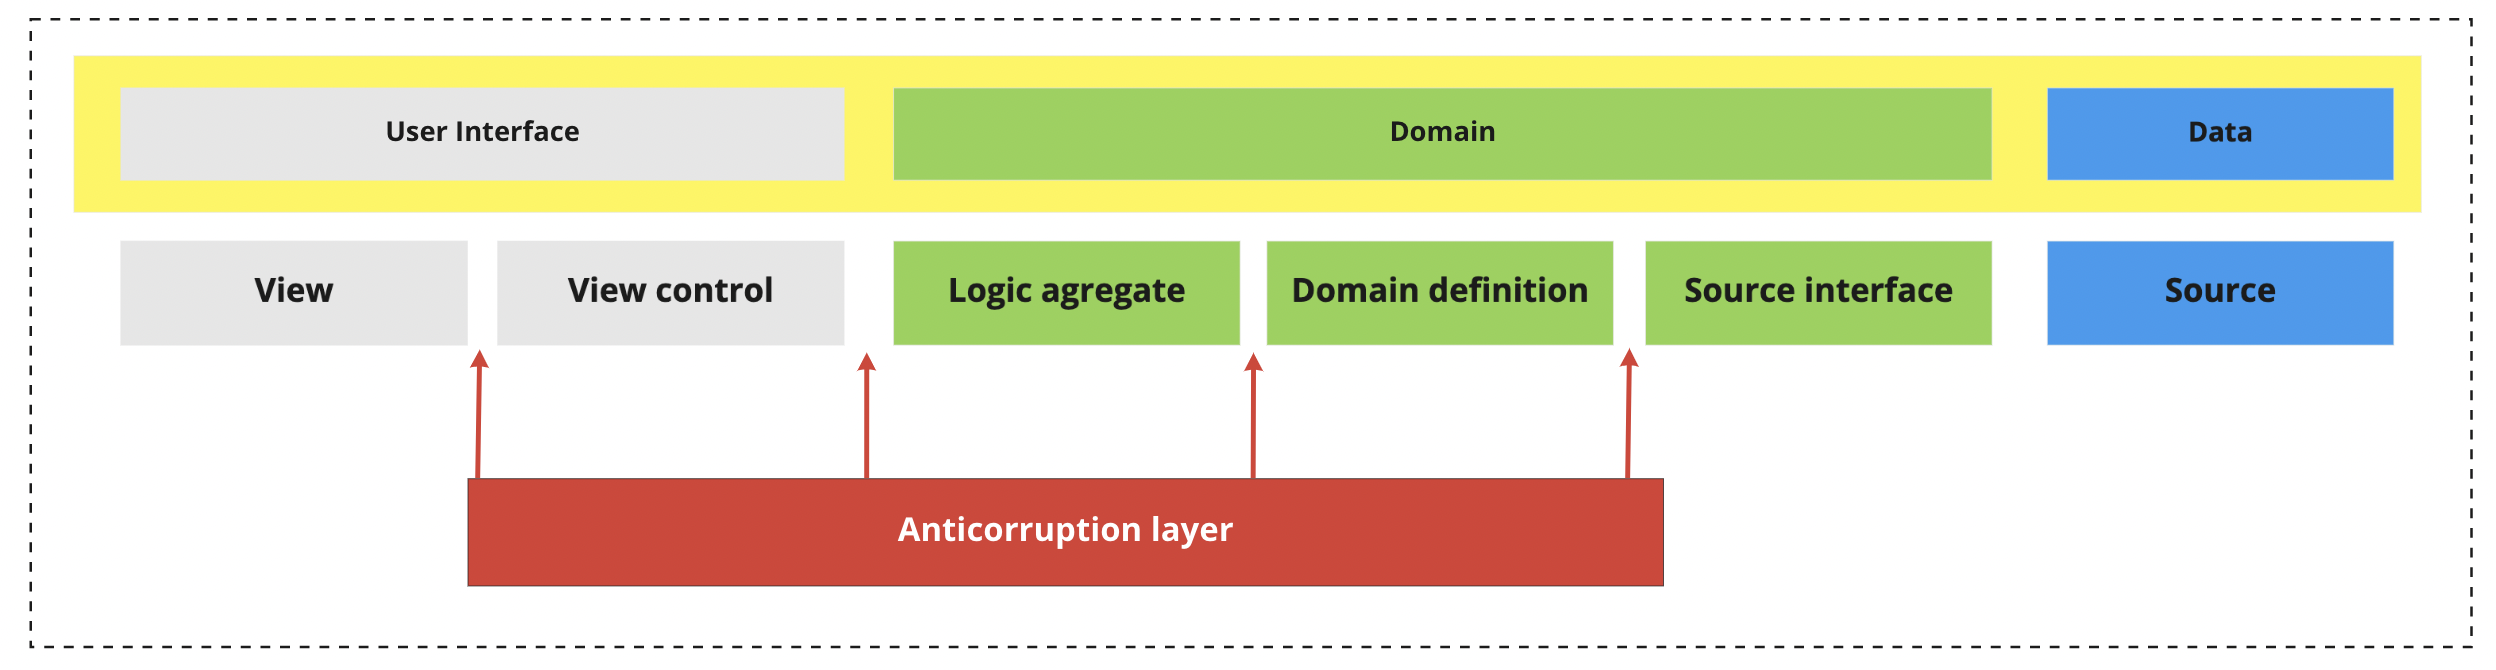
Source
The main idea of the source component is to define a contract with a data provider service. In practice, this could be an API, a database, file system, etc. These systems mostly live outside the app scope and are maintained by a separate team of engineers. This separation makes it easier to exchange sources in the future and hides the implementation from other layers.
Examples: Retrofit API service interface, Room database Dao interface.
Source interface
In addition to the source itself, we want to define a component that separates the data from the rest of the app, which is the main purpose of the Source interface. This layer completely hides the underlying implementation of the data provider, while ensuring a consistent way of communication to other components (callbacks, coroutines, Rx, etc.). This component should not contain any business logic or change the data received from the provider in any way. The most popular implementation would be the Interactor.
Domain definition
Most of the time, sources are not created just for a mobile app. Also, it's not uncommon to use multiple sources in a single app. There might be two different APIs, or an API used together with a local database for some offline mode, etc. No matter the case, we should ensure that from this layer on, we speak only about the data of interest for the layers downstream. So, the goal of this component is to reduce, combine, transform, filter, fix, and so on, the models coming from the source and ensure the resulting models are ready to be used within the Logic aggregate component.
The most common implementation of this component is done via the Repository pattern and an appropriate mapper. There are other patterns that can be used depending on the case and the source definition, such as Factory, Adapter, Dispatchers, etc.
Logic aggregate
With the domain prepared, it's time to focus on business rules. The Logic aggregate component mixes different models to provide extra information requested by app features. Using Logic aggregate components makes it easier to maintain and reuse logic snippets across the project. Good naming is paramount for achieving readability in components below that control the view and user interactions. A popular implementation of this component would be the Use case. Some projects might merge the Logic aggregate and the View control (ViewModel) into a single component. Keep in mind though, that if this joint component gets too complex, it's best to extract the shared logic into a separate Logic aggregate component.
View control
With the View control component, we move close to what the user sees on the screen and their interactions with the app. This component is tasked with preparing the data for the UI and passing user interaction events to the appropriate logic. The logic here can refer to business logic (passing to correct Logic aggregate), navigation (move to a specific screen by propagating events), validating user interaction/input, etc. We tend to use the ViewModel for the implementation, but some older projects still use Presenters.
View
The View components goal is to present data on the screen. There are a few decision to be made on how to organize the whole UI layer, including but not limited to: Activity vs Fragments, Layouts vs Compose, Jetpack Navigation, etc.
Anticorruption layer (ACL)
The ACL should be used across the entire project and it naturally belongs between two components that are speaking a different language (different data models). Using the ACL ensures data consistency and correct mapping in both directions (e.g. from source to domain and back). The important thing to mention about the latter is that it doesn't have to be the same component (class) doing both transformations. For more complex cases, it's encouraged to create separate implementations for each usage and direction of data transformation. As a bare bones implementation, The ACL will simply map one data model into another.
Common places where the ACL should be used:
- Domain definition - When creating a new type of model, the ACL ensures that transformation rules are well implemented and consistent across the app
- View control - The view should only get the minimal set of data needed to display the information correctly on screen. ViewState models here can serve as an ACL
- Logic delegate - When combining multiple models from a defined domain, we might need to communicate results with different types. The same way the user interaction needs to be communicated to the domain in the right way
In simple cases, other components might take care of this task so not to create unnecessary classes. Implementations and naming here may vary, but the ones used the most are Mapper, Converter and ViewState.
Documentation
In most cases, there are direct relations between components and implementation classes. For example: View -> Activity/Fragment, Logic aggregate -> UseCase, Source Interface -> Interactor. This is fine, but note that the intention of components is to describe the purpose, not the actual implementation. That said, on each project we have enough flexibility to use any design pattern that fits best and brings the most value to the project.
Each engineer should be able to identify components on the project they're working on. To have an overview of the project architecture, we have a Keynote template [PDF]. The template contains object composition and examples that guide the documentation style. The main goal is to have an overview of implementation details, classes, pattern, etc. used on different projects, which will provide the foundation for the steps to follow, which includes knowledge sharing, architecture overview, project comparison, refactor planning, lessons learned overviews and other analyses.
How to
- Download the template and rename it following the ""<project_name> Architecture Overview v<x>" pattern. You can leave out the version part if this is the only version, but put the v2, v3, etc. when updating the existing architecture, so we can follow the history of project refactors.
- Update the content and document important notes that apply to the project.
- Save both the keynote and PDF version in this Drive folder
- Link the PDF file in the project Readme.md and push it to the repository. This will be a great starting point for new colleagues during onboarding.
The template is not set in stone, neither is Keynote as the preferred tool. For now, this looks like the simplest solution, but you can do it in any tool that you feel is a good fit. If you know a handy tool that serves this purpose better, make sure to discuss it with other team members so that we may adopt it and make it the default. Keep in mind that everyone should be able to open the documentation file, so a PDF version of the original document should always be made available.
Implementation
Domain Driven Design
In the following chapter, we'll talk about Domain Driven Design as the preferred way to organize the app's architecture.
What is DDD in theory?
Domain Driven Development (DDD) is an approach to developing software for complex needs by deeply connecting the implementation to an evolving model of core business concepts. Its premise is to place the project’s primary focus on the core domain and domain logic by simplifying base complex designs on a model.
How to achieve correct DDD structure?
Engineers needs to initiate a creative collaboration between technical and domain experts to iteratively cut ever closer to the conceptual heart of the problem. DDD provides a structure of practices and terminology for making design decisions that focus and accelerate software projects dealing with complicated domains. In simpler terms, DDD shines when all project collaborators agree on the definition of a domain model for a specific feature. Some of the most important parts of defining the domain are to determine naming, functionality and properties of the domain model.
What are the components of DDD?
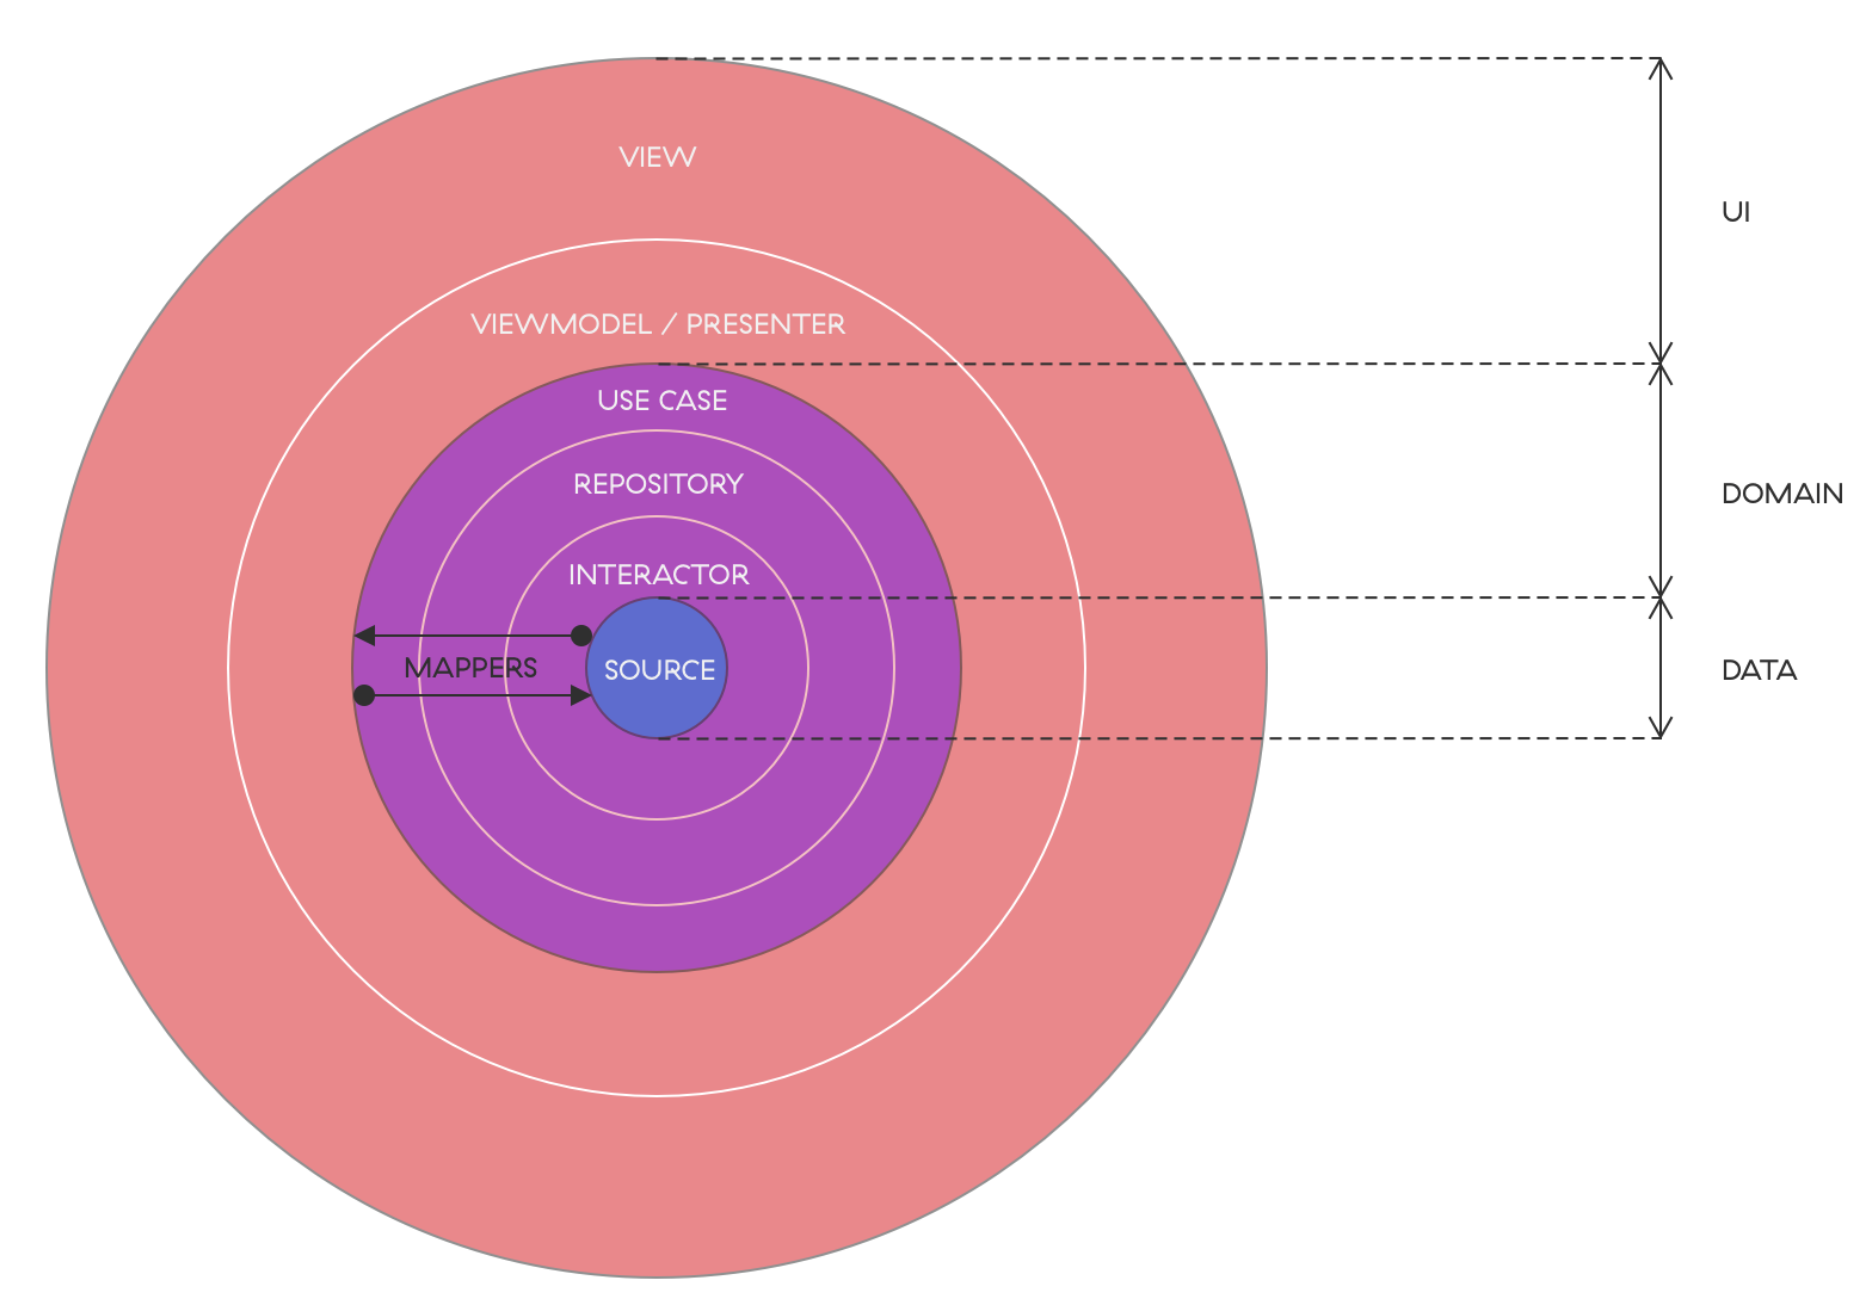
To understand why we need each of those layers, the best way to look at them is to focus on types of models that travel from source to the view (and vice versa). Sources are usually some remote APIs or a database. From a given source, an interactor fetches a source specific model. The model often contains more data than needed for a specific feature. For example, we are developing a feature that displays user's first and last name on screen, but the source specific model will contain the entire user resource that also has age, role, ID, etc.
The Interactor's only purpose is to talk to a source. Their job is not to modify data objects, just transfer them. Even though we know where an interactor gets its data from, it hides the source implementation (e.g. Retrofit, Room) from the rest of the logic. Also, the interactor is a good place to encapsulate asynchronous chains used in Rx or Coroutine Flows. Ideally, the interactor communicates only to a single source and resource, there are very few cases where an interactor might talk to multiple sources. An exception would be to fetch a value from an additional source that is mandatory for creating the main resource. The output model of an interactor is still a source-specific data model.
A strategy for abstracting data access is the key component of DDD. When organizing the domain layer according to DDD, some engineers may use the factory pattern, but we as a team prefer the Repository. When creating a repository, it's important to define what the domain model will be. A simplified definition of a domain model would be "An object model of the domain that incorporates both behaviour and data". It's a model tailor made for a specific feature, also called a subdomain. The domain model is an output of a repository. Important to note is that the domain model is not the same as the source specific data model! Sometimes, for simple API calls, the properties of those two objects can be the same. But even then, the domain model should be separated, so that changes to the source model can't affect the subdomain. Because the repository takes care of the domain model, it can have multiple interactors for fetching or manipulating the same model through different sources (backend, database, memory etc.).
The component that helps us create a domain model from a source-specific data model (and vice versa) is called a Mapper. Since the repository must output a domain model object, that makes the mapper one of its essential parts. The mapper is also a part of the Anticorruption layer (ACL). It ensures that the domain model produced by the repository is valid and sanitized. Also, we can use a mapper to create source-specific data models from domain models when going in the opposite direction.
A UseCase is a component that will use one or more repositories to get the data requested by a ViewModel. The ViewModel will use this data to create a view state, which is a format suitable for a view to properly render the UI. UseCases shine when there are multiple repositories from which they need to combine data for the ViewModel. From an architectural point of view, the UseCase is a tool that delegates a chunk of logic which would usually make a ViewModel complex, while also allowing that same business logic to be reused.
The Interactor, Mapper, Repository and UseCase are components that make the Domain layer. With the Domain layer, we ensure a stable data structure, so that the ViewModel can focus on properties needed for the view state. In theory, the ViewModel should only know about UseCases it needs to provide the right data. It doesn't care where the values come from or how they're combined. Additionally, the separation between the components and the precise declarations of interfaces make this approach very easy to test.
Example
Let's say that we have an app that can connect to some hardware (appliance). Our task is to implement a screen where the appliance name would be shown. If the app is connected to the appliance, a name is fetched from the appliance's storage. If there is no connection to the appliance, a name is fetched from local storage.
During a meeting with the rest of the team, we agreed to call this domain MachineFriendlyName. In Android, MachineFriendlyName will be the domain model set as the output model of a MachineFriendlyNameRepository. In this simple example, it will be a String.
MachineFriendlyNameRepository should look something like this:
class MachineFriendlyNameRepository @Inject constructor(
    private val getMachineInfoInteractor: Interactors.GetMachineInfo,
    private val setMachineFriendlyNameInteractor: Interactors.SetMachineFriendlyName,
    private val getStoredMachineNameInteractor: Interactors.GetStoredMachineName,
    private val storeMachineNameInteractor: Interactors.StoreMachineName,
    private val machineInfoToMachineNameMapper: Mappers.MachineInfoToMachineName
) : Repositories.MachineFriendlyName {

    override suspend fun fetch(parameters: MachineFriendlyNameParams) = when (parameters) {
        MachineFriendlyNameParams.FetchLocal -> getStoredMachineNameInteractor()
        MachineFriendlyNameParams.FetchFromMachine -> machineInfoToMachineNameMapper.fromRemote(getMachineInfoInteractor())
        else -> throw IllegalArgumentException("Invalid use of MachineFriendlyNameParams. Use FetchLocal or FetchFromMachine for fetching.")
    }

    override suspend fun modify(parameters: MachineFriendlyNameParams) = when (parameters) {
        is MachineFriendlyNameParams.SaveLocal -> storeMachineNameInteractor(parameters.machineFriendlyName)
        is MachineFriendlyNameParams.SetOnMachine -> setMachineFriendlyNameInteractor(parameters.machineFriendlyName)
        else -> throw IllegalArgumentException("Invalid use of MachineFriendlyNameParams. Use SaveLocal or SetOnMachine for storing.")
    }
}
Let's first take a look at the injected dependencies. As you may have noticed, the only components that we use in the repository in this example are interactors and mappers. However, this might differ from project to project. For example, sometimes, we also inject converters which are classes used for converting domain models to source-specific (data) models (basically, they do the opposite of what mappers do). Therefore, you should keep in mind that you can adjust the dependencies in the repository according to the project's needs as long as you follow the repository pattern.
MachineFriendlyNameRepository has a very clear purpose, it provides a way to apply simple CRUD operations on the domain model. In this case, read and update (named fetch and modify to separate repository naming from standard API call naming). To achieve this, the repository knows which interactors can be used to extract the needed data.
getStoredMachineNameInteractor is an ideal interactor, because it can fetch a String from SharedPreferences which we can propagate to the repository's fetch method, which is used by a UseCase that needs the name from local storage. But, having an ideal interactor is rarely the case, so let's focus on getMachineInfoInteractor interactor. As the name says, it doesn't just fetch the machine name, but a source-specific data model MachineInfo. Since MachineFriendlyNameRepository works with a String as the domain model, we need a way to create a machine friendly name from MachineInfo. For that purpose, we use machineInfoToMachineNameMapper. Keep in mind, mappers can become significantly more complex than this and therefore, they need to be thoroughly tested!
There is one more pattern used in this repository that may vary between implementations and that is the use of Params class, in our example MachineFriendlyNameParams. In DDD, this class also has a name and it's called a Data transfer object (DTO). It's used to pass domain specific data properties between layers. In the machine friendly name example, we need to define a way to either fetch or store a name, both from a connected appliance or from local storage. MachineFriendlyNameParams serves that purpose. DTOs are also used to pass values from the UI to a repository and finally to a mapper in order to prepare a model required for some request.
The interactors in this example are implemented fairly simply. Here are two examples for getStoredMachineNameInteractor and getMachineInfoInteractor:
class GetStoredMachineNameInteractor @Inject constructor(
    private val localStorage: Sources.Local.Preferences,
) : Interactors.GetStoredMachineName {

    override suspend fun invoke(input: Unit) = localStorage.machineFriendlyName
}
class GetMachineInfoInteractor @Inject constructor(
    private val connectedApplianceProvider: Sources.Raw.ConnectedApplianceProvider
) : Interactors.GetMachineInfo {

    override suspend fun invoke(input: Unit) = connectedApplianceProvider.get()?.let { appliance -> appliance.info
    } ?: throw WifiException("Appliance not connected")
}
You'll notice that interactors work with sources, which means they know how which source handles the requested data.
Finally, the component that consumes functions provided by the repositories is the UseCase. In our original meeting, a request was set for us to first try to fetch the machine name from the appliance and only if that fails, retrieve it from local storage. We can call this "the business logic" and our component that implements it will be called GetMachineFriendlyNameUseCase.
class GetMachineFriendlyNameUseCase @Inject constructor(
    private val machineFriendlyNameRepository: Repositories.MachineFriendlyName
) : UseCases.GetMachineFriendlyName {
    override suspend fun invoke(input: Unit) = try {
        machineFriendlyNameRepository.fetch(MachineFriendlyNameParams.FetchFromMachine)
    } catch (e: WifiException) {
        Timber.e("Machine name could not be fetched from appliance")
        machineFriendlyNameRepository.fetch(MachineFriendlyNameParams.FetchLocal)
    }
}
In this example, the UseCase uses the same repository to call both functions, but in more complex cases, we could use separated repositories to fetch different domain models and then combine that data. As already mentioned, ViewModels should only inject UseCases. The reason for this is that they shouldn't care about details of the business logic behind data extraction and transformation, but about the UI model used to set some state or trigger events. By delegating work from the ViewModel to the domain layer, we can significantly simplify ViewModels and make them easy to test and maintain.
The last thing to mention about usecases is that they are the perfect place to inject Dispatchers or Schedulers used to change threads. That way, we can easily mock them in tests. Taking this into account, GetMachineFriendlyNameUseCase actually looks something like this:
class GetMachineFriendlyNameUseCase @Inject constructor(
    private val machineFriendlyNameRepository: Repositories.MachineFriendlyName,
    private val ioDispatcher: Dispatchers.IO
) : UseCases.GetMachineFriendlyName {
    override suspend fun invoke(input: Unit) = try {
        ioDispatcher {
           machineFriendlyNameRepository.fetch(MachineFriendlyNameParams.FetchFromMachine)
        }
    } catch (e: WifiException) {
        Timber.e("Machine name could not be fetched from appliance")
        machineFriendlyNameRepository.fetch(MachineFriendlyNameParams.FetchLocal)
    }
}