Usually, when you work in a team environment, and/or when you need to use multiple configurations, Xcode project settings UI can quickly get really messy, and it becomes hard to track changes.
git log is not really useful with the amount of noise you get by changing one simple bool.
Proposed project structure (xcconfig files, build targets, build configurations)
- Use xcconfig files for project build settings and for custom user-defined keys
- custom user keys (e.g., GOOGLE_ANALYTICS_KEY...)
- Use build configurations (default are release and debug) for different build setups
- release build
- qa build
- test build
- production build
- Use target to define a single product
- it organizes the inputs into the build system
- source files and instructions for processing those source files required to build that product
- it usually doesn't make sense to use targets in place of build configurations
Configuration structure
- Two targets (and a project)
- Three build configurations
- Each build configuration (debug, release, qa)
Configurations
    |
    |-----> Shared (Project settings - Inherited from Xcode and custom (e.g. extra CLANG warnings))
    |   |
    |   |-----> Project - Shared.xcconfig
    |   |-----> Project - Debug.xcconfig
    |   |-----> Project - Release.xcconfig
    |   |-----> Project - QA.xcconfig
    |
    |-----> Target0
    |   |
    |   |-----> Target0 - Shared.xcconfig
    |   |-----> Target0 - Debug.xcconfig
    |   |-----> Target0 - Release.xcconfig
    |   |-----> Target0 - QA.xcconfig
    |
    |-----> Target1
    |   |
    |   |-----> Target1 - Shared.xcconfig
    |   |-----> Target2 - Debug.xcconfig
    |   |-----> Target3 - Release.xcconfig
    |   |-----> Target4 - QA.xcconfig
Shared
- Will contain all settings that are inherited for a specific type of project (e.g., iOS)
- You'll want to have this included in everything else
Usually compiler flags and friends... :)
//  Clang Warnings
OTHER_CFLAGS = -Wall -Wextra
You would get those from the UI by clicking on a top-level project
- PROJECT -> Name Of Your Project -> Build Settings
Target
- Specific target settings would be:
- custom Info.plist
- developer profile for signing the app
- app icon
- analytics key
- Facebook key
- iOS version...
xcconfig
- The key/value file for storing build settings and user-defined keys
// Asset Catalog App Icon Set Name
//
// Name of the asset catalog app icon set whose contents will be merged into the
// Info.plist.

ASSETCATALOG_COMPILER_APPICON_NAME = AppIcon

// Code Signing Identity
//
// The name ("common name") of a valid code-signing certificate in a keychain within your
// keychain path.   A missing or invalid certificate will cause a build error.

CODE_SIGN_IDENTITY = iPhone Developer


// Info.plist File
//
// This is the project-relative path to the plist file that contains the Info.plist
// information used by bundles.

INFOPLIST_FILE = Park-AAA copy-Info.plist


// Runpath Search Paths
//
// This is a list of paths to be added to the runpath search path list for the image
// being created.  At runtime, dyld uses the runpath when searching for dylibs whose load
// path begins with '@rpath/'. [-rpath]

LD_RUNPATH_SEARCH_PATHS = $(inherited) @executable_path/Frameworks


PRODUCT_BUNDLE_IDENTIFIER = infinum.co.Park-BBB


// Product Name
//
// This is the basename of the generated product.

PRODUCT_NAME = $(TARGET_NAME)
- We will leverage this to make our project settings cleaner and easier to understand
Build targets
- Use when dealing with a template app, for example. One target for every vendor.
- can have separate assets
- a whole new project, except code, can be shared between targets more easily
Build configurations
- Use when we need to fine-tune certificates, third-party SDK keys, versioning APIs...
User-defined keys
[[NSBundle mainBundle] objectForInfoDictionaryKey:@"HockeyKey"]];
Custom xcconfigs
Step 0—empty project
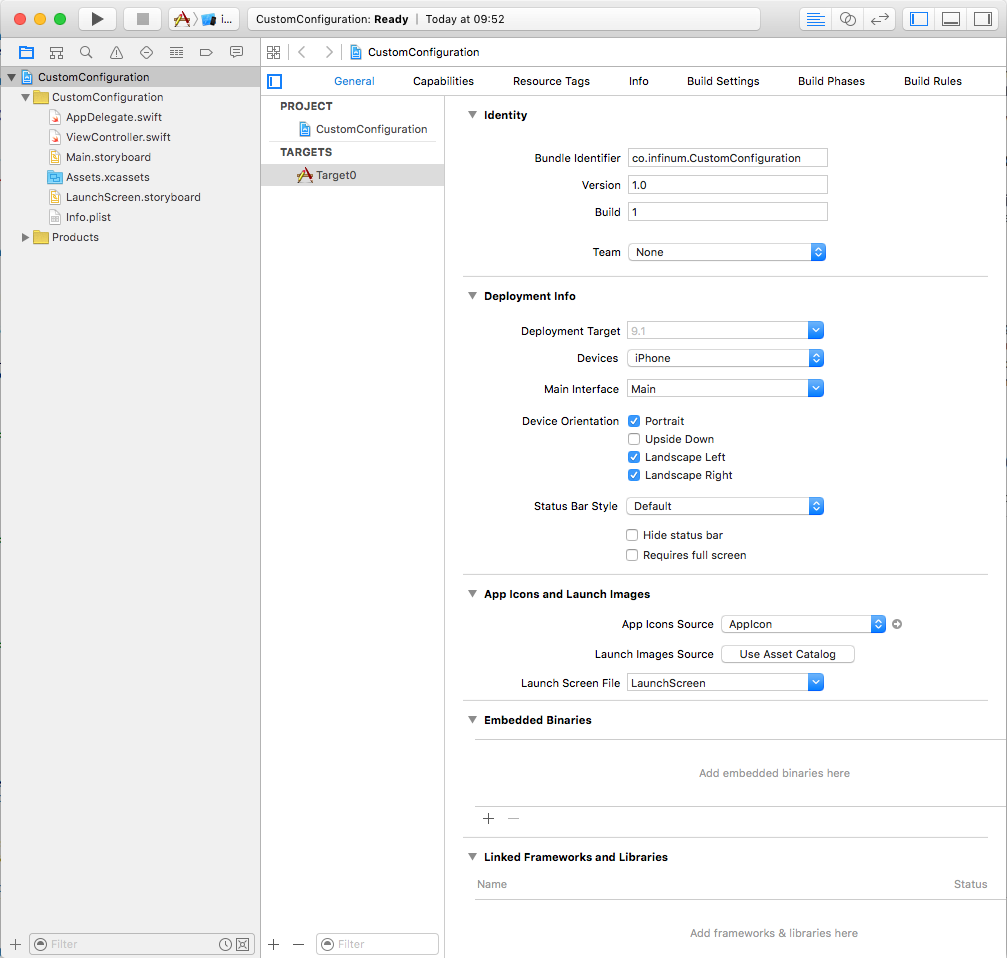
Step 1—targets
- Add a new target
- CMD + D

- New target added
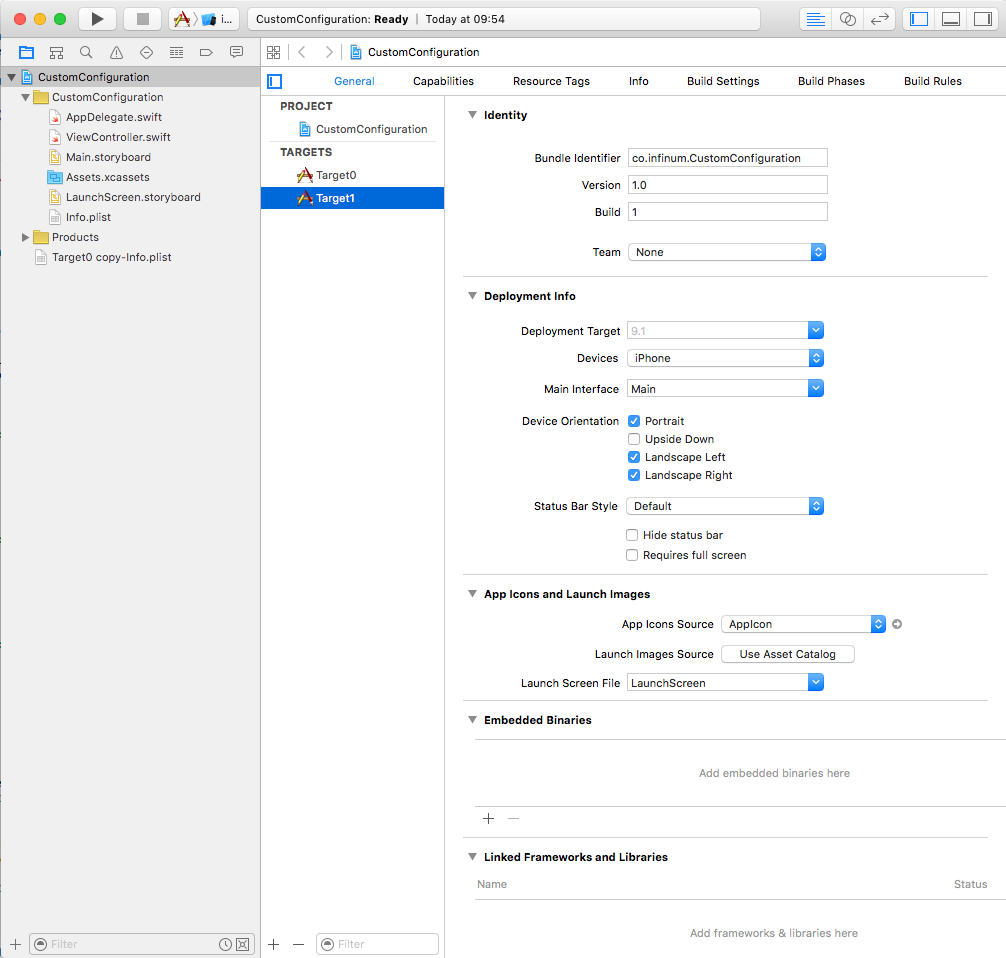
Step 2—add new build configurations
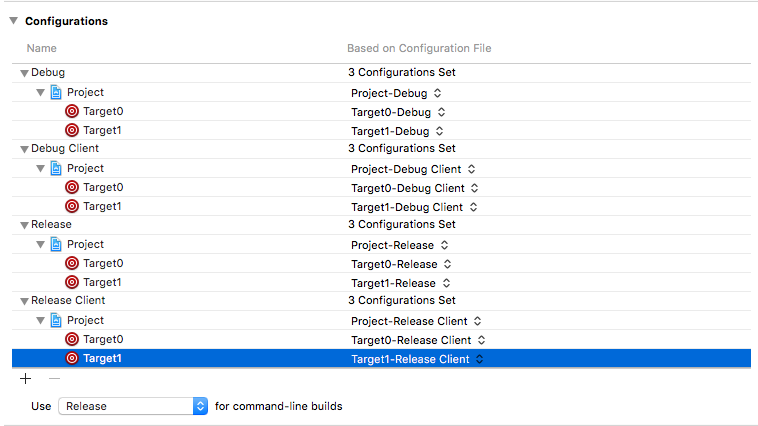
- Select project
- Info tab
- Configurations
- Always duplicate an existing one (choose between debug and release).
- Use case: we are currently using our enterprise account for develop, but the client wants to use their account for release to the Store.
- Basically, we would have to change certificates, provisioning profiles, and bundle identifiers before each submission. This is both cumbersome and error-prone!
- That is why we will create copies of both debug and release build configurations.
- If you have a lot of configurations that you need to add, maybe it's a good idea to start with one or two configurations, and go through all of the steps. That way you can check if you've done everything correctly, and Xcode will be faster when you're updating target related configurations :)
- If you're working with an App + SDK project, make sure that both App and the SDK contain the same configuration names since the SDK might use the release configuration as the fallback if it doesn't find the one that has the same name as the app one

Step 3—build settings
Project
- Build settings
- Always use
AllandLevels
- Always use
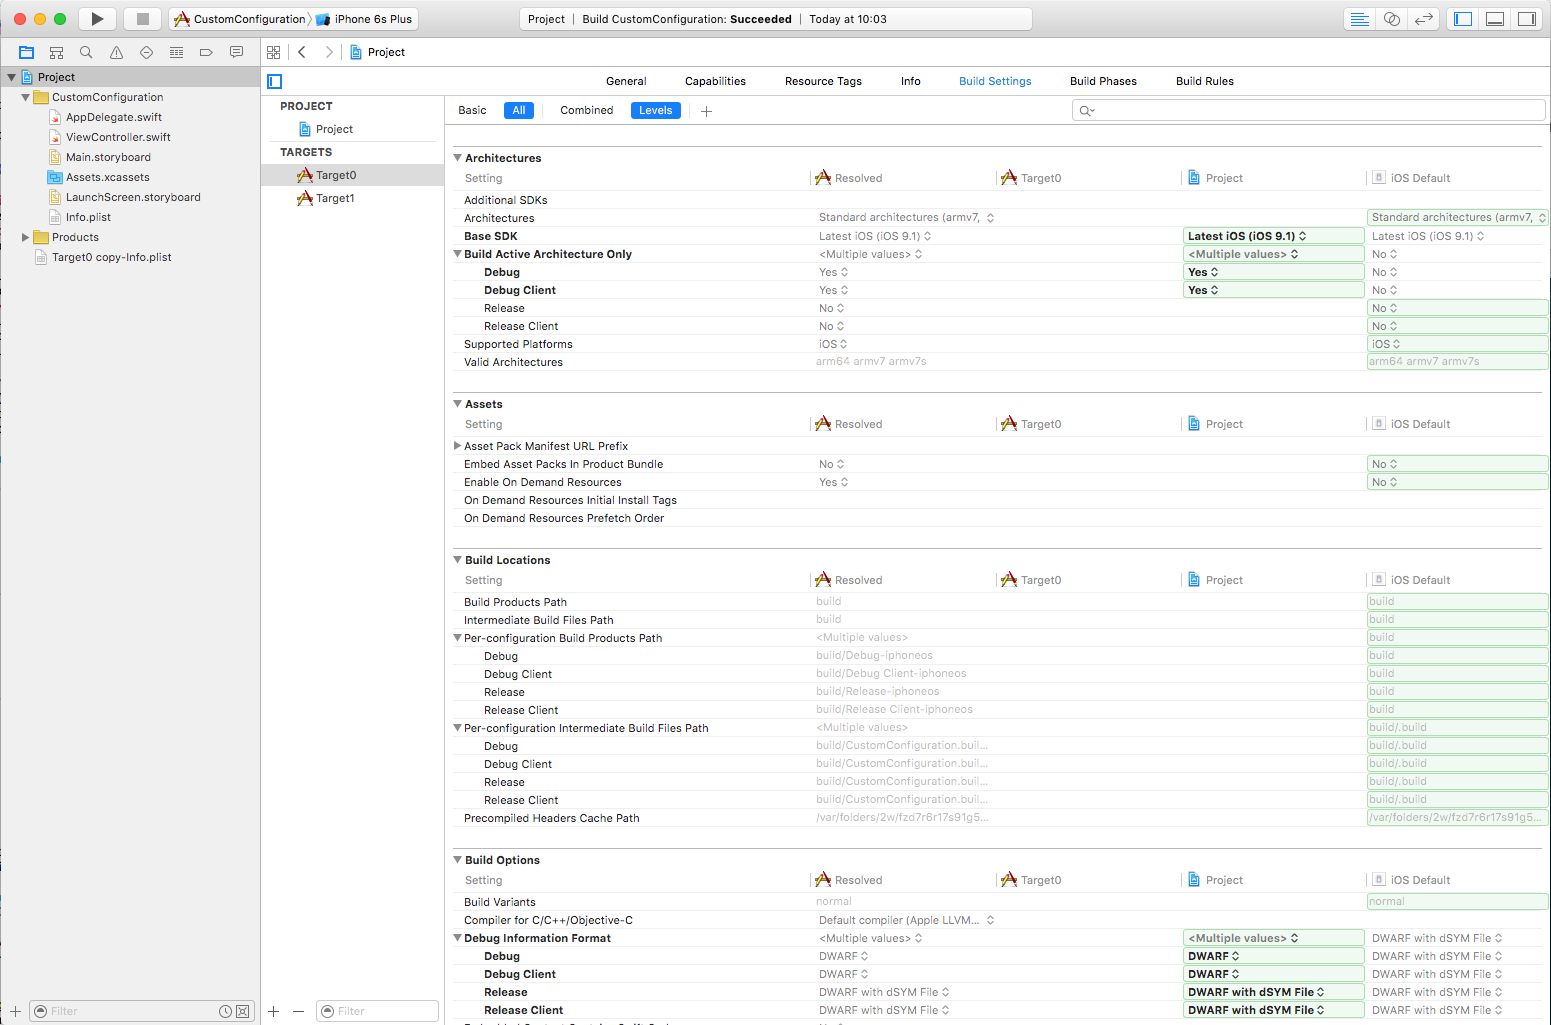
- Settings will be resolved from right to left
- iOS Default—Project - Resolved
- iOS Default—default settings defined by Apple (compiler flags, architecture, etc.)
- Project—user-defined using UI
- Resolved—by combining the previous two

Target
- Build Settings
- always use
AllandLevels
- always use
- Settings will be resolved from right to left
- iOS Default -> Project -> Target0 -> Resolved
- The same as project; the only difference is that here you can define custom settings per target
- user profiles, bundle identifiers, user-defined keys (e.g., analytics)
Step 4—custom xcconfig
- For everything above, we want to use xcconfig files to make it easier for us in the long run.
- It is much easier to add something in a text file than in Xcode.
- But copying keys from Xcode to xcconfig files manually is cumbersome and error-prone.
- We will use this handy tool for automatic creation: BuildSettingsExtractor.
- Just drop you Xcode project on top of it, and it will autogenerate all the files you need.
- What is great about this tool is that it will not do anything to your project—you have to do it manually!

Step 5—set up custom xcconfig
- Add all of the above to your project.
- I would suggest adding those by drag'n'drop so that, when Xcode asks you for which target you want to add, those unselect all targets.
Add all of the custom xcconfig files to your build configurations.
- Select Project
- Select Info
Configurations
- Add custom config files
select project — Build Settings (All + Levels)
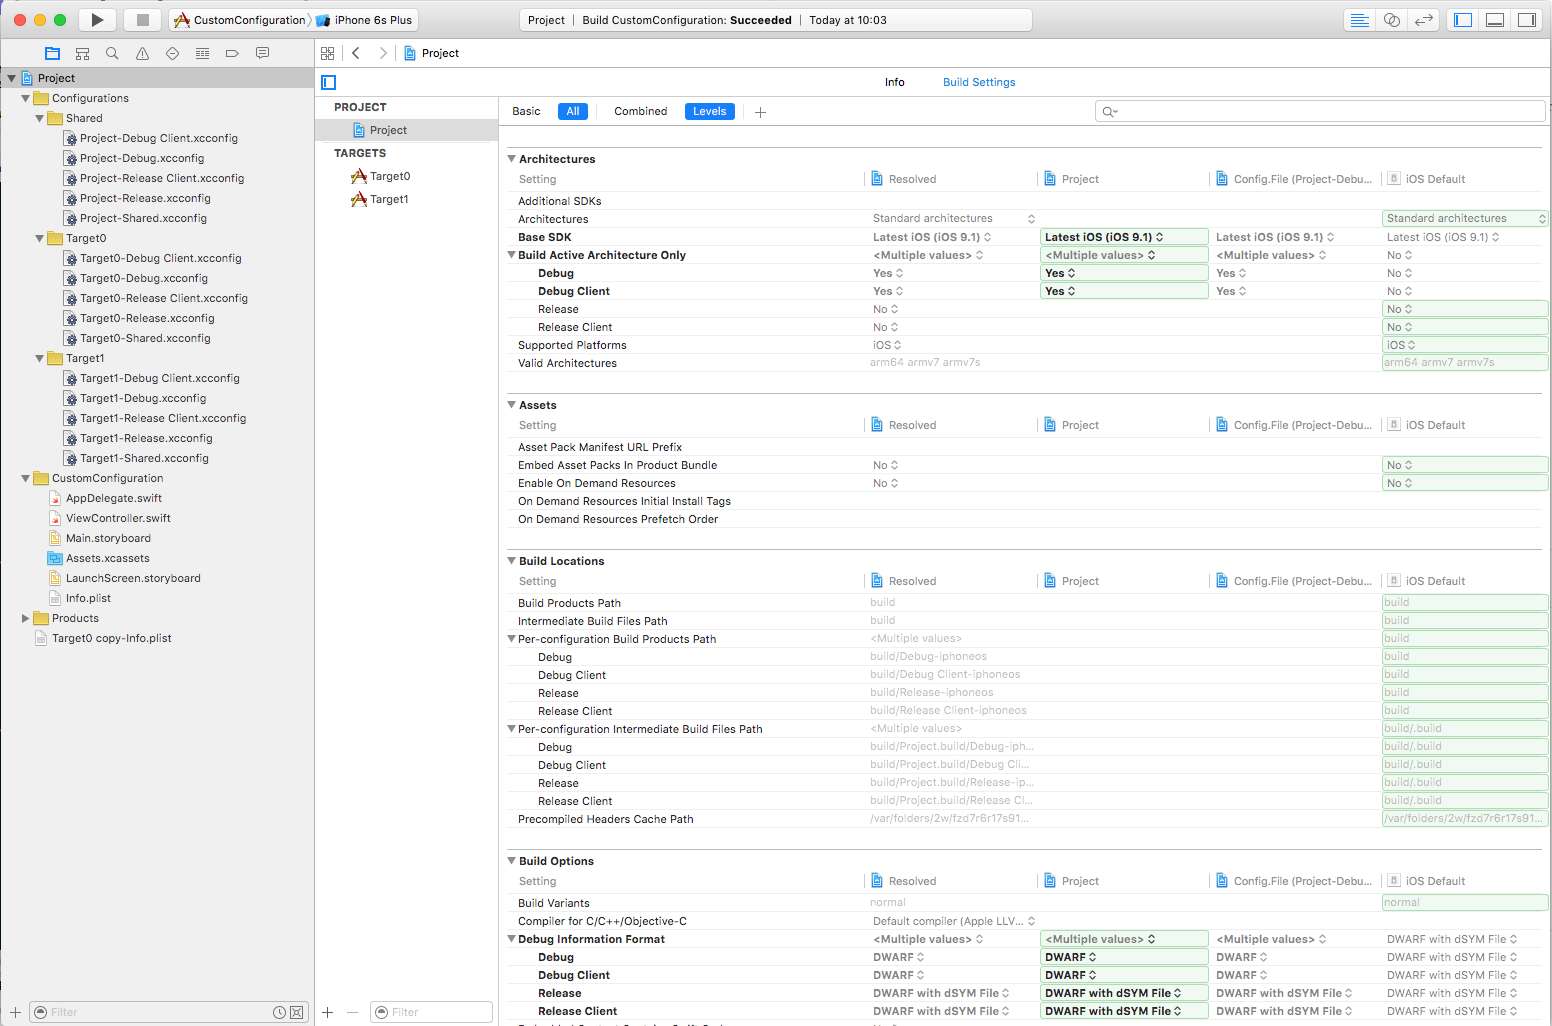
- As you can see, there is a new field Config.file(...)—this is our custom config file.
But if we think about our goal to have everything inside our custom file:
- we don't want the UI settings to override our custom file
- settings will be resolved from right to left
- that means that UI has a higher precedence than custom files
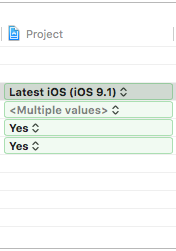
go through the Project row and delete it; you can only edit the Project row on the current level
- you have to delete only the rows that contain something
- if you can't delete the rows, click on it and change its value to $(inherited) which will inherit the value from the previous column (in this case your xcconfig file)
- sometimes you won't be able to change the row value to $(inherited), so you will have to click on the row, and select "other". After that, you'll be able to enter a string instead of the predefined values.
- if you have a lot of configurations, don't be scared if Xcode shows its famous rainbow spinner. Just let it update for a minute :D
- don't replace row values to "" since Xcode will replace your custom configuration values with an empty string, tend to use the $(inherited) value
select target — Build Settings (All + Levels)
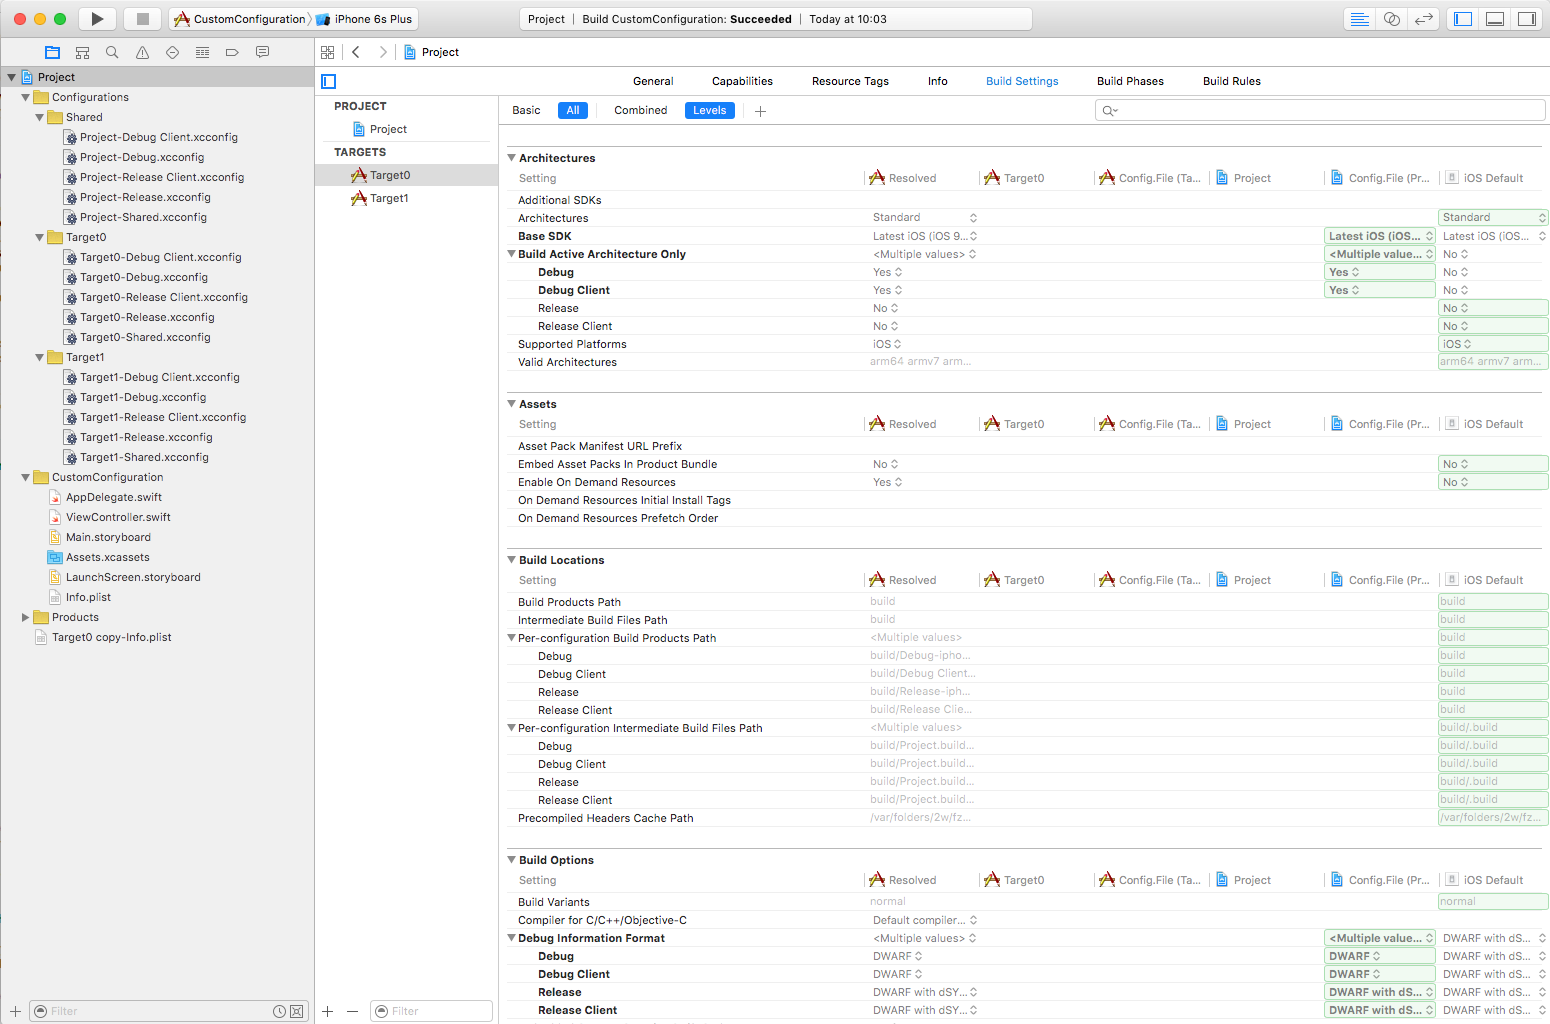
- As you can see, there is also a new field on this level. Now we have 6 columns.
Resolved | Target0 | Config.File (Target Build) | Project | Config.File (Project Build)| iOS Default
Config File (Target Build)
- Build configuration based on the current target build configuration settings
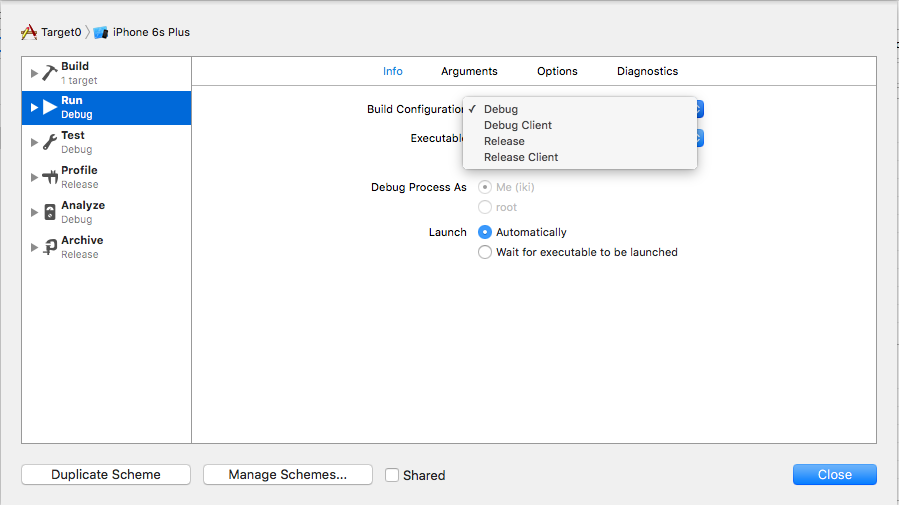
Go through the target row and delete it. Again, be careful here, the same rules apply as the project ones (explained in the step 5)
Step 6—custom Info.plist
After duplicating the default target in step 1., Info.plist can get all messed up.
- Delete newly created Info.plist, which is probably in the root of the project.
- Copy default Info.plist.
- Rename both to something meaningful (e.g., Info—Target0.plist, Info—Target1.plist).
- Add those files to the project as you would add any other file.
- Be sure to unselect Target Membership.

Set up your custom files to use those
- Open Target0-Shared.xcconfig
- Find INFOPLIST_FILE
- Change to INFOPLIST_FILE = CustomConfiguration/Info - Target0.plist (newly created)
- Check that everything is OK by clicking on
- Project
- Target
- General
The great thing about custom Info.plist is that you can easily set up custom AppIcon, Assets Catalog...
Step 7—Cocoapods
- Be careful when installing Pods in a project with multiple targets.
platform :ios, '8.0'

use_frameworks!

# Debug/release config specification
# You need to add the same configuration names you have set in the project file
project 'Project', {
  'Debug' => :debug,
  'Release' => :release,
  'ClientDebug' => :debug,
  'ClientRelease' => :release
}

# If you need a pod only for some configurations, eg. only for debug and release
def debugging
  pod 'Sentinel', :configurations => [
    'Debug',
    'Release'
  ]
end

def shared
    pod 'Alamofire'
end

# If you have targets which use the same pods, you can combine them into an abstract target
# then you won't need to specify every single target like we do below.
# You can use either this or specify every single target
# abstract_target 'MainTargets' do
  # Shared pods
#  shared
#  debugging

#  target 'Target0'
#  target 'Target1'

#end

target 'Target0' do
   shared
   debugging
end

target 'Target1' do
   shared
   debugging
end
Make sure to read the comments in the podfile, and use the code which suits your needs best :)
Pod install will probably give you a warning.
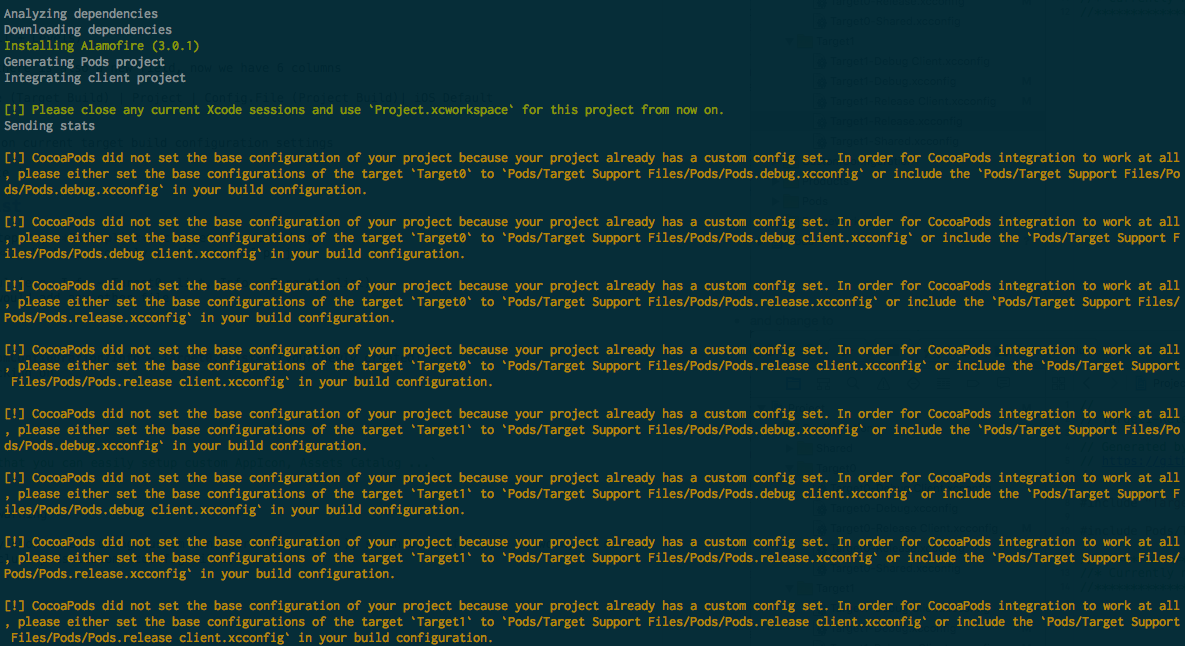
This is normal because, as you know by now, we are using custom configuration files. :) So, in order for pods to work, we need to edit our xcconfig files to also include pods custom xcconfig files;
open Target1-Debug.xcconfig
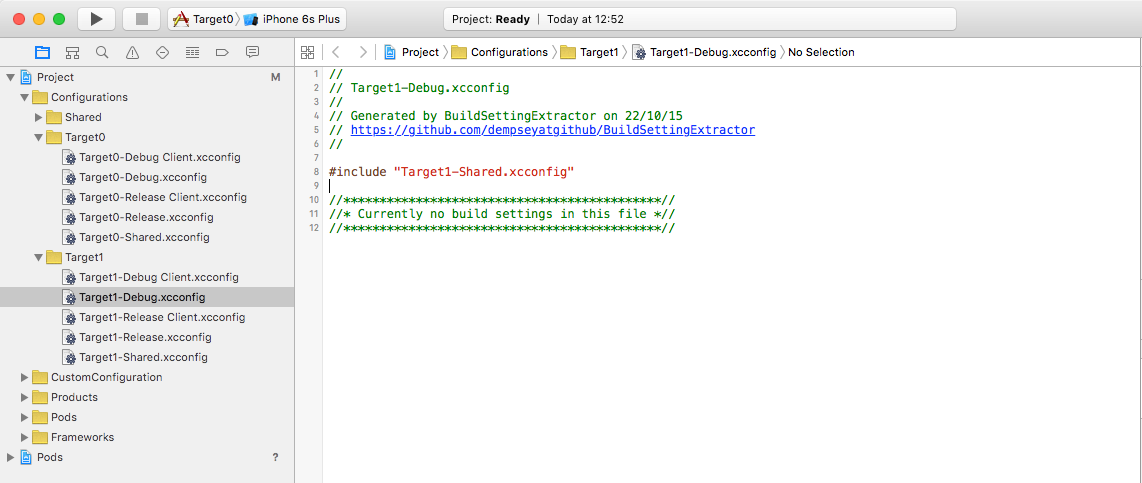
and change to
- please note, when including other xcconfig files, if the first one, and the second one contain the same property, the first one will be overwritten by the second one, and the second one will be the "Resolved" property value. Eg. if your shared.xcconfig file contains Swift flags, they will be overwritten by the ones from cocoapods. If you want your Swift flags, then you have to put the cocoapods xcconfig file as the first include, and your custom one as the last :)
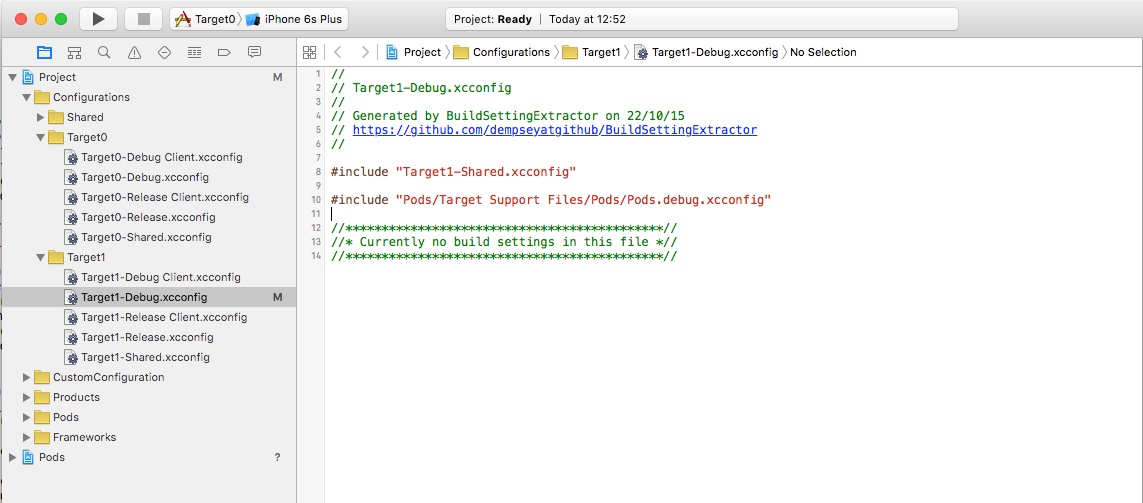
open Target1-Release.xcconfig
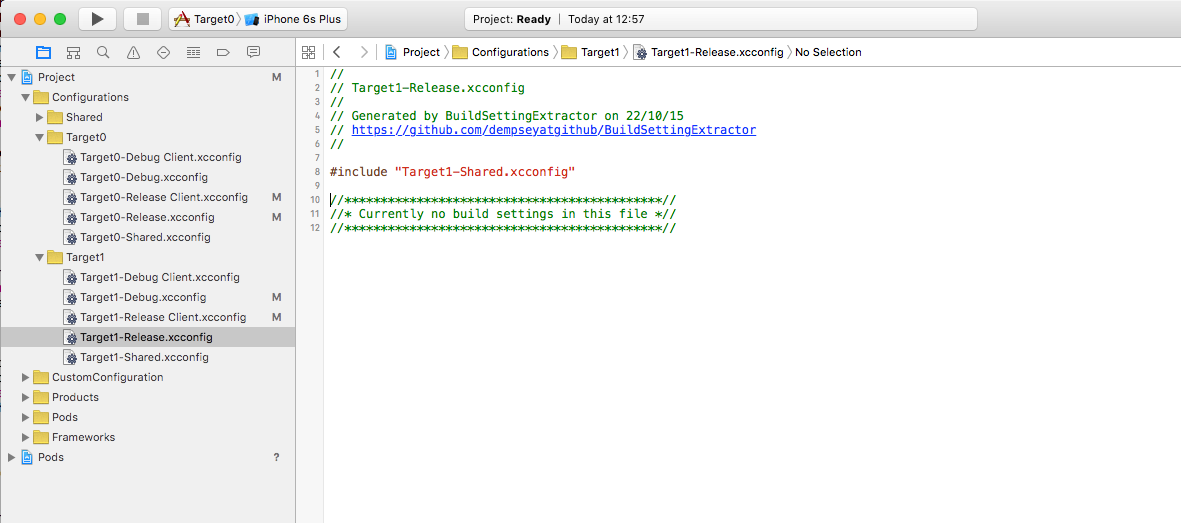
and change to
- please make sure to read the note on the debug xcconfig file :)
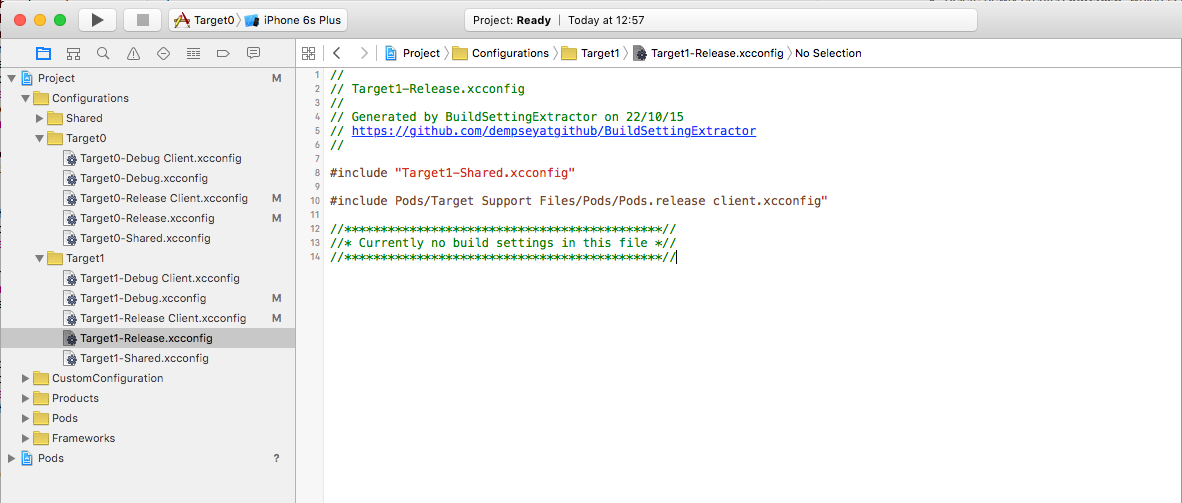
repeat this process for Target0.
Build a project :)