The idea behind this chapter is to standardize Git usage across platforms as much as possible. We are divided into teams based on the technology we work with. But, most of the time we are working on multiple platforms for the same client and sees us as one team.
Not all projects will or should follow all the points from this guideline. But it is of great importance to define clear and consistent guidelines on the same project across all platforms, especially on mobile platforms where the flow is pretty much the same.
Using Git
Before you can start using Git, you need to do a setup of SSH keys which is described in the Git basics - SSH keys chapter.
Creating a repository
Repository name should follow naming conventions below:
- technology-client-project-name for example:
ios-client-project,android-client-project,js-infinum-long-project-name,ios-client-long-project-name,rails-infinum-labs... You can skip the client name in repo name if it is the same as project name, for example:ios-client - or type-client-project-name if the repository is not technology related, for example
specification-client-project-name
The only allowed characters are [a-z0-9] and - (hyphen). This way we will make our DevOps’ life easier.
Add a readme
A readme is the first file one should read when starting a new project. It's a set of useful information about a project and a kind of manual. It is the first file GitHub or any Git hosting site will show when someone opens your repository. Since it is a really important part of any project you should fill it with the relevant information, which depends on the technology you work on, but some general ideas are:
- description of the app
- status badges - Bitrise, Travis, Codebeat, Sonarcloud...
- dependencies & prerequisites
- setup, development, test & deployment instructions
- links to API documentation, architecture overview, used services...
- any other project-specific information that someone who takes over a project needs to know
Please check your team's handbook for any technology-specific information which you readme needs to contain.
Branch naming
The development branch should always be named main for consistency across projects.
Branches are named according to their use, and hyphens delimit words. You should use the Productive/Jira task number when possible. Some examples:
feature/123-login-screen
enhancement/ui-improvements
fix/533-pin-user-alert
Commits
In general, commits should be small and frequent - Commit early, commit often. You should follow the single responsibility principle in Git. Whenever possible include task number in commit message, e.g.:”#123 Fix screen title”, this helps a lot in the future when another person needs to know why you had to implement it that way.
The important thing is that changes should be described in the imperative mood, e.g. "Make xyzzy do frotz" instead of "[This patch] makes xyzzy do frotz" or "[I] changed xyzzy to do frotz", as if you are giving orders to the codebase to change its behavior.
When writing commit messages we should stick to these 7 rules:
- Separate subject from body with a blank line
- Limit the subject line to 50 characters (easier to read on the client)
- Capitalize the subject line
- Do not end the subject line with a period
- Use the imperative mood in the subject line
- Wrap the body at 72 characters
- Use the body to explain what and why vs. how
- You can find more details about those in this blog post.
There is also a Git hook available to validate your commit message.
Don't commit generated code
Generated code does not belong in the repo. Use the .gitginore file to exclude it. This file can be generated using the gitignore.io tool. All you need to do is write a few keywords (such as macOS, Android Studio, Xcode, Android, IntelliJ, or other similar IDEs/code editors you are using), and the tool will generate the file content for you.
Don't commit chunks of commented out code
Don't comment out code and commit it to the repository so you can 'uncomment it if you ever need it again'. This creates a mess in the code and makes it less readable. It's easy to return to an earlier commit and look up the code that you removed, so there is no need to leave commented code lying around everywhere.
Starting work on a new feature
git checkout main
git checkout -b feature/123-login-screen
Merging the feature into main
The preferred way of merging a branch back into main is by creating a pull request and assigning it to a colleague for review.
There are two different roles in every pull request—the assignee and the reviewer. Reviewers are your colleagues who review your pull request, whereas the assignee is the person responsible for merging or canceling the pull request—in other words, you.
If you cannot merge the branch back into the main because of a merge conflict, you need to fix the conflict on your feature branch by either merging main into your branch.
git checkout feature/login-screen
git merge main
or by rebasing from main
git checkout feature/login-screen
git rebase main
If you want to find more about rebasing and merge, here is the good article comparing both commands - how do they work and when to use each of them.
Version tagging
After releasing the app on PlayStore/AppStore, the release has to be tagged with the version number. Also, provide a short description of the release. Here's an example of adding a tag:
git tag -a v3.0.0 -m "The best version ever."
git push --tags
You can find more info about tagging here.
Release branches
Most projects have one active development stream at the moment. This means that all new changes should be included in the next upcoming release. Because of this, all changes can be merged into the main branch without the need to introduce multiple release branches.
However, some projects have multiple releases planned ahead. It is possible that, at some point, a development team will work on multiple releases at the same time. In that case, release branches should be introduced and handled in the same manner as the main main branch. You can use regex to match all the release branches and not worry about protecting the newly created ones. Note: Suppose you want to delete a protected branch on GitHub. In that case, you will need to remove the protection because we are disabling that option when protecting a branch to avoid accidental deletes, even for admins. You can find more info on protecting the branch on GitHub here.
When working with release branches, it needs to be clear which task should be included in which version. If you are not sure, ask the project manager before starting the task. In Productive, release versions can be defined with tags or boards. In Jira, you can track the status of each release and define a Fix version/s attribute on a task.
After releasing a new version from the release branch, make sure to create a new tag with that version from the last commit in that branch. Then you can merge the release branch into the main branch. Also, don't forget to update all other active release branches.
Protected branches
main and release branches must be marked as protected on GitHub in order to prevent direct push to those branches or accidental deletes. Next options should be checked on the branch protection rules page on Github:
Require pull request reviews before merging
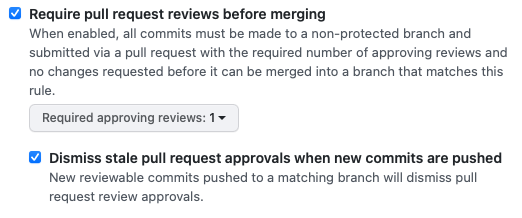
Require status check to pass before merging (this includes any CI and Sonarcloud if used)
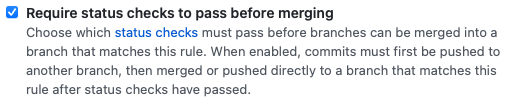
Require branches to be up to date before merging

Resolving merge conflicts
In the case of merge conflicts, Visual Studio Code has a great built-in tool for resolving merge conflicts. It's not mandatory to use VSC, so feel free to use the tool in which you are most proficient. But if you don't have any preference or don't know any tool, Visual Studio Code is a good start.
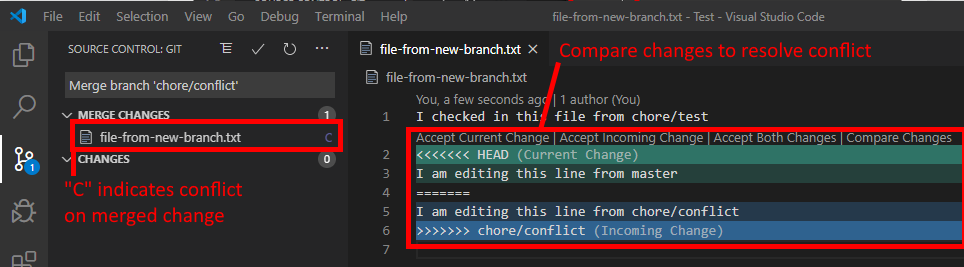
You can find more details about the tool here.
Quick tricks
For a quick overview of your commit messages for today and yesterday, you can use the following aliases:
alias today='git log --since=6am --format="* %s" --author="$(git config user.email)" --reverse -- | pbcopy'
alias yesterday='git log --since=yesterday.6am --until=6am --format="* %s" --author="$(git config user.email)" --reverse -- | pbcopy'