SwiftLint checks the source code for programmatic as well as stylistic errors. This is helpful in identifying some common and uncommon mistakes that are made during coding. SwiftLint is based on guidelines from the Swift style guide. To put it simply, it can help us with:
- maintaining a higher level of code discipline
- increasing the code's reliability
Installation
You can easily install SwiftLint using Homebrew: $ brew install swiftlint.
If you have already installed SwiftLint, you can update it to the latest version using the $ brew upgrade swiftlint command.
NOTE: Please update Homebrew to the latest version before installing and updating SwiftLint: $ brew update.
Running in Xcode
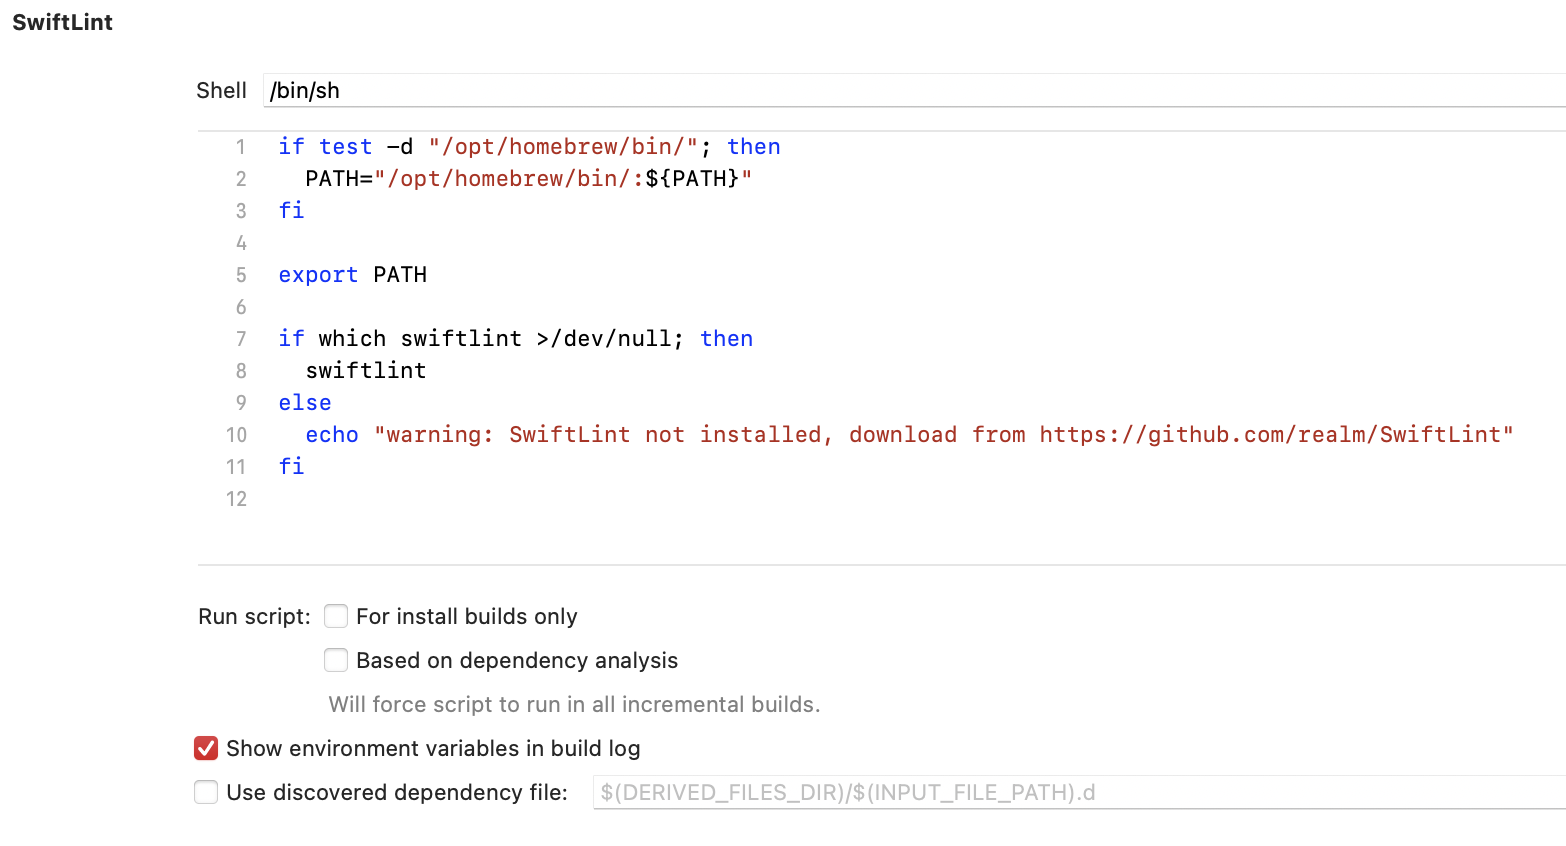
If you want to integrate SwiftLint to Xcode, add the following script to your target:
if test -d "/opt/homebrew/bin/"; then
  PATH="/opt/homebrew/bin/:${PATH}"
fi

export PATH

if which swiftlint >/dev/null; then
  swiftlint
else
  echo "warning: SwiftLint not installed, download from https://github.com/realm/SwiftLint"
fi
Example
And that's it. SwiftLint will now run with default settings.
Configuration file
You can find all rules by running $ swiftlint rules.
You have the possibility to control which rule is disabled/enabled and set thresholds for warnings and errors for a given rule. Just create a .swiflint.yml file and add it to your project root directory.
You need to change the ProjectNameTests to the name of your Tests folder in the Project.
To disable a rule, comment it out from the list of only_rules and it will not be included in the linting process. However, if you do so, leave a note detailing why the rule is disabled for future reference and as a reminder that in the end the project should be updated to accommodate the new rules.
To customize a rule threshold for warnings and errors, go to the end of the file and change warning and error properties of the rule. If the rule is not present at the file end, just add it with your customization. Similar to disabling a rule, leave a comment detailing why you are doing the rule customization.
You can also exclude some parts of your project, such as Pods, so SwiftLint won't check them:
excluded: # paths to ignore during linting. Takes precedence over `included`.
- Carthage
- Pods
- ProjectNameTests
Disable a rule in code
Rules can be disabled with a comment inside a source file with the following format:
// swiftlint:disable <rule>
The rule will be disabled until the end of the file or until the linter sees a matching enable comment:
// swiftlint:enable <rule>
For example:
// swiftlint:disable colon
let noWarning :String = "" // No warning about colons immediately after variable names!
// swiftlint:enable colon
let hasWarning :String = "" // Warning generated about colons immediately after variable names
It's also possible to modify a disable or enable command by appending :previous, :this, or :next to apply the command only to the previous, this (the current), or the next line.
For example:
// swiftlint:disable:next force_cast
let noWarning = NSNumber() as! Int
let hasWarning = NSNumber() as! Int
let noWarning2 = NSNumber() as! Int // swiftlint:disable:this force_cast
let noWarning3 = NSNumber() as! Int
// swiftlint:disable:previous force_cast
NOTE: Do not overuse this!
iOS SwiftLint rules
In accordance with our Swift Style Guide and rules discussion we had, we have created the SwiftLint configuration file which all projects should use. This file is located on our Swift Style Guide repo and shall be updated on regular basis. To use it on your project, put the parent_config specifier at the start of your .swiftlint.yml configuration file:
# Parent config - Infinum Style Guide
parent_config: https://raw.githubusercontent.com/infinum/swift-style-guide/master/.swiftlint.yml

# Specifics/custom rules for the project...
included: ...
excluded: ...
# ...
This will tell Swiftlint to pull the configuration file from the remote URL. This also allows us to sync the rules on every project more easily. We just change the rules on the repo and every project gets the change (no more copy-pasting). For more information on how SwiftLint works with remote URLs, see the SwiftLint Github Repo.
Xcode trailing whitespace
By default, Xcode won't remove trailing whitespace if the line is empty. SwiftLint does not like that, and you will probably receive some warnings for this. For future coding, you should change Xcode settings and set it to automatically remove all trailing whitespace even if the line is empty.
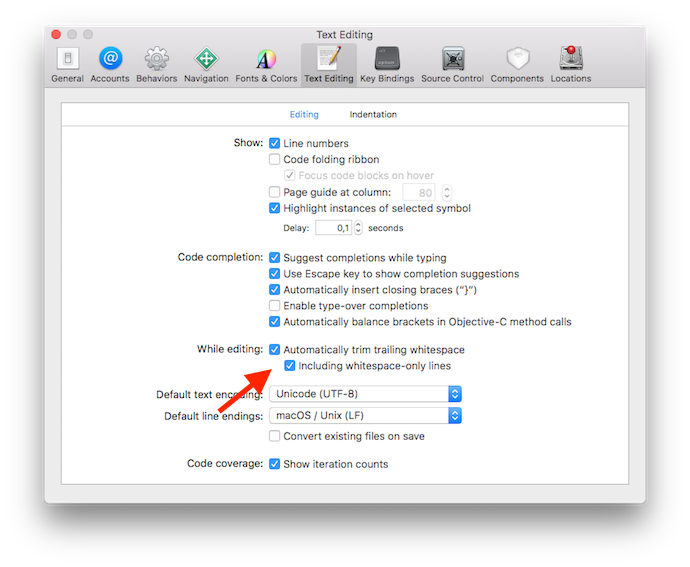
NOTE: This will not automatically fix the SwiftLint warnings you've already received, but it will prevent them from repeating.
That's it. Install SwiftLint, add the configuration file to your root directory, and lint up your project!